")
In this tutorial about using LionWeb to combine JetBrains MPS with Kotlin, we are going to see, in particular, how JetBrains MPS interoperate with code written in Kotlin. To do that, we are taking advantage of LionWeb.
In short, we will build a DSL using JetBrains MPS, and use it to define a few pricing strategies. We will then see how the data structures defining the language, and the actual pricing strategies defined using the language can be accessed from Kotlin. In Kotlin, we will build an interpreter that will run those pricing strategies.
You can find all the code for this tutorial at: https://github.com/LIonWeb-org/lionweb-pricing-demo
Wait a minute, what is LionWeb?
LionWeb is an initiative to make Language Engineering interoperable so that they can be easily combined to build awesome systems more quickly and more efficiently. If you want to learn more about the goals of LionWeb, you can read this article: LionWeb – Building great Language Engineering applications
What we are going to build
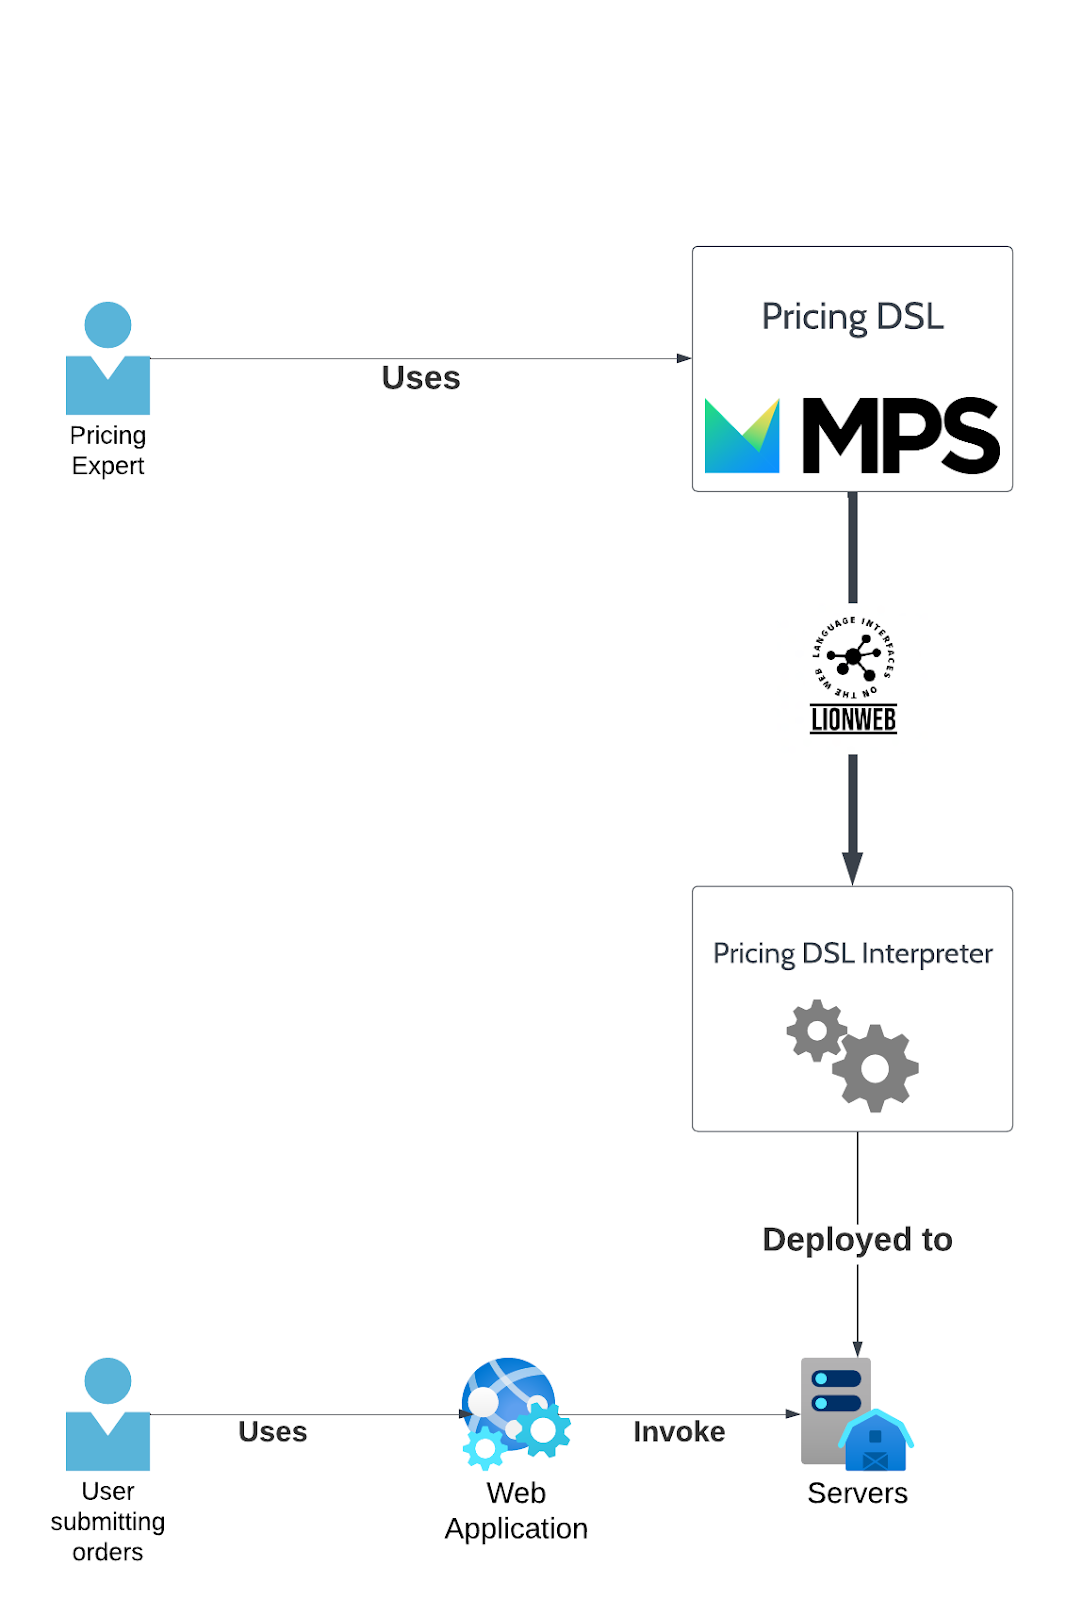
This is a description of the scenario we imagined and an explanation of why we are building the different pieces of the solution:
- In our scenario, we are working with a company selling office supplies. They are very creative with their prices, and they have a pricing expert who regularly comes up with new pricing policies. To give him the possibility of defining new policies on his own, we define a DSL for pricing. This DSL is implemented using JetBrains MPS
- All is well and good with defining a DSL and using it within MPS, but how can we consume that code outside of MPS? Once the pricing expert has defined a pricing strategy we want to use it to calculate the quotes to send to clients. We want that to happen within the backend of our web application, which we intend to write in Kotlin
- LionWeb helps achieve that because:
- It allows us to export the language itself from MPS to Kotlin so that we get a Kotlin class for each Concept in our language. By using those generated classes we can build an interpreter in Kotlin. The interpreter, given a pricing strategy, will use it to calculate the price for each order we get.
- It then allows us to export the actual pricing strategies written inside MPS using our DSL to the LionWeb format so that we can read them easily from Kotlin and feed them to our interpreter. And we are ready for business!
For a longer explanation, you can take a look at this video:
The DSL built in JetBrains MPS
Now, we are going to keep things very simple and define a tiny little DSL, as the goal of this tutorial is not to show you how to build great DSLs in MPS. If you are interested in that, I suggest you take a look at the book DSL Engineering and the posts on Specific Languages.
In our little language, we can define a Pricing Strategy. Let’s look at what a Pricing Strategy is:
- A Pricing Strategy tells us everything we need to know to produce a quote for an order
- A Pricing Strategy is composed by base prices (e.g., a stapler normally costs 7 USD) and discount policies (e.g., when the user spends at least 200 USD, we give them the “big order discount” of 10%)
- A Pricing Strategy can inherit base prices from another pricing strategy so that we do not need to rewrite them all the time. This is useful as we may set base prices once per year and have seasonal discounts.
- Prices in our DSL are defined by an amount and a currency. We support Euros, USDs and Yens. But feel free to extend the language with your currency
- There are a few simple expressions we support, just to be able to put together a minimal example. But we should add way more to make this DSL actually useful
If you want to have a quick tour of the DSL and take a look at a couple of simple pricing strategies, here we have a video:
Setting up the overall project
We will define a gradle-based project with two modules: one for the JetBrains MPS DSL and one for the interpreter that we are going to write in Kotlin.
Under the root of the project, we will create these files:
- build.gradle.kts: here we just specify the gradle wrapper task
- settings.gradle.kts: we list our modules and specify the versions for some gradle plugin
- gradle.properties: here we store the version numbers of our dependencies
Build.gradle.kts:
tasks.wrapper {
   gradleVersion = "8.2.1"
   distributionType = Wrapper.DistributionType.ALL
}
Settings.gradle.kts:
rootProject.name = "lionweb-pricing-demo"
include("mps-pricing-dsl")
include("pricing-engine")
pluginManagement {
   val kolasuVersion: String by settings
   repositories {
       gradlePluginPortal()
   }
   plugins {
       id("com.strumenta.kolasu.lionwebgen") version kolasuVersion
   }
}
gradle.properties:
kolasuVersion=1.5.30
lionwebJavaVersion=0.0.28
lionwebMPSVersion=0.0.9-SNAPSHOT
We can now create the two directories for the two modules and an empty build.gradle.kts in each of them and run:
gradle wrapper
To get the gradle wrapper installed.
Setting up the MPS project
We can now create an MPS project in a subdirectory of our root project. We are going to call it mps-pricing-dsl.
We can then fill mps-pricing-dsl/build.gradle.kts, where we mainly list our dependencies. We use the MPS Extensions (because which MPS project does not use them?) and then we use the MPS bindings for LionWeb: lionweb-mps.
mps-pricing-dsl/build.gradle.kts:
plugins {

   id("com.specificlanguages.mps") version "1.6.0"

}

repositories {

   mavenLocal()

   mavenCentral()

   maven(url="https://s01.oss.sonatype.org/content/repositories/snapshots/")

   maven(url="https://artifacts.itemis.cloud/repository/maven-mps")

}

val lionwebMPSVersion = extra["lionwebMPSVersion"]

dependencies {

   mps("com.jetbrains:mps:2021.1.4")

   generation("de.itemis.mps:extensions:2021.1.+")

   generation("io.lionweb.lionweb-mps:lionweb-mps:$lionwebMPSVersion")

}
At this point, we can run from this directory ../gradlew setup. This will download our dependencies under build/dependencies.
From within MPS, we can now add the dependencies to the project. We open the Preferences/Settings, and under Project Libraries we add this new directory with any name we want. Note that you can just add the “dependencies” directory itself, and all plugins in all of its subdirectories will be found. You can call this library whatever you want; I called it Deps.

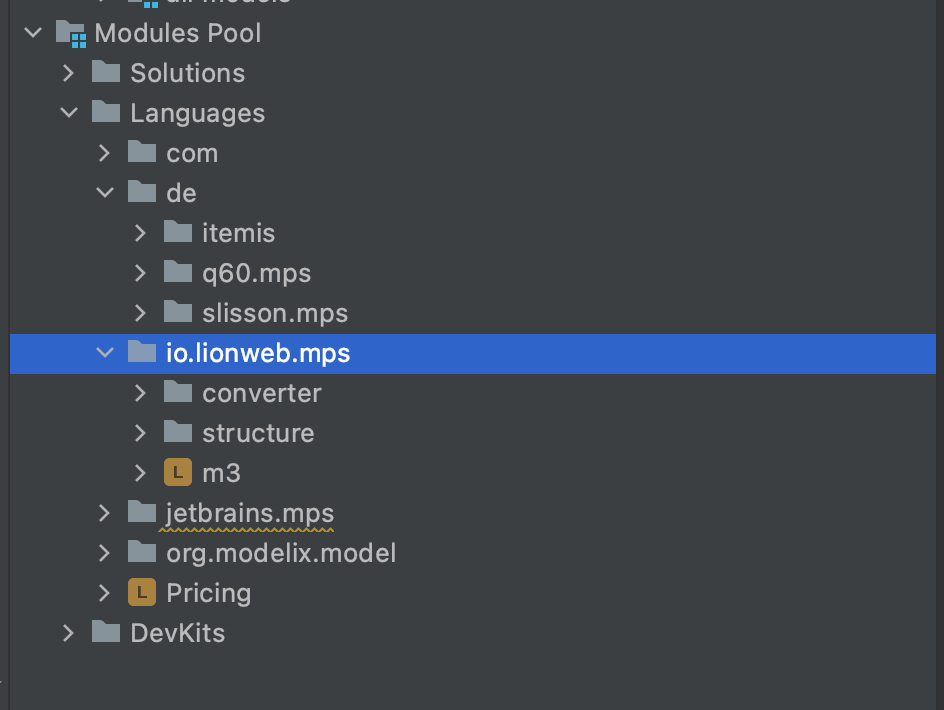
Under the Modules Pool, inside the Logical View, you should now see our dependencies:
If you look at mps-pricing-dsl/.mps/libraries.xml this is how it should look like:
<?xml version="1.0" encoding="UTF-8"?>

<project version="4">

 <component name="ProjectLibraryManager">

   <option name="libraries">

     <map>

       <entry key="Deps">

         <value>

           <Library>

             <option name="name" value="Deps" />

             <option name="path" value="$PROJECT_DIR$/build/dependencies" />

           </Library>

         </value>

       </entry>

     </map>

   </option>

 </component>

</project>
Defining the DSL
I will not bother you with describing how I built this DSL; I just put together the bare minimum number of concepts I needed to, in order to have a running example.
For the sake of playing with LionWeb and MPS you can really build whatever DSL you like, but if you are interested in seeing the details of the Pricing DSL I put together, well, the code is available on GitHub, so feel free to take a peek.
Exporting from JetBrains MPS to LionWeb
We have now created a language within MPS. Here we have a great environment to define the language, evolve it, and use it. Our language engineers are happy to take advantage of this great environment and our language users feel at ease using the editors we created for them.
All is well and good, if it was not for the fact that this work is confined within MPS and we would really want to have the logic defined within MPS to run somewhere else.
You may ask: aren’t the MPS generators the answer to that?
I would say that they are not always the best possible answer, and there are a couple of reasons for that:
- While I can generate code that I run outside MPS, and I can define an interpreter that runs inside MPS, I cannot easily define an interpreter that runs outside of MPS. Why is that the case? Because I can export models to JSON or XML, for example. But I would then need to recreate the language concepts outside MPS, as part of my interpreter.
That is quite some work, and it would require maintaining that code aligned with the language definition we have in MPS, as it evolves over time. With LionWeb, we export not only the code written in the DSL but also the language definition, and we can use that to generate classes that we use while writing interpreters. In this way, we can maintain the language in MPS and the outside code depending on the language aligned, as the language evolves over time
- Also, when my goal is to generate code and not interpret it, doing that within MPS may not always be the best choice. One reason is this: to write a code generator in MPS one needs to know both MPS and the target environment. For example, if I want to generate an Angular application using an MPS generator, I would need to know about MPS and Angular. I think it is fair to say that most Angular developers do not know MPS. By exporting the models from MPS I can then have someone who knows (just) Angular, to write the generators
With this approach, within MPS we define languages and models using those languages. We then stop and we pass the ball to the external world, which is free to define how to consume the models. The fact of having access to the language’s definition will help them in building the mechanisms to consume the models (for example, providing the core classes needed to write an interpreter).
Exporting the language
First of all we need to export the language definition themselves.
This is a video showing the process:
The process consists of two steps:
- Exporting from the MPS languages to an intermediate format
- Exporting from the intermediate format to the LionWeb format (JSON based)
To do that requires defining two nodes:
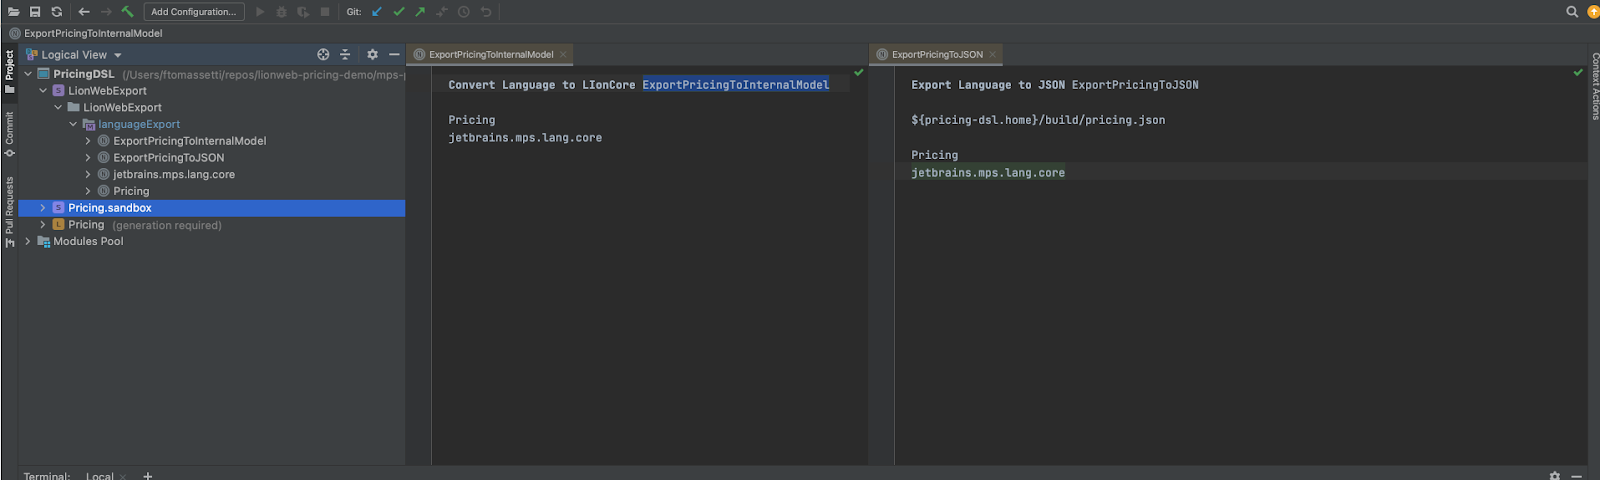
On each of these two nodes we trigger an intention and we are done.
That was easy, right?
Exporting the models
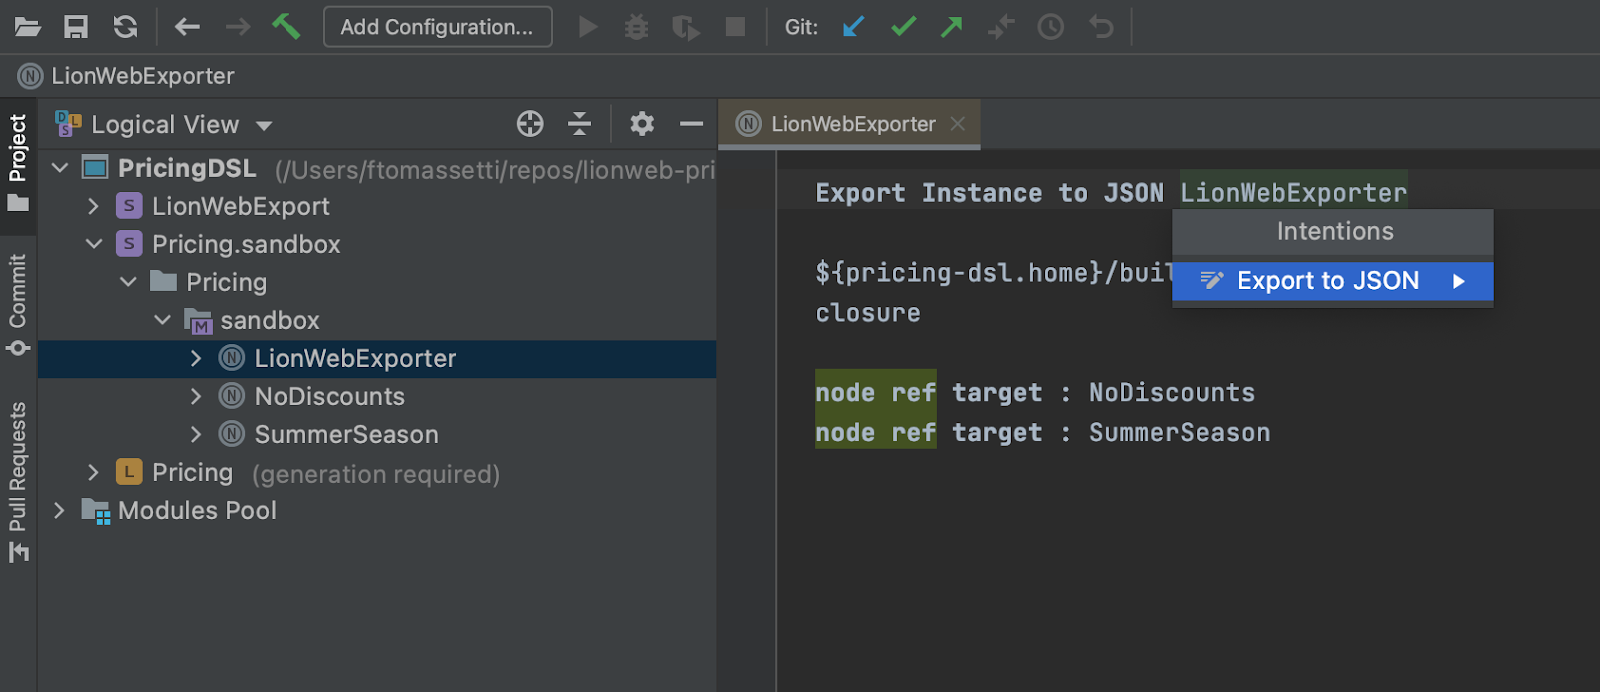
When it comes to exporting models, things get even easier: we just define a node where to indicate what we want to export and where we want to save the exported file. We then trigger the intention and we are done:
If you want to see me executing these steps you can watch this video:
Importing the language from LionWeb to Kotlin
Here there is nothing much to say about importing a language from LionWeb into Kotlin, as the process is just a matter of configuring a gradle plugin and putting the language in the src/main/lionweb directory.
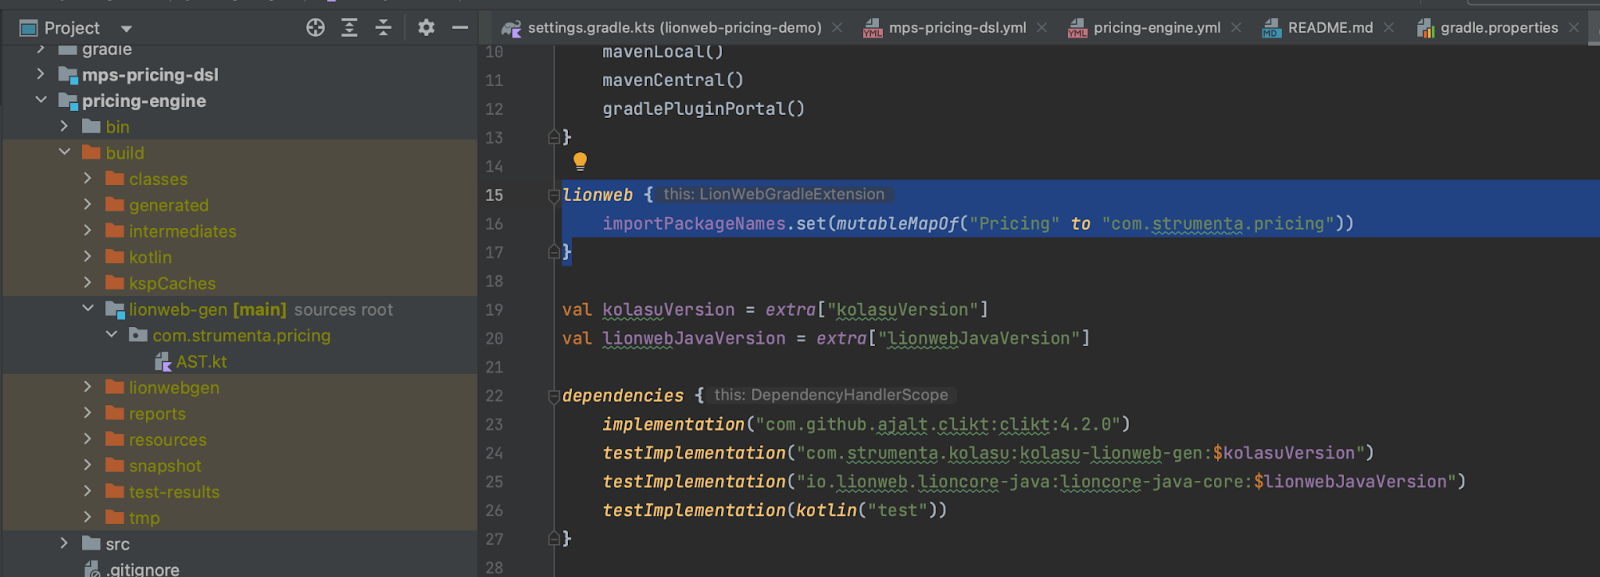
The only configuration we need is to indicate the kotlin package where to store the generated code. We do that in pricing-engine/build.gradle.kts:
lionweb {

   importPackageNames.set(mutableMapOf("Pricing" to "com.strumenta.pricing"))

}
Now, when building the project, the gradle plugin will generate an AST.kt file in the package com.strumenta.pricing under pricing-engine/build/lionweb-gen:
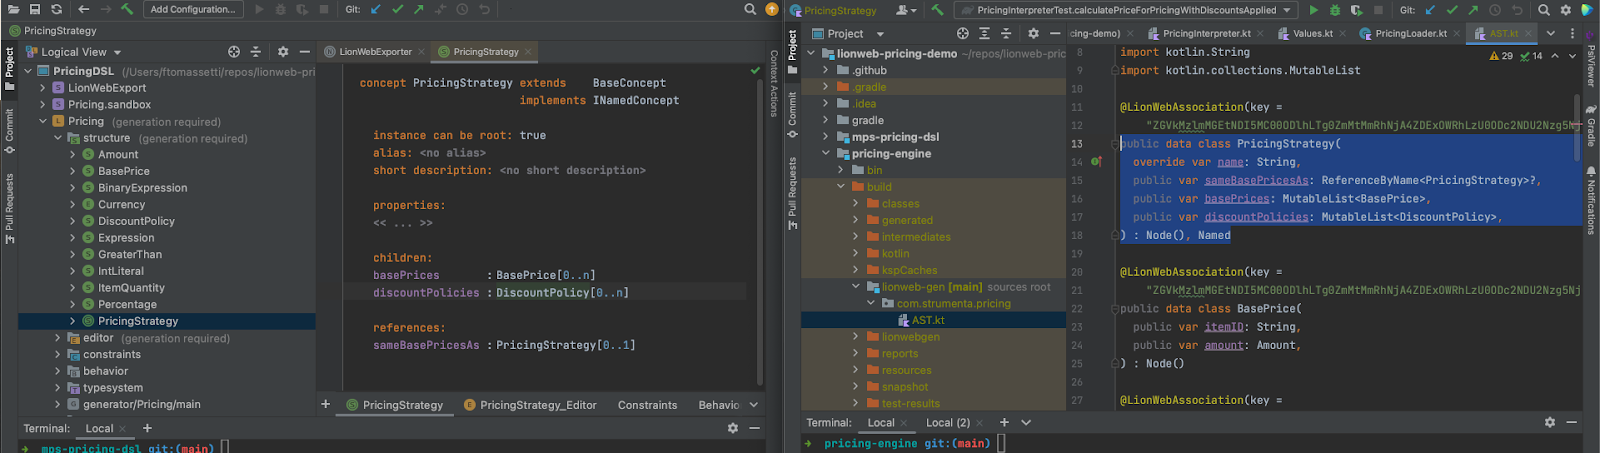
Now that we have Kotlin classes, we can use them to write our interpreter.
For example, here there are a couple of MPS Concepts side-by-side with the corresponding Kotlin classes generated for them:

If you want to see the process live and hear a slightly longer explanation, you can watch this video:
Writing an interpreter in Kotlin
Let’s see how we can write our interpreter.
At a glance, this is how our interpreter looks like:

- It is built to receive a PricingStrategy (this is one of the classes we generate from the LionWeb language)
- It exposes one method that, given an Order, returns a Pricing. A pricing contains the original price, the description of the discounts applied, and the final price
- Internally a key method is “Expression.evaluate”. Here, we create an additional method called evaluate for the class Expression. This extension method is private, which means it is only visible within our interpreter. This is the core of our interpreter because an interpreter is mostly about evaluating single expressions and combining the results
So, how do we calculate the price?
fun calculatePrice(order: Order): Pricing {

   val pricing = Pricing()

   order.lines.forEach { orderLine ->

       pricing.addComponent(basePriceFor(orderLine.productID).multipliedBy(orderLine.quantity))

   }

   val pricingContext = PricingContext(order, pricing.startingPrice)

   pricingStrategy.discountPolicies.forEach { discountPolicy ->

       if (discountPolicy.condition.evaluate(pricingContext).asBoolean()) {

           val discountAmount = discountPolicy.discount.evaluate(pricingContext).asPrice()

           pricing.discounts.add(Discount(discountPolicy.description, discountAmount))

       }

   }

   return pricing

}
- We start by going through the lines of the order and defining the initial price (the one before any discount is applied).
- We then traverse the different discount policies and verify if the condition for the discount is verified. If that is the case, we calculate the amount of the discount and then add it to our pricing. We add the amount together with a description of the discount policy, which we will show to the user
Expression.evaluate contains the logic for the different expressions supported:
private fun Expression.evaluate(pricingContext: PricingContext): Value {

   return when (this) {

       is GreaterThan -> BooleanValue(

           this.left.evaluate(pricingContext).asBigDecimal() > this.right.evaluate(pricingContext).asBigDecimal()

       )

       is LessThan -> BooleanValue(

           this.left.evaluate(pricingContext).asBigDecimal() < this.right.evaluate(pricingContext).asBigDecimal()

       )

       is ItemQuantity -> IntegerValue(pricingContext.itemQuantity)

       is IntLiteral -> IntegerValue(this.value.toInt())

       is Percentage -> pricingContext.basePrice.multipliedBy(

           this.base.evaluate(pricingContext).asBigDecimal().divide(

               BigDecimal(100)

           )

       )

       else -> TODO("Evaluate $this (${this.javaClass.canonicalName})")

   }

}
Nothing too surprising here.
As part of the interpreter relies on a few supporting classes, stored in Values.kt:
And if you want a tour of the code you can look at:
Importing the models from LionWeb to Kotlin
We now have an interpreter in Kotlin that, given a Pricing Strategy, can use it to calculate prices.
But how do we load in Kotlin Pricing Strategies exported from MPS?
We do that in the Pricing Loader:
package com.strumenta.pricing

import com.strumenta.kolasu.language.KolasuLanguage

import com.strumenta.kolasu.lionweb.LionWebModelConverter

import com.strumenta.kolasu.lionweb.StarLasuLWLanguage

import io.lionweb.lioncore.java.language.Language

import io.lionweb.lioncore.java.serialization.JsonSerialization

import java.io.File

import java.io.FileInputStream

class PricingLoader {

   private var language: Language

   private var jsonser: JsonSerialization

   init {

       var languageFile = File("src/main/lionweb/pricing.json")

       if (!languageFile.exists()) {

           languageFile = File("pricing-engine/src/main/lionweb/pricing.json")

       }

       require(languageFile.exists())

       jsonser = JsonSerialization.getStandardSerialization()

       jsonser.nodeResolver.addTree(StarLasuLWLanguage)

       language = jsonser.unserializeToNodes(FileInputStream(languageFile)).first() as Language

       jsonser.conceptResolver.registerLanguage(language)

   }

   fun loadPricingStrategyFromLionWebFile(lionwebFile: File): PricingStrategy {

       require(lionwebFile.exists())

       jsonser.enableDynamicNodes()

       val model = jsonser.unserializeToNodes(FileInputStream(lionwebFile))

       val lwImpExp = LionWebModelConverter()

       val kolasuLanguage = KolasuLanguage("pricing").apply {

           addClass(Amount::class)

           addEnumClass(Currency::class)

           addClass(PricingStrategy::class)

           addClass(IntLiteral::class)

       }

       lwImpExp.associateLanguages(language, kolasuLanguage)

       return lwImpExp.importModelFromLionWeb(model.first()) as PricingStrategy

   }

}
Now, this part is a lot of boilerplate code, and in the future, we may work on making it more concise by improving our frameworks. For the time being, you can copy this into a file and forget about it.
What happens when I want to evolve the language?
That is a very good question.
I would say that a core advantage of projectional editing and MPS is the ability to iteratively evolve the language. In projectional editing, this is much more convenient than with textual languages, as when we evolve the language we do not automatically break all the code written to that point. For this reason, we need to keep this need in mind, and with LionWeb, we can do that reasonably easy, as we get our core Kotlin classes automatically re-generated as the MPS language evolves.
Let’s see the process in action:
What next?
We could work to make this integration a bit smoother. One thing that comes to mind is to add the possibility of running the export of languages and models from the command line.
We could then look into other integrations, for example with Freon, a platform for creating web-based projectional editors. Or with a model repository.
What about you? What would you like to use LionWeb for?
Acknowledgements
Thanks to Niko Stotz for creating LionCore-MPS and for helping me in getting the code of the tutorial running.

")