
Introduction
Automatic code completion, also known as IntelliSense, is an important part of the modern software development experience. No matter if you’re a programmer writing code in a general-purpose programming language, or a business expert writing rules in some domain-specific language; your editor is incomplete without such a feature. Integrating Code Completion in Visual Studio Code – With the Language Server Protocol is the goal of this tutorial.
In one of our last articles, we’ve introduced antlr4-c3, the code completion core for ANTLR4.
Our objective is to build a working VSCode extension that will showcase a limited form of code completion for the Kotlin language. Our editor will be able to suggest variable names and keywords of the language. You may use it as a learning tool or as the basis for your own extension. We’ve made the code for this tutorial available on GitHub.
The Language Server Protocol
As we’ve suggested in the introduction, we’ll use the Language Server Protocol (LSP) to talk with Visual Studio Code.
LSP is a standardized protocol, first developed by Microsoft for Visual Studio Code, to expose language-specific information and operations to a tool that can consume them, typically an editor or IDE.
Implementors of a language or third parties can build a language server to support the language across several tools, with features such as code completion, error detection, navigation, and others. Previously, without the LSP, they would have had to build a different extension or plugin for each tool: Eclipse, IntelliJ IDEA, VSCode, Sublime Text, and so on.
Although these days, when hearing the word ‘server’, we immediately think of HTTP and sockets, LSP is a textual protocol based on JSON-RPC, with little resemblance to HTTP. Indeed, often a client will launch a ‘language server’ as a separate process (say, with node.js) and communicate with it over standard input/output, with no networking code involved. This will be the solution that we’ll adopt in this tutorial, too.
Setup
Our solution will be an extension for Visual Studio Code, based on the LSP. In fact, VSCode supports the LSP natively, but it still needs some metadata and code to consume the services of a Language Server. That’s why we’ll build an extension; that, and the possibility of publishing it on the VSCode marketplace for others to use.
Visual Studio Code extensions are TypeScript (or JavaScript) packages, so to start we’ll need to install Node.js and the npm package manager that comes with it. Please refer to the Node.js website, but it should just be a matter of downloading and running an installation wizard.
Once we’re set up with Node.js, we’ll clone a Git repository containing a number of Visual Studio Code extension samples:
git clone https://github.com/microsoft/vscode-extension-samples.git
In particular, we’re interested in the lsp-sample directory, which contains the source code accompanying an introduction to the LSP on VSCode by Microsoft. Among other things, this small language server example highlights all-uppercase words with a warning and suggests to complete “ja…” with “JavaScript”, demonstrating a few of the capabilities that the Language Server Protocol offers.
Let’s copy the directory somewhere else, and let’s give it a better name, for example:
cp -r vscode-extension-samples/lsp-sample ~/projects/kotlin-code-completion
Later, we’ll modify this template to integrate the code completion engine. However, as a first step, to download the required dependencies, let’s run the following command from the project’s root directory:
npm install
To check that we’ve installed everything properly, we can compile the extension with:
npm run-script compile
We should receive no errors.
The Layout of the Solution
The README.md file that we can find under the project’s root directory describes the following layout:
.
├── client // Language Client
│   ├── src
│   │   ├── test // End to End tests for Language Client / Server
│   │   └── extension.ts // Language Client entry point
├── package.json // The extension manifest.
└── server // Language Server
    └── src
           └── server.ts // Language Server entry point
We can see that the extension contains a manifest, a client component and a server component.
Metadata
The extension manifest – i.e., the top-level ‘package.json’ file – contains the metadata that VSCode consumes when installing the extension. This particular sample is attached to the ‘plain text’ language that comes with VSCode, as evidenced by the following fragment:
"activationEvents": [
  "onLanguage:plaintext"
]
However, we want to activate our extension for the Kotlin language – or rather, our version of the Kotlin language, as we don’t want to interfere with the default Kotlin extension.
So, we’ll invent a new language called “my-kotlin” and associate the extension with it, modifying package.json like so:
"activationEvents": [
  "onLanguage:my-kotlin"
],
"contributes": {
  "languages": [
     {
        "id": "my-kotlin",
        "extensions": [ ".mykt" ]
     }
  ]
},
We can see that my-kotlin files have extension “.mykt”. This is how VSCode will know about our language. We don’t want to clash with Kotlin files supported by the Kotlin plugin, which have the extension “.kt”.
The metadata in package.json also includes information regarding publishing, such as name, description, author, license, and so on. You may want to edit it to your liking.
Dependencies
Of course, we’ll have to include the Kotlin code completion engine we’ve developed in the previous article. For convenience, we’ve published it on GitHub so we can simply add:
"toy-kotlin-language-server": "https://github.com/Strumenta/article-antlr4-c3/releases/download/1.0.0/toy-kotlin-language-server-1.0.0.tgz",
in the “dependencies” section of server/package.json. This will pull in all of toy-kotlin-language-server’s own dependencies as well.
Also, in the top-level package.json file, we need to downgrade TypeScript to the latest 3.x version (3.9.7 at the time of writing) because of an incompatibility between antlr4ts 0.5.0-alpha.3 and TypeScript 4.
Running the Extension
The extension we’ve cloned already includes the configuration that VSCode needs in order to run it. Of course, it cannot run by itself, as it’s not a standalone program; instead, it needs a host, that is, an instance of VSCode that will provide the right environment to consume the extension’s services. So, when we’ll launch our extension, VSCode will make sure to run it in a fresh instance of VSCode itself.
To run the extension we first need to build it (Ctrl/Cmd + Shift + B). Then, if everything goes fine, we can switch to the Run panel (Ctrl/Cmd + Shift + D), choose Client from the dropdown at the top of the window, and press the green arrow button.
We may also choose Client + Server if we want to debug the server with VSCode’s integrated debugger.
Let’s now look at the solution in detail.
The Client
The client part of the solution is the portion of the extension that runs in the VSCode process. It lies in the “client” directory, it’s pretty simple and requires minimal intervention from us. The main task of the client is to launch the server and to interact with it. The server, instead, is where most of the work happens.
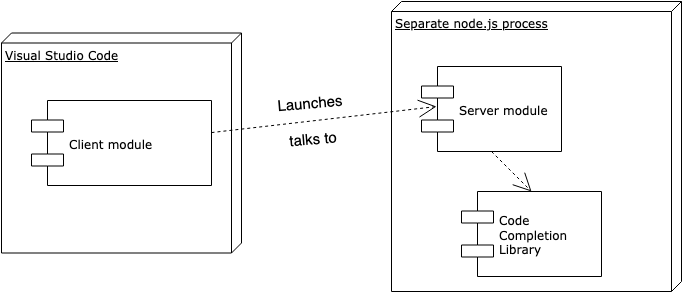
Thus, our client will launch the server as a Node module and it will talk to it with inter-process communication or IPC:
let serverModule = context.asAbsolutePath(path.join('server', 'out', 'server.js'));
//...
let serverOptions: ServerOptions = {
  run: { module: serverModule, transport: TransportKind.ipc },
  //...
};
VSCode supports other kinds of setups, but we don’t have any reason to switch.
There’s only one part that we have to change. For some reason, the client repeats the association to the “plaintext” language that we’ve already replaced in package.json earlier; therefore, VSCode will only activate it for plain text files, and not for Kotlin. So, to associate the client with “.mykt” files, we’ll have to replace the following lines:
// Register the server for plain text documents
documentSelector: [{ scheme: 'file', language: 'plaintext' }],
with:
// Register the server for .mykt files
documentSelector: [{ scheme: 'file', language: 'my-kotlin' }],
Remember that “my-kotlin” is the name that we’ve introduced in package.json.
We may also want to change the “id” and “name” of our language server, a few lines below. With that, we’re done with the client.
The Server
The server component implements the actual logic that we want to expose to the editor. Adding capabilities to the language server involves registering event handlers for the various requests that can come from the client.
In particular, the example we’ve cloned showcases mainly two features:
- Error reporting
- Code completion.
As we’re only interested in code completion, we can safely remove everything related to diagnostics, and the handling of settings (that we won’t be using).
So, we’ll be left with just some initialization code and four event handlers:
- connection.onInitialize
- connection.onInitialized
- connection.onCompletion
- connection.onCompletionResolve
The Basics
We can leave initialization as it comes out of the box. There’s some code related to settings, that we won’t be using and we may safely remove; or, we may leave it there without consequences. In the sample we’ve cloned, settings were used to give the user some control over error reporting. Here, we don’t report errors and warnings, and we’ll not introduce other configurable parameters.
Let’s concentrate on completions. We can see that the sample onCompletion method returns “JavaScript” and “TypeScript” as completion candidates, regardless of the contents of the document. Then, VSCode filters the results that don’t match with the text under the caret. That’s why we only see “JavaScript” when we hit Ctrl+Space after having typed, e.g., “ja”.
We can also see that each completion item is associated with some “data” (in this case, a number):
{
    label: 'TypeScript',
    kind: CompletionItemKind.Text,
    data: 1
},
We can use this data later to provide additional information for the item. In general, this could include documentation about the suggested symbol, type information, function/method signature, and so on. In the example that we’ve cloned, it’s just some fixed text:
if (item.data === 1) {
    item.detail = 'TypeScript details';
    item.documentation = 'TypeScript documentation';
}
These two pieces of information – which completions are available, and what extra details are associated with a certain symbol suggested for completion – result from the handler methods that we associate respectively to onCompletion and onCompletionResolve. These go hand in hand: if we implement the first one, we also have to provide the other one.
In our simple case, we don’t want to return any extra information for the symbols that we suggest; our onCompletionResolve will just return its input:
connection.onCompletionResolve((item: CompletionItem): CompletionItem => {
        return item;
    }
);
Instead, the bulk of the action happens in onCompletion:
connection.onCompletion(
  (_textDocumentPosition: TextDocumentPositionParams): CompletionItem[] => {
     let document = documents.get(_textDocumentPosition.textDocument.uri);
     let pos = _textDocumentPosition.position;
     let suggestions = getSuggestions(document.getText(),
         { line: pos.line + 1, column: pos.character - 1 },
         computeTokenPosition);
     return suggestions.map(s => {
        return {
           label: s,
           kind: CompletionItemKind.Keyword
        }
     });
  }
);
Let’s break it down piece by piece.
Providing Completion Candidates
First, we grab hold of the document that we’re opening:
let document = documents.get(_textDocumentPosition.textDocument.uri);
Here, documents is an object that automatically keeps track of documents as they’re opened and closed in the editor. We initialize it near the top of the file:
// Create a simple text document manager.
let documents: TextDocuments<TextDocument> = new TextDocuments(TextDocument);
Afterward, near the bottom of server.ts, we attach it to the connection. That way, it will listen to the appropriate events:
// Make the text document manager listen on the connection
// for open, change and close text document events
documents.listen(connection);
Back to code completion. Once we’ve got a reference to the open document, we can compute the suggestions using the library from our previous article:
let suggestions = getSuggestions(document.getText(),
    { line: pos.line + 1, column: pos.character - 1 },
    computeTokenPosition);
We can notice a few things here. First, we obtain the textual contents of the document with document.getText(). Then, we have to add 1 to the line, because VSCode is zero-based while our library is 1-based when it comes to lines of code. Conversely, we subtract 1 from the column because VSCode counts columns from 1 while our library counts from 0.
Finally, we’re ready to return our suggestions:
return suggestions.map(s => {
  return {
     label: s,
     kind: CompletionItemKind.Keyword
  }
});
Now, we’re mapping everything as a keyword, because our engine only returns plain strings; it doesn’t differentiate between keywords, variable names, type names, and so on. Extending it to provide this information, and integrating it into VSCode, is a good exercise that we leave to the reader.
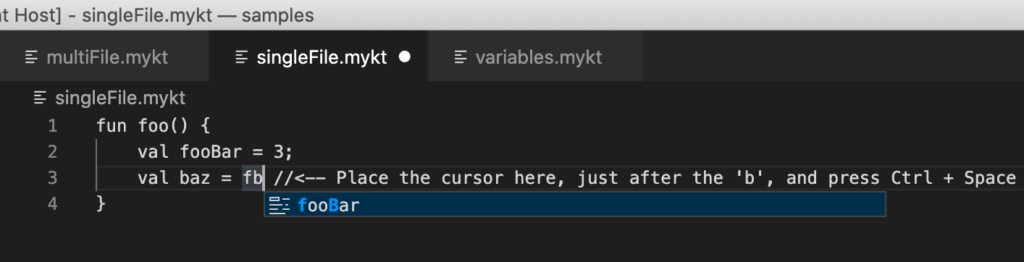
With the code above in place, we can now see meaningful code suggestions in the editor:
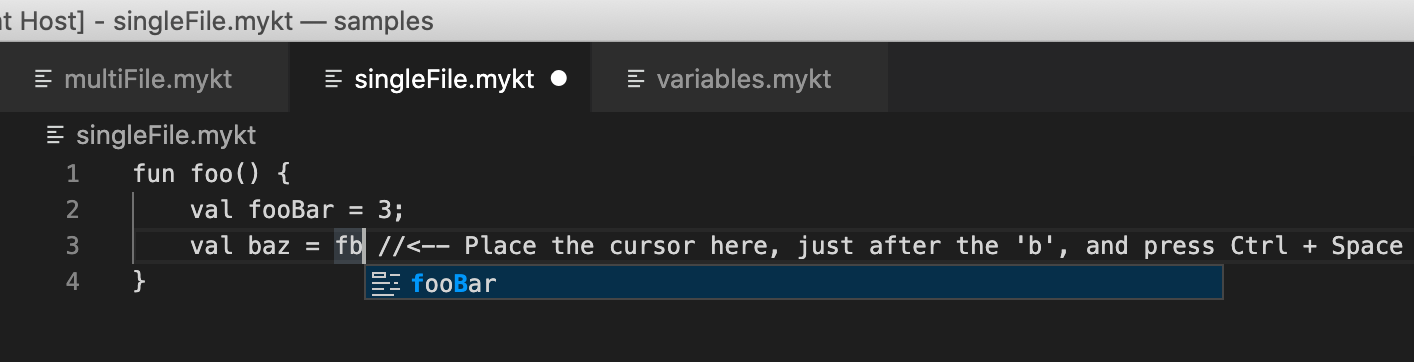
Note: when no suggestions are available, Visual Studio Code resorts to scanning the text in the file for words and suggests those. So, in this case, it would have probably suggested “fooBar” even if our extension hadn’t been there or if it hadn’t been working. The difference? Here, “fooBar” is marked with a little symbol that tells us that it’s a keyword. VSCode’s native suggestion engine would report it with an “ABC” symbol to indicate that the word comes from the text. More importantly, our extension only suggests appropriate keywords and variable names, not just any random word in the file that happens to match with what we’ve written.
Completing Identifiers From Other Files
So far, so good. However, our editor is pretty limited: it only knows about the open document. Usually, code is organized across many different files, and languages provide means to reference code from other files, modules, libraries, etc.
For example, Kotlin has the import statement:
import foo.bar.baz
It’s not important to go into detail about the resolution strategy that Kotlin uses to find imported symbols; we’ll interpret import statements in a simplistic manner, just to show how we may complete identifiers from other files.
That is, we’ll assume that import x means to load the file x.mykt from the same directory. Simple as that!
Of course, the first thing we want to do is to retrieve the list of imports. For that, we need a parse tree:
let input = CharStreams.fromString(document.getText());
let lexer = new KotlinLexer(input);
let parser = new KotlinParser(new CommonTokenStream(lexer));
let parseTree = parser.kotlinFile();
let imports = parseTree?.preamble()?.importList()?.importHeader();
Now that we have the imports, what can we do with them? In the previous article, we filled a symbol table with the identifiers that we could find in the open file. The idea is to pre-fill the same symbol table with identifiers from the imported files:
let symbolTableVisitor = new SymbolTableVisitor();
if(imports) {
    processImports(imports, uri, symbolTableVisitor);
}
Here, the symbol table visitor holds a reference to the symbol table and to the top-level scope. The top-level scope will be the scope of all the identifiers defined at the top level in all the files (the main one and the imported ones). Basically, it’s as if all the code was written sequentially in a single file.
We’ll look at how the processImports method is implemented in the next section. For now, let’s just suppose that it does the right thing, and let’s move on to the next lines of code, where we compute the actual suggestions.
We’ve previously invoked the getSuggestions method of our library to do so. However, to reuse the symbol table (and the parse tree as well, for better performance), we’ll now invoke a lower-level entry point, getSuggestionsForParseTree:
let suggestions = getSuggestionsForParseTree(parser, parseTree, symbolTableVisitor,
    { line: pos.line + 1, column: pos.character - 1 },
    computeTokenPosition);
return suggestions.map(s => {
    return {
        label: s,
        kind: CompletionItemKind.Keyword
    }
});
And that’s it. If a file has no imports, the results are the same as before.
Processing Imports
If a file starts with some import statements, however, we’ll include the symbols from the imported files, if available. We load the symbols in the processImports method that we’ve invoked, but not yet defined:
function processImports(imports: ImportHeaderContext[], uri: string, symbolTableVisitor: SymbolTableVisitor) {
    let basePath = computeBasePath(uri);
    for(let i in imports) {
        const filename = imports[i].identifier().text + ".mykt";
        const filepath = basePath + filename;
        if (fs.existsSync(filepath)) {
            processImport(filepath, symbolTableVisitor);
        } else {
            connection.window.showErrorMessage("Imported file not found: " + filepath);
        }
    }
}
On line 4 in the above code snippet, we see that we look for imported files only in the same directory as the importing document. Of course, this is just an example, while a real-world editor would traverse the workspace to look for source files and libraries.
If all is well, we load each imported file with the processImport method, which is not so different from the code we’ve already written for the main document:
function processImport(path: string, symbolTableVisitor: SymbolTableVisitor) {
    try {
        let data = fs.readFileSync(path);
        let input = CharStreams.fromString(data.toString());
        let lexer = new KotlinLexer(input);
        let parser = new KotlinParser(new CommonTokenStream(lexer));

        let parseTree = parser.kotlinFile();
        symbolTableVisitor.visit(parseTree);
    } catch (e) {
        connection.window.showErrorMessage("Cannot read from imported file " + path + ": " + e);
        console.error(e);
    }
}
Note that we leverage the fact that our parser, which we generated using ANTLR4 in the previous article, always returns a parse tree even if it contains errors. This way, we have a chance to suggest identifiers even if a file is malformed.
It’s also interesting to note how we’ve used the LSP connection to send back an error message:
connection.window.showErrorMessage("...");
This will show a non-intrusive pop-up error message on the client.
We’ll leave the computeBasePath method for the reader to define – or to copy from GitHub.
With the above code, we get suggestions for identifiers defined in other files:

Further Improvements
The solution we’ve presented in this tutorial just scratches the surface of what is possible. We don’t want to complicate it too much; we’ll just give a few ideas for improvement.
Tracking the type of every suggested token. For example, keyword, variable, method, class, … the LSP has a rich taxonomy of types. This requires modifying our code completion library to compute and return this extra information, as it now only suggests variables and keywords and does not differentiate between the two.
Tracking where each symbol is defined and reporting such information to the user when suggesting the symbol. Again, this requires modifying our code completion library, as well as passing the path or URI of each loaded file to the same library.
Handling multiple definitions/redefinitions of the same symbol. E.g., we could define a variable foo in a file that we import, and then redefine it in the current file. The semantics of redefinition are language-dependent, but as a bare minimum we should avoid suggesting the same identifier twice.
Improving performance by caching. In the code we’ve written in this tutorial, we parse and analyze each file every time the user asks for code completion. While this works for our small examples, it quickly becomes impractical. In a real-world scenario, we’ll cache the parse trees and the symbol tables.
Packaging the Extension
To package the extension for distribution, we use the command: vsce package. vsce is VSCode’s extension tool that you can install using npm. This creates a .vsix file in the current directory, that we can install on any VSCode instance.
We’ll probably want to bundle the extension, that is, to minify and concatenate all the JavaScript sources to avoid loading many small files. Microsoft publishes an excellent guide about bundling using Webpack, so we won’t repeat what you can find there. Just keep in mind that in our project the extension’s entry point is not in src/ but in client/src/.
Conclusions
In this tutorial, we’ve touched on adding code completion to the Visual Studio Code editor for a language with an ANTLR4 grammar. All the code is available on GitHub.
This article follows our previous tutorial on antlr4-c3, where we’ve shown how to build a code-completion engine in TypeScript which is independent of any editor technology. An editor is where a software developer, or a business expert using a domain-specific language, spend most of their time, and code completion is now considered to be a fundamental part of the tool support for a language.
In fact, these two articles were born out of our real-life experience with editors and code completion for DSLs in several fields (financial, data warehousing, templating, etc.).
Read more:
To discover more about how to write a python parser, you can read Parsing In Python: Tools And Libraries
To understand how to use ANTLR, you can read The ANTLR Mega Tutorial
To discover more about parsing in Javascript, you can read Parsing in JavaScript: Tools and Libraries
For a full understanding how parsers works, see A Guide to Parsing: Algorithms and Terminology
To discover more about parsing in Java, you can read Parsing in Java: Tools and Libraries
To discover more about parsing in C#, you can read Parsing in C#: Tools and Libraries
To discover more about parsing SQL, you can read Parsing SLQ