
We have built numerous transpilers for our customers and we know how challenging it can be. This is why we started exploring machine learning to implement our transpilers using examples provided by our clients. The challenge was to find an approach that would work with a limited set of samples and we believe our approach is promising. Language2Language Transformers: machine learning to build transpilers.
The process of translating a spoken language to another language has seen significant improvement in recent years with the rise of Machine Learning. In July 2020, Open AI released the beta API for GPT3, the third-generation language prediction model. A few months later the developers who obtained access to the API started to showcase a wide range of applications including implementations able to automatically generate code starting from a description in English. Since then Open AI released Codex, a language model tuned on publicly available code from GitHub, and GitHub itself, made available Copilot, an AICopilot an AI pair programmer that allows to automatically generate Python code starting from a description in natural language. The Machine Learning on Source Code website provides information about this new area of research between the machine learning and natural language processing communities, software engineering, and programming language communities. This article makes use of the Transformer, which is a deep learning architecture introduced in 2017 by Google and used by the GPT models, to translate a source code written in a programming language (a tiny subset of PL/I) to Kotlin. As usual, the code is available on GitHub (link).
Traditional vs Machine-Learning based architecture for transpilers
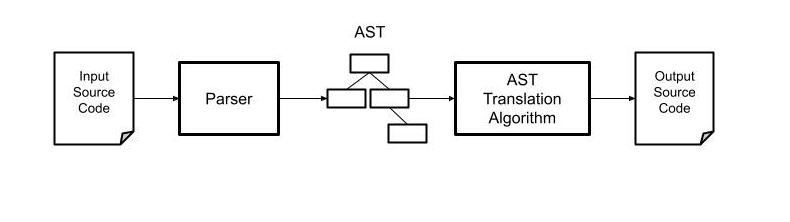
In language engineering there exists a set of well-established techniques to perform the translation of code written in a given programming language to another programming language. The steps involved in the process include parsing the input source code, creating an abstract representation of the program, operating transformations on the representation, and finally transforming the abstract model in source code in the target programming language. The diagram below presents the relevant part of this process.
In a similar way, the process of translating a corpus of text from a language to another using AI techniques consists of creating a language model based on a set of data. The diagram below illustrates the conceptual model of translation using AI. In this case, instead of implementing the algorithm, it is required to provide s dataset with examples of the input code and the expected output code.
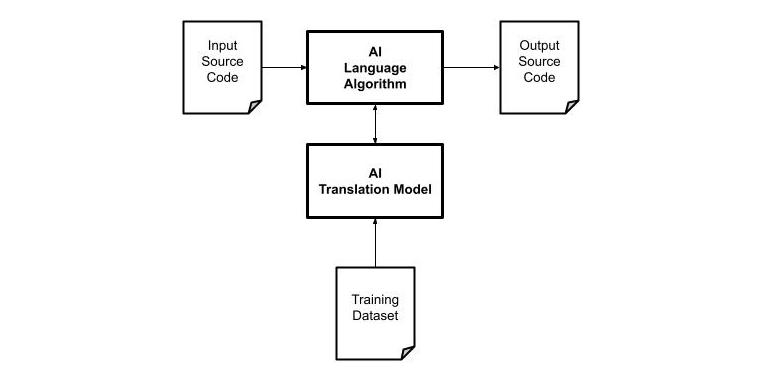
There is a key difference between the two approaches. In the algorithmic solution, the language model (AST) is created programmatically by the developers while in the Machine Learning approach the language model is created starting from data and computing probabilities.
Maybe you heard of the expression “In AI data is King” which refers to the need for large amounts of data to train the models. The dataset consists of samples which are usually a list of values as inputs and a list of values as output representing the expected results. The amount and the quality of the samples in the dataset is key factor as it affects the accuracy of the translation. In Natural Language Processing a corpus of text is first translated into tokens, and then into a numerical representation that can be used as input and output samples.
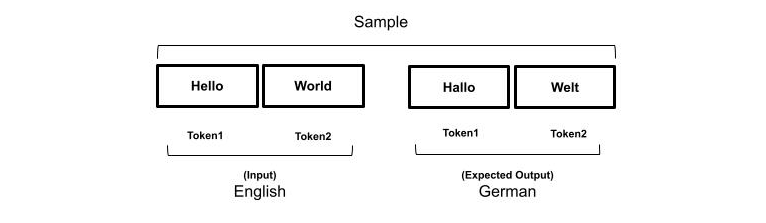
The process is similar to parsing a source code, which consists in translating the keywords into a stream of tokens defined by the rules of the lexer. In both cases, the order of the tokens matters to the meaning of a sentence or a statement of code.
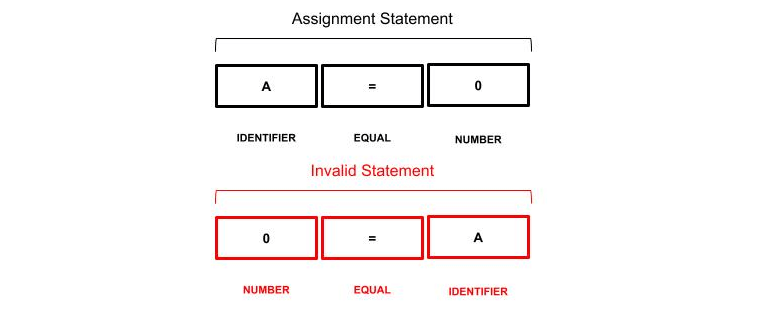
A parser generator like ANTLR allows specifying the grammar of a language defining the rules that a sequence of tokens must satisfy to be considered correct. In natural language processing, it is cumbersome to define such a set of rules to verify the correctness of a sentence. We can take advantage of a parser to improve the quality of the input dataset providing a well-defined set of samples and reducing significantly the complexity of the model required to learn the relationship between the input and the expected result. In addition, it would be possible to automatically generate a large number of valid training datasets starting from the rules of the input and the output language. The transformer used in this article can be used to model a sequence-to-sequence algorithm where the sequence of the tokens is one of the features used to train the model.
From AST to Dataset
In addition to the sequence of tokens required, it would be nice to include as much information as possible to input the dataset. For example, the word2vec algorithm uses a neural network to learn word associations and can detect synonymous words or suggest additional words given a partial sentence. Word2vec is a particular machine learning model that produces something called word embedding and what it means is that any given word can be associated with a vector of numbers. The idea is that similar vectors refer to similar words and many other relationships can be established. The process of converting the abstract language representation into data consists in transforming the stream of tokens and the semantic of a statement into a set of input for the AI algorithm.

The diagram above shows the data pipeline to create both the dataset for the training and the input data. The idea is to use an ANTLR parser to translate the AST in a flat sequence of tokens and apply some rules to reduce the ambiguity.
Synthetic Token
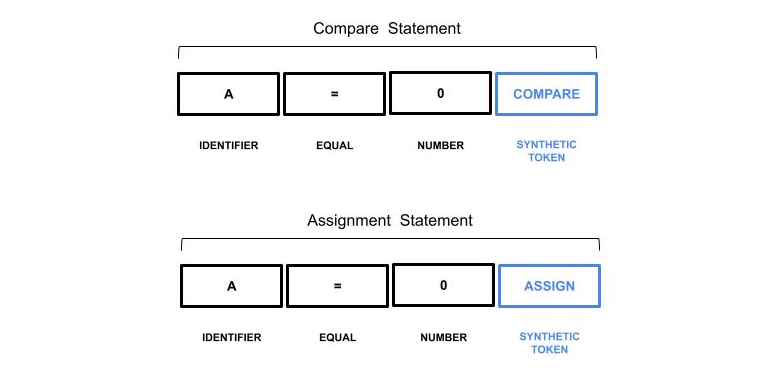
For example, consider a language where the equal token (=) can be used in assignment and comparison statements. The sequence of tokens can be hard to classify for an AI algorithm as it looks exactly the same in both contexts.

The ANTLR parser is aware of the context in which the sequence of tokens appears we can take advantage of this information by adding a synthetic token.
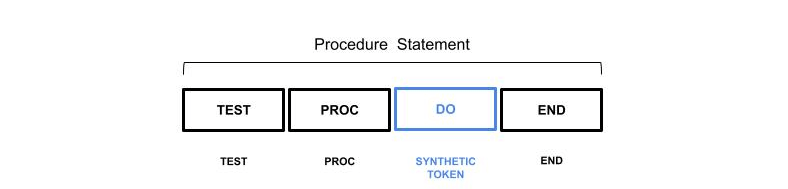
The Synthetic tokens can also be used when it is necessary to provide additional information not available in the input sequence. Suppose you want to translate a procedure declaration from PL/I to Kotlin. Both languages provide tokens to specify the beginning and the end of a block of statements. In PL/I they are the DO/END tokens, in Kotlin they are the open and close braces { }. But there are exceptions, consider the following example:
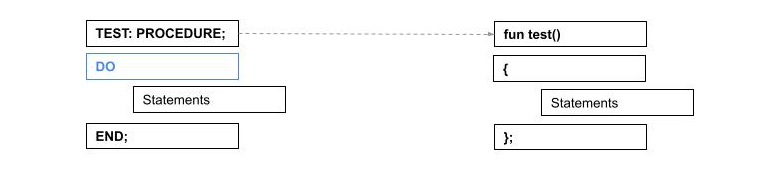
The DO statement is implicit within a procedure declaration so it is not present in the actual sequence of tokens. To avoid the confusion of the implicit information an additional DO token could be added to improve the quality of the data sample. For machine learning algorithms it would be simpler to generalize if that DO token in PL/I has the same meaning as the open branch in Kotlin.
Abstract Tokens
When dealing with identifiers such as variables or function names it is possible to provide an abstract representation of the token value. For example, consider the following statement:
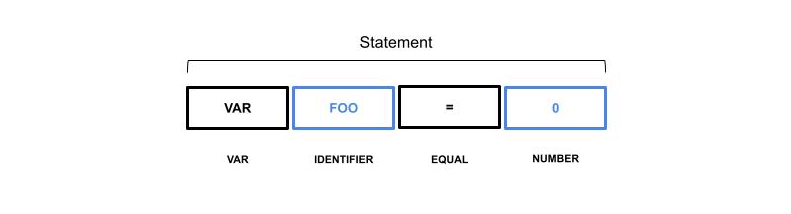
From a code translation perspective, the token foo and the value 0 do not provide any useful information about the meaning of the statements and they can be classified as special tokens to be replaced later. Within the dataset, a translation lookup table can be included to translate the tokens to the actual names.
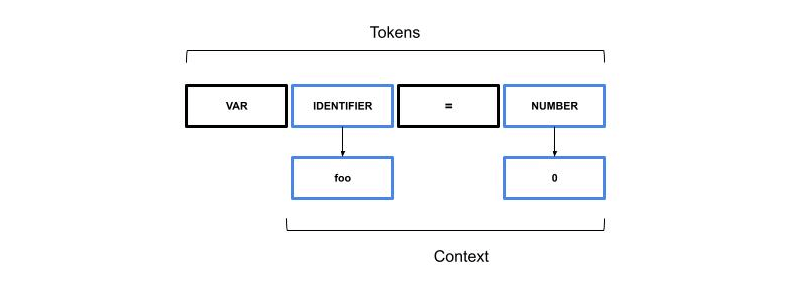
The values stored in the context are not used during the training, they are applied later in the final code generation phase.
Unnecessary Tokens
In programming languages, many tokens are used to identify the beginning of a set of other tokens or to separate tokens. For example, consider a procedure declaration with comma-separated parameters between parentheses.
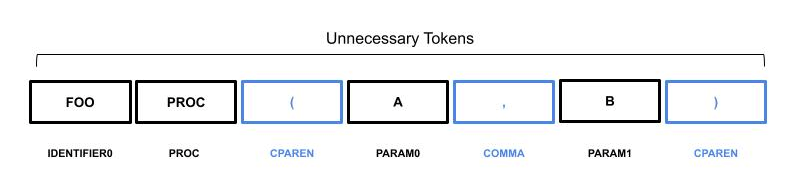
A and B represent the parameters of the procedure, however, the open parenthesis is used to tell the parser the beginning of a list of parameters, the comma between A and B is used as a separator. These tokens do not provide any useful information in the translation process and are not translated into the dataset.

The IDENTIFIER0 represents the name of the procedure (foo), PARAM0 and PARAM1 are respectively the parameters A and B. The other tokens such as parentheses and commas are not included in the dataset sample as they don’t contribute any valuable information.
Setup
In order to run the code of this article, it is required to set up the development environment and install all the required components: Python3, Pytorch, and ANTLR. We made use of Conda which is a great package, dependency, and environment manager for Python. On top of Conda, it is required to install Pytorch which provides all the code to implement the Transformer, and for the data processing. The instructions for installing Pytorch in your environment can be found on the website. The ANTLR binary required for the parser generation is included in the GitHub repository. The GitHub repository contains minimal grammar for PL/I which covers a tiny fraction of the language, just a few statements are supported but enough to have an idea of how it works.
Running the Sample Code
The code available on GitHub can be executed out-of-the-box if you feel impatient to give it a try. All you need is to download the pre-trained model from this link and place it in the same directory of pli2kt.py. The command line below produces as output the translation from PL/I to Kotlin of the FIB.PLI example.
python3 pli2kt.py -run FIB.PLI

fun main (args: Array<String>)
{
    var     n : Int
    var     result : Int
    n = 21
    result = compute_factorial(n)
}
fun compute_factorial(n : Int) : Int
{
    if(n<=1)
    {
        return 1
    }
    return n*compute_factorial(n-1)
}
The pli2kt.py program is the front end to the training and execution of the Transformer with the command line switches -run and -train.
Training the Model
This article does not contain a detailed explanation of the Transformer, you can find more details online or in the original Google white paper. The code of this article implements a Sequence to Sequence transformer using the Pytorch library, the Transformer class in pli2kt.py is used to wrap the Transformer class provided and represent the language model. Detailed information about the Pytorch implementation can be found in the documentation. The first step required before starting training the language model is to create the dataset as shown in the code below.
tokenizer = lambda x: x.split()

pli = Field(sequential=True, use_vocab=True, tokenize=tokenizer, lower=True, init_token="<sos>", eos_token="<eos>")
ktl = Field(sequential=True, use_vocab=True, tokenize=tokenizer, lower=True, init_token="<sos>", eos_token="<eos>")

fields = {'pli': ('p', pli), 'ktl': ('k', ktl)}

train, test = TabularDataset.splits(
    path='data',
    train='train.json',
    test='test.json',
    format='json',
    fields=fields
)

pli.build_vocab(train, max_size=10000, min_freq=1)
ktl.build_vocab(train, max_size=10000, min_freq=1)
The code specifies that the dataset for training will be found in the train.json file (train=’train.json’) within the data directory (path=data) in json format (format=’json’) of the TabularDataset class. This class is part of torchtext.data package and provides data processing utilities and popular datasets for natural language. Let’s take a look at the train.json file to figure out the other elements of the program.
{"pli":["PROCEDURE","{{name}}"],"ktl":["fun","{{name}}()"] }
{"pli":["DO"], "ktl":["{"]}
{"pli":["END"],"ktl":["}"]}
As you can see the dataset consists of JSON objects in text format with two data members pli and ktl. The pli member contains the list of tokens of the PL/I source code and the ktl contains the equivalent list of tokens as the desired output. For example, we want to train the model to translate a DO token into a { token as output, an END token into a } token. More importantly, a sequence of token PROCEDURE followed by {{name}} into a sequence of the fun {{name}}(). The {{name}} represents an Abstract Token as described previously in the article. As we are implementing a sequence to sequence transformer the order of the tokens matters. The Field definition in the source describes this data layout so that it can be used to feed to the transformer, the final build_vocab extracts all the tokens and creates a vocabulary so that each token is represented by a number. If you print the contents of vocab of the pli field you will see something like this:
print(pli.vocab.stoi)

{'<unk>': 0, '<pad>': 1, '<sos>': 2, '<eos>': 3, '{{name}}': 4, 'procedure': 5, '{{value}}': 6, 'call': 7, '{{param0}}': 8, '{{type0}}': 9, 'assign': 10, 'declare': 11, 'do': 12, 'end': 13, 'if': 14, 'main': 15, 'return': 16, 'then': 17, '{{return}}': 18, '{{type1}}': 19, '{{type}}': 20})
All the tokens specified in the training dataset are present in the vocabulary plus some additional special tokens like <sos> for start of sentence, <eos> end of sentence <unk> unknown, and <pad> used as a filler. The size of these vocabularies is required by the Transformer.
The next relevant part is the training loop which requires creating an iterator on top of the dataset and using the iterator to submit the data to the model.
train_iterator, test_iterator = BucketIterator.splits(
    (train, test),
    batch_size=batch_size,
    sort_within_batch=True,
    sort_key=lambda x: len(x.p),
    device=device,
)
The training data are subdivided in batches of batch_size samples sorted by the length of the samples. Not sure how much the order of the samples is important, but the iterator will follow the specified order within each batch. Within the training loop, the batches are submitted to the model.
 for batch_idx, batch in enumerate(train_iterator):
    inp_data = batch.p.to(device)
    target = batch.k.to(device)

    ...

    # plot to tensorboard
    writer.add_scalar("Training loss", loss, global_step=step)
The omitted code in the loop performs the steps to train the model according to the PyTorch API, the last statement allows to collect the value of the losses and plot the results on Tensorboard, a dashboard provided by Google to monitor various data. The losses represent how badly the transformer performed the sequence to sequence translation therefore the lower the better.
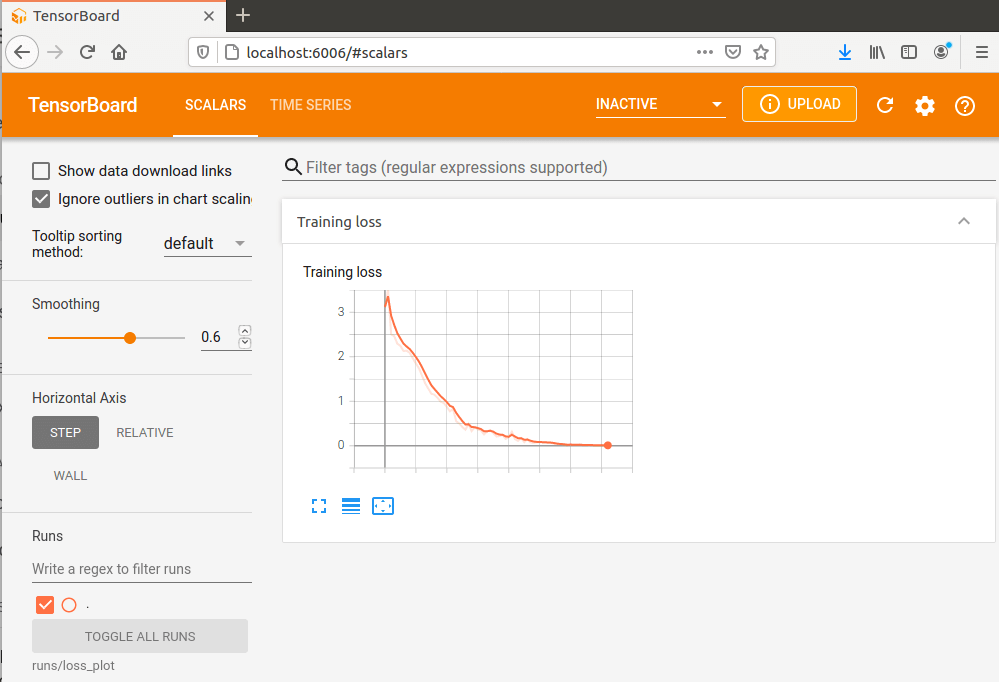
The descendant curve on the chart means that the losses decreased over time or, in other words, that the model learned how to perform the sequence to sequence transformation. The shape of the curve provides information useful to tune the hyper-parameters.
# Training hyperparameters
num_epochs = 250
learning_rate = 3e-4
batch_size = 32

# Model hyperparameters
src_vocab_size = len(pli.vocab)
trg_vocab_size = len(ktl.vocab)
embedding_size = 512
num_heads = 8
num_encoder_layers = 6
num_decoder_layers = 6
dropout = 0.10
max_len = 100
forward_expansion = 4
TThe training parameters are used to tune and control the training cycle such as the number of epochs and the learning rate. The model hyperparameters control the feature of the transformer in this case we used the values provided in the original Google paper. We could not find a well-defined process to adjust these values, observing the curve on the Tensorboard chart is helpful to set the parameters. It is pretty much a trial and error approach.
The very last step is to store the trained model to a file so it can be loaded and used later.
if save_model:
    checkpoint = {
        "state_dict": model.state_dict(),
        "optimizer": optimizer.state_dict(),
    }
    save_checkpoint(checkpoint)
Translation Process
As mentioned in the previous section, to interact with the model we need to provide the data in JSON format, therefore, it is required to translate the input source code into JSON. During this process, we can also generate the Synthetic and Abstract tokens or remove all the Unnecessary tokens, see the section above for details. The translation from source code to JSON is a two-step process: the first step makes use of an ANTLR generated parser to create the parse tree, the second step consists of processing the tree and producing the JSON. The code below shows how the translation process is executed.
# Lexer setup
input_stream = FileStream(sys.argv[2])
lexer = PLILexer(input_stream)
stream = CommonTokenStream(lexer)

# Parser setup
parser = PLIParser(stream)
tree = parser.program()

# Dataset generation
visitor = PLIVisitor()
statements = visitor.visit(tree)
The first part is a typical ANTLR parse code snippet to create the parse tree. The PLIVisitor class walks the parse tree and invokes the corresponding methods on the visitor. Within this method, the elements of the parse tree are converted to JSON. The visit method returns the list of the statements in JSON format. Let’s take a look at the return statement, according to the ANTLR grammar the statement has the following syntax:
RETURN (expression)
In this case, we can take advantage of the Abstract Token to store the expression and we can eliminate the parenthesis as unnecessary tokens. For example:
RETURN (1) -> {'pli': ['RETURN', '{{value}}'], 'context': {'value': '1'}}
The resulting JSON does not contain the parenthesis tokens as they are not significant for the sequence to sequence translation, the expression 1 has been encapsulated within a generic symbol {{value}}. The context member value of the JSON contains the actual expression ‘1’. Below is the code implementation of the return statement translation performed within the PLIVisitor class method.
# Visit a parse tree produced by PLIParser#stmt.
def visitStatement(self, ctx: PLIParser.StatementContext):
    ...
    # Return statement
    if ctx.returnStmt() is not None:
        tokens = ["RETURN", "{{value}}"]
        context = {
            "value": ctx.returnStmt().expression().getText().lower(),
        }
        self.statements.append({
            "pli": tokens,
            "context": context
        })
The correspondent sample in the training dataset looks like this.
{"pli":["RETURN","{{value}}"],"ktl":["return {{value}}"] }
This means that when the transformer encounters a sequence of RETURN and {{value}} will return a single token return {{value}}. The sequence to sequence translation happens in translate_sequence which returns a sequence of tokens corresponding to the given sequence.
level = 0
for s in statements:
    translated = translate_sequence(
        s["pli"], pli, ktl, device, max_length=50
    )
    transpiled,level = transpile_sequence({
        'code': translated,
        'context': s['context']
    },level)
    print(f"{transpiled}")
The next step consists of translating the tokens returned by translate_sequence into actual Kotlin source code. The transpile_sequence function performs this task.
def transpile_sequence(translated,level):
    tokens = translated["code"]
    data = translated["context"]
    lint = []

    for t in tokens:
        spacer = "".rjust(level * 4)
        if t == "{":
            level += 1
        elif t == "}" and level > 0:
            level -= 1
            spacer = "".rjust(level * 4)

        if t != "<eos>":
            lint.append(spacer + t)


    code = " ".join(lint)
    t = Template(code)

    return t.render(data),level
The function performs many tasks, the first consists in eliminating the <eos> tokens which are used to mark the end of the sentence. The level variable is used to indent the output source code. All the other tokens are collected in the lint list and joined to form the code template. The resulting code is processed by the Jinja template processor to produce the output, which replaces the abstract tokens in the context with the actual value.
Conclusion
This article walked through the implementation of a transpiler making use of a transformer technology the building block of many language models including GPT and BERT. This approach allows our customers to provide a set of samples made of the input code and the expected result. All the magic is done by parsing the code, applying the transformation to JSON, and submit to the transformer.

")