
The code for this article is on GitHub: language-server-dot
In a previous post we have seen how the Language Server Protocol can be a game changer in language development: we can now build support for one language and integrate it with all the IDEs compatible with this protocol.
In this article we are going to see how easy is to build support for the DOT Language in Visual Studio Code.
Note that Visual Studio Code now runs also on Mac and Linux
To do this we are going to build a system composed of two elements:
- A server which will provide support for our language (DOT)
- A very thin client that will be integrated in Visual Studio Code
If you want to support another editor you must create a new client for that editor, but you could reuse the same server. In fact, the server is nothing else than a node app.
The code for this article is in its companion repository. In this tutorial we are not going to show every little details. We are going to focus instead on the interesting parts. We will start slow and explain how to setup the client and then only the parts necessary to understand how everything works. So you have to refer to the repository if you want to see all the code and the configuration details.
Language Server Protocol Recap
If you haven’t read the previous article there is a few things that you may want to know. The protocol is based upon JSON-RPC, this means it is lightweight and simple both to use and to implement. In fact there are already editors that support it, such as Visual Studio Code and Eclipse, and libaries for many languages and formats.
The client informs the server when a document is opened or changed, and the server must mantain it’s own representation of the open documents. The client can also send requests that must be fullfilled by the server, such as requesting hover information or completion suggestions.
DOT Language
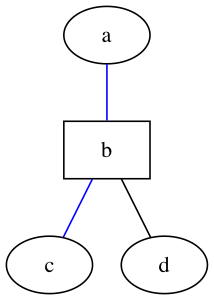
The DOT Language permits to describe graphs. A tool named Graphviz can read descriptions in DOT and generate nice pictures from those. Below you can see an example. It does not matter if you are not familiar with DOT. It is a very simple language that is perfect to show you how to use the Language Server Protocol in practice.
 graph short {
     // This attribute applies to the graph itself
     size="1,1";
     a;
     // The node shape is changed.
     b [shape=box];
     // These are edges
     // You don't have to declare each node
     a -- b -- c [color=blue];
     // You don't have to use the ending ';'
     b -- d
 }
From this graph Graphviz will generate this image:
Setup
Before starting, we have to install a couple of things:
- VS Code extension generator: to generate a skeleton extension
- VS Code extension for the DOT language: to register the DOT language
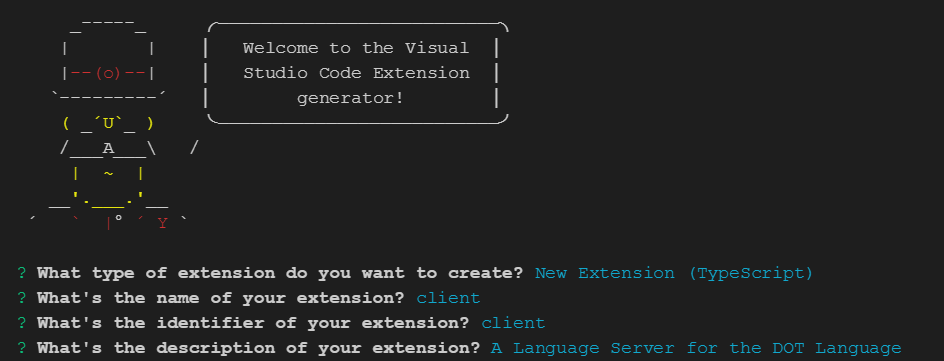
VS Code Extension Generator
The generator can be installed and used the following way.
npm install -g yo generator-code
yo code
The generator will guide through the creation of an extension. In our case, we need to create one for the client, which is the proper VS Code extension.
VS Code Extension For The DOT Language
The Language Support for the DOT language is an extension to register the DOT language with Visual Studio Code.
You can navigate to the extensions page
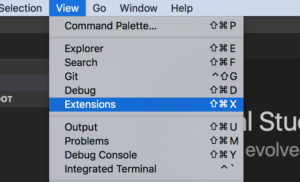
Once you are there search for dot and install it.
You may wonder why we need an extension for the DOT Language. I mean, aren’t we building it one right now?
We are building a Language Server for the DOT Language, to implement things such as verifying the correcteness of the syntax or suggesting terms for autocompletion. The extension we are going to install provides instead basic stuff like syntax highlighting. It also associate the extension .dot files with the DOT language. These kinds of extensions are quite easy to create: they consist just of configuration files.
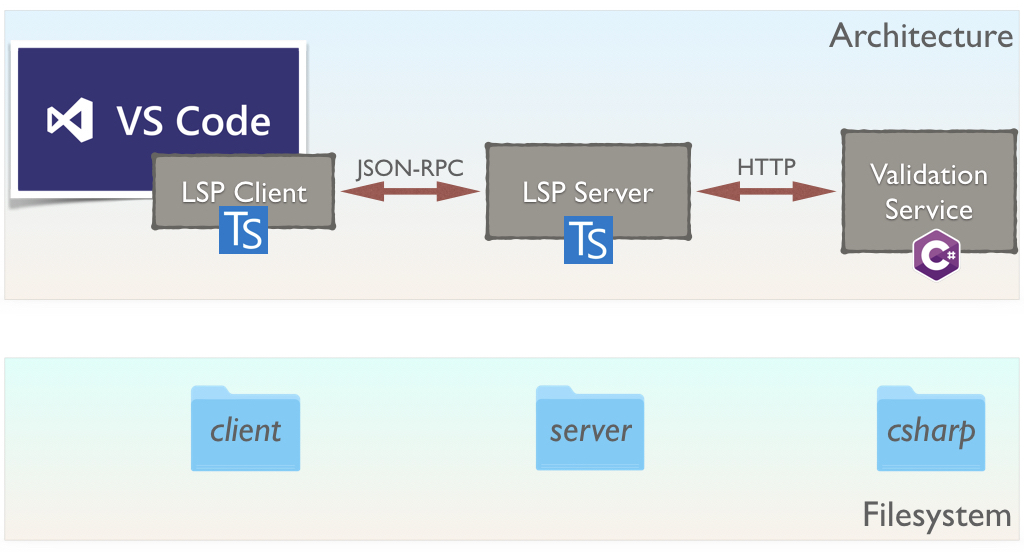
Structure Of The Project
The project will be composed by:
- a Language Protocol client
- a Language Protocol server
- a backend in C# and .NET Core that will provide the validation of the code
So under the project there will be a folder client, that will contain the client code, a folder server, that will contain the server code, and a folder csharp, that will contain the C# service. There will also be a data folder, that will contain two files with a list of shapes and colors.
Since client and server are actually node projects you have to install the node packages. And for the .NET Core project you have to restore the nuget packages using the well known commands inside the respective folders. More precise information is available in the repository.
You have also to remember to start the C# project first (dotnet run) and then run the extension/client after that.
1. The Client For The Language Server Protocol
Configuration Of The Client
Our client is a Visual Studio Code extension, and a very simple one, given the integrated support in VS Code for the protocol.
We are writing it using TypeScript, a language that compiles to JavaScript. We are using TypeScript for two reasons:
- because it provides some useful features, such as strong typing
- because it’s the default language for a VS Code extension.
First we are going to setup how TypeScript will be compiled into Javascript, by editing tsconfig.json.
{
    "compilerOptions": {
        "target": "es6",
        "module": "commonjs",
        "outDir": "out",
        "lib": [ "es6" ],
        "sourceMap": true
    },
    "exclude": [
        "node_modules",
        "server"
    ]
}
In addition to the usual node_modules, we exclude the folder server, because it will contain the already compiled server. In fact, to simplify the use of the extension, the client will also contain the server. That is to say, we are going to create the server in another project, but we will output the source under the client/server folder, so that we could launch the extension with one command.
To do just that you can use CTLR+Shift+B, while you are in the server project, to automatically build and output the server under the client, as soon as you edit the code.
Setting Up The Extension
In package.json we include the needed packages and the scripts necessary to automatically compile, install the extension in our development environment, and run it.
For the most part it’s the default one, we just add a dependency.
"scripts": {
    "vscode:prepublish": "tsc -p ./",
    "compile": "tsc -watch -p ./",
    "postinstall": "node ./node_modules/vscode/bin/install",
  },
  "devDependencies": {
    "@types/node": "^6.0.52",
    "typescript": "^2.1.5",
    "vscode": "^1.0.3"
  },
  "dependencies": {
    "vscode-languageclient": "^3.1.0"
  }
The same file is also used to configure the extension.
  "activationEvents": [
    "onLanguage:dot"
  ],
  "contributes": {
    "configuration": {
      "type": "object",
      "title": "Client configuration",
      "properties": {
        "dotLanguageServer.maxNumberOfProblems": {
          "type": "number",
          "default": 100,
          "description": "Controls the maximum number of problems produced by the server."
        },
        "dotLanguageServer.trace.server": {
          "type": "string",
          "enum": [
            "off",
            "messages",
            "verbose"
          ],
          "default": "off",
          "description": "Traces the communication between VSCode and the dotLanguageServer service."
        }
      }
    }
  },
The setting activationEvents is used to configure when should the extension be activated, in our case for DOT files. The particular value (onLanguage:dot) is available because we have installed the extension for GraphViz (Dot) files. This is also the only thing that we strictly need from the DOT extensions. Alternatively, we could avoid installing the extension by adding the following to the contributes section. But doing this way we lose syntax highlighting.
"contributes": {
    "languages": [
      {
        "id": "dot",
        "extensions": [
          ".dot",
          ".DOT",
          ".gv"
        ]
      }
    ],
The contributes section can also contain custom properties to modify the configuration of the extension. As an example we have a maxNumberOfProblems setting.
This is the time to call npm install so that the extension vscode-languageclient will be installed.
Setting Up The Client
Let’s see the code for the client. Copy it (or type it) in src/extension.ts
'use strict';

import * as path from 'path';
import * as fs from 'fs';

import { workspace, Disposable, ExtensionContext } from 'vscode';
import { LanguageClient, LanguageClientOptions, SettingMonitor, ServerOptions, TransportKind, TextEdit,
RequestType, TextDocumentIdentifier, ResponseError, InitializeError, State as ClientState, NotificationType } from 'vscode-languageclient';

export function activate(context: ExtensionContext) {

    // The server is implemented in another project and outputted there
    let serverModule = context.asAbsolutePath(path.join('server', 'server.js'));
    // The debug options for the server
    let debugOptions = { execArgv: ["--nolazy", "--debug=6009"] };

    // If the extension is launched in debug mode then the debug server options are used
    // Otherwise the  normal ones are used
    let serverOptions: ServerOptions = {
        run : { module: serverModule, transport: TransportKind.ipc },
        debug: { module: serverModule, transport: TransportKind.ipc, options: debugOptions }
    }

    // Options of the language client
    let clientOptions: LanguageClientOptions = {
        // Activate the server for DOT files
        documentSelector: ['dot'],
        synchronize: {
            // Synchronize the section 'dotLanguageServer' of the settings to the server
            configurationSection: 'dotLanguageServer',
            // Notify the server about file changes to '.clientrc files contained in the workspace
            fileEvents: workspace.createFileSystemWatcher('**/.clientrc')
        }
    }

    // Create the language client and start the client.
    let disposable = new LanguageClient('dotLanguageServer', 'Language Server', serverOptions, clientOptions).start();

    // Push the disposable to the context's subscriptions so that the
    // client can be deactivated on extension deactivation
    context.subscriptions.push(disposable);
}
This is the entire client: if you remove the comments it is just a bunch of lines long.
We first create and setup the server, for normal and debug sessions.
Then we take care of the client: on line 27 we order the client to call the server only for DOT files.
On line 37 we create the client with all the options and the informations it need.
This is quite easy, given the integrated support for the Language Server Protocol in Visual Studio Code. If you had to create a client from scratch, you would have to support the protocol JSON-RPC and configure the client to call the server whenever is needed: for instance, when the document changes or a completion suggestion is asked by the user.
2. The Server For The Language Server Protocol
To create the server you use the same procedure we use to create the client extension, with the command yo code. At the end the server and the client will be in one extensions, but during development we separate them for easier debugging.
The code will be automatically moved in the proper place thanks to the following options in package.json…
{
[..]
"scripts": {
    "compile": "installServerIntoExtension ../client ./package.json ./tsconfig.json && tsc -p .",
    "watch": "installServerIntoExtension ../client ./package.json ./tsconfig.json && tsc --watch -p ."
  }
[..]
}
…and tsconfig.json, that are created for the server.
{
	"compilerOptions": {
		[..]
		"outDir": "../client/server",
		[..]
	},
	[..]
}
Creating the Server
The basics of a server are equally easy: you just need to setup the connection and find a way to maintain a model of the documents.
// Create a connection for the server. The connection uses Node's IPC as a transport
let connection: IConnection = createConnection(new IPCMessageReader(process), new IPCMessageWriter(process));

// Listen on the connection
connection.listen();

// Create a simple text document manager. The text document manager
// supports full document sync only
let documents: TextDocuments = new TextDocuments();
// Make the text document manager listen on the connection
// for open, change and close text document events
documents.listen(connection);

// After the server has started the client sends an initialize request. The server receives
// in the passed params the rootPath of the workspace plus the client capabilities.
let workspaceRoot: string;
The first thing to do is to create the connection and start listening.
Then we create an instance of TextDocuments, a class provided by Visual Studio Code to manage the documents on the server. In fact, for the server to work, it must maintain a model of the document on which the client is working on. This class listens on the connection and updates the model when the server is notified of a change.
// hold a list of colors and shapes for the completion provider
let colors: Array<string>;
let shapes: Array<string>;

connection.onInitialize((params): InitializeResult => {
    workspaceRoot = params.rootPath;
    colors = new Array<string>();
    shapes = new Array<string>();

    return {
        capabilities: {
            // Tell the client that the server works in FULL text document sync mode
            textDocumentSync: documents.syncKind,
            // Tell the client that the server support code complete
            completionProvider: {
                resolveProvider: true,
                "triggerCharacters": [ '=' ]
            },
                        hoverProvider: true
        }
    }
});
On initialization we inform the client of the capabilities of the server. The Language Server Protocol can work in two different ways: either sending only the portion of the document that have changed or sending the whole document each time. We choose the latter and inform the client to send the complete document every time, on line 13.
We communicate to the client that our server supports autocompletion. In particular, on line 17, we say that it should only ask for suggestions after the character equals ‘=’. This makes sense for the DOT language, but in other cases you could choose to not specify any character or to specify more than one character.
We also support hover information: when the user leaves the mouse pointer over a token for some time we can provide additional information.
Finally we support validation, but we don’t need to tell the client about it. The rationale is that when we are informed of changes on the document we inform the client about any issue. So the client itself doesn’t have to do anything special, apart from notifying the server of any change.
Implement Autocompletion
The suggestions for autocompletion depends on the position of the cursor. For this reason the client specify to the server the document, and the position for each autocompletion request.
Given the simplicity of the DOT language there aren’t many element to consider for autocompletion. In this example we consider the values for colors and shapes. In this article we are going to see how to create suggestions for color, but the code in the repository contains also suggestions for shapes, which are created in the same way.
connection.onCompletion((textDocumentPosition: TextDocumentPositionParams): CompletionItem[] => {
    let text = documents.get(textDocumentPosition.textDocument.uri).getText();
    let lines = text.split(/r?n/g);
    let position = textDocumentPosition.position;

    if(colors.length == 0)
        colors=loadColors();

    let start = 0;

    for (var i = position.character; i >= 0; i--) {
        if(lines[position.line][i] == '=')
        {
            start = i;
            i = 0;
        }
    }
});
In the first few lines we set the proper values, and load the list of possible colors.
In particular, on line 2, we get the text of the document. We do that by calling the document manager, using a document URI, that we are given as input. In theory, we could also read the document directly from disk, using the provided document URI, but this way we would had only the version that is saved on disk. We would miss any eventual changes in the current version.
Then, on line 11, we find the position of the equals (=) character. You may wonder why we don’t just use position.character - 1: since the completion is triggered by that character don’t we already know the relative position of the symbol? The answer is yes, if we are starting a suggestion for a new item, but this isn’t always true. For instance it’s not true if there is already a value, but we want to change it.
By making sure to find the position of the equals sign, we can always know if we are assigning a value to an option, and which option it is.
Sending The Suggestions For Autocomplete
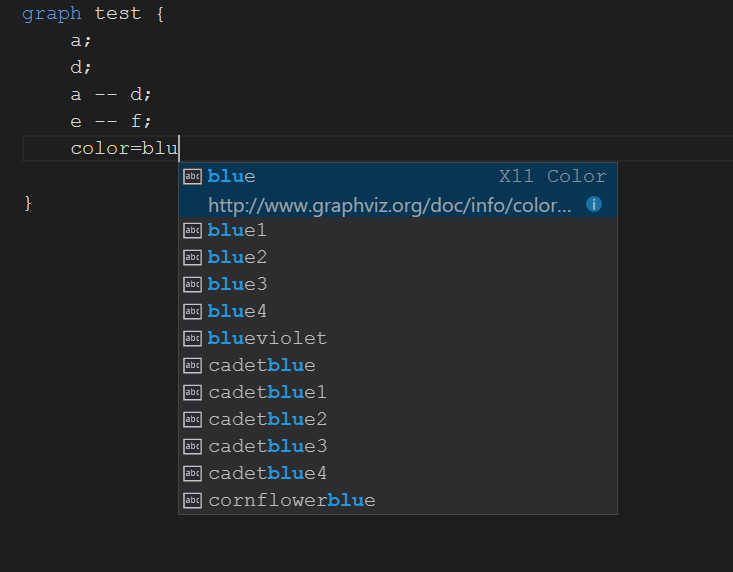
These suggestions are used when the user typed “color=”.
if(start >= 5
&& lines[position.line].substr(start-5,5) == "color")
{
    let results = new Array<CompletionItem>();
    for(var a = 0; a < colors.length; a++)
    {
        results.push({
            label: colors[a],
            kind: CompletionItemKind.Color,
            data: 'color-' + a
        })
    }

    return results;
}
Now that we know the option name, if the option is color we send the list of colors. We provide them as an array of CompletionItems. On lines 26-28 you can see how they are created: you need a label and a CompletionItemKind. The “kind” value, at the moment, is only used for displaying an icon next to the suggestion.
The last element, data, is a field meant to contain custom data chosen by the developer. We are going to see later what is used for.
We always send all the colors to the client, Visual Studio Code itself will filter the values considering what the user is typing. This may or may not be a good thing, since this makes impossible to use abbreviations or nicknames to trigger a completion suggestion for something else. For example, you can’t type “Bill” to trigger “William Henry Gates III”.
Giving Additional Information For The Selected CompletionItem
You may want to give additional information to the user, to make easier choosing the correct suggestion, but you can’t send too much information at once. The solution is to use another event to give the necessary information once the user has selected one suggestion.
connection.onCompletionResolve((item: CompletionItem): CompletionItem => {
    if(item.data.startsWith('color-'))
    {
        item.detail = 'X11 Color';
        item.documentation = 'http://www.graphviz.org/doc/info/colors.html';
    }

    return item;
});
The method onCompletionResolve is the one we need to use for doing just that.
It accepts a CompletionItem and it adds values to it. In our case if the suggestion is a color we give a link to the DOT documentation that contains the whole list of colors and we specify which color scheme is part of. Notice that the specification of DOT also supports color schemes other than the X11 one, but our autocomplete doesn’t.
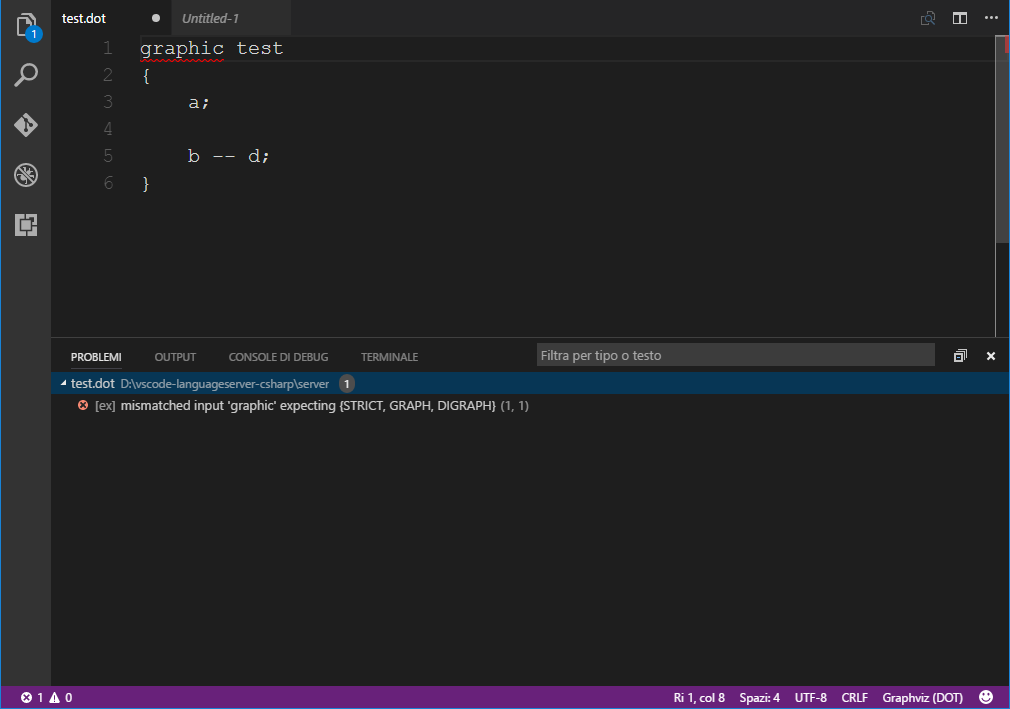
Validating A Document
Now we are going to see the main feature of our Language Server: the validation of the DOT file.
But first we make sure that the validation is triggered after every change of each document.
documents.onDidChangeContent((change) => {
    validateDotDocument(change.document);
});;
We do just that by calling the validation when we receive a notification of a change. Since there is a line of communication between the server and the client we don’t have to answer right away. We first receive notification of the change and once the verification is complete we send back the errors.
The function validateDotDocument takes the changed document as argument and then compute errors. In this particular case we use a C# backend to perform the actual validation. So we just have to proxy the request through the Language Server and format the results for the client.
While this may be overkill for our example, it’s probably the best choice for big projects. If you want to easily use many linters and libraries, you are not going to mantain a specific version of each of these just for the Language Server. By integrating other services you can mantain a lean Language Server.
The validation is the best phase in which to integrate such services, because it’s not time sensitive. You can send back eventual errors at any time within a reasonable timeframe.
function validateDotDocument(textDocument: TextDocument): void {
    let diagnostics: Diagnostic[] = [];

    request.post({url:'http://localhost:3000/parse', body: textDocument.getText()}, function optionalCallback(err, httpResponse, body) {
        let messages = JSON.parse(body).errors;
        names = JSON.parse(body).names;

        let lines = textDocument.getText().split(/r?n/g);
        let problems = 0;

        for (var i = 0; i < messages.length && problems < maxNumberOfProblems; i++) {
            problems++;

            if(messages[i].length == 0)
                messages[i].length = lines[i].length - messages[i].character;

            diagnostics.push({
                severity: DiagnosticSeverity.Error,
                range: {
                    start: { line: messages[i].line, character: messages[i].character},
                    end: { line: messages[i].line, character: messages[i].character + messages[i].length }
                },
                message: messages[i].message,
                source: 'ex'
            });
        }
        // Send the computed diagnostics to VSCode.
        connection.sendDiagnostics({ uri: textDocument.uri, diagnostics });
    });
}
On lines 5-6 we receive back both our errors and other values computed by our service (line 4). We take advantage of the validation to compute which are the names of nodes and graphs, that we store in a global variable. We are going to use these names later, to satisfy requests for hover information.
The rest of the marked lines shows the gist of the communication with the client:
- we gather the diagnostic messages
- we setup them for easier use by the user
- we send them to the client.
We can choose the severity, for instance we can also simply communicate informations or warning. We must also choose a range for which the message apply, so that the user can deal with it. Sometimes this doesn’t always make sense or it’s possible, in such cases we choose as a range the rest of the line length, starting from the character that indicate the beginning of the error.
The editor will then take care of communicating the mistake to the user, usually by underlining the text. But nothing forbids the client to do something else, for instance if the client is a log manager, it could simply store the errore in some way.
We are going to see the actual validation later, now we are going to see the last feature of our server, instead, the Hover Provider.
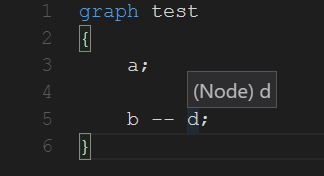
A Simple Hover Provider
An Hover Provider job is to give additional information on the text that the user is hovering on, such as the type of an object (ex. “class X”), documentation about it (ex. “The method Y is […]) or the signature of a method.
For our language server we choose to show what are the elements that can be used in an edge declaration: node, graph or subgraph. To find that information ourselves we simply use a listener when we validate the DOT document on the service.
connection.onHover(({ textDocument, position }): Hover => {
    for(var i = 0; i < names.length; i++)
    {
        if(names[i].line == position.line
           && (names[i].start <= position.character && names[i].end >= position.character) )
        {
            // we return an answer only if we find something
            // otherwise no hover information is given
            return {
                contents: names[i].text
            };
        }
    }
});
To communicate this information to the user, we search between the names that we have saved on the Languager Server. If we find one on the current position that the user is hovering on we tell the client, otherwise we show nothing.
3. The C# Backend
Choosing One ANTLR Runtime Library
Since we are creating a cross platform service we want to use the .NET Core Platform.
The new ANTLR 4.7.0 supports .NET Core, but at the moment the nuget package has a configuration problem and still does not work. Depending on when you read this the problem might have been solved, but now you have two choices: you compile the ANTLR Runtime for C# yourself, or you use the “C# optimized” version.
The problem is that this “C# optimized” version that supports .NET Core it’s still in beta, and the integration to automatically create the C# files from the grammar it’s still in the future. So the generate the C# files you have to download the latest beta nuget package for the ANTLR 4 Code Generator. Then you have to decompress the .nupkg files, which is actually a zip file, and then run the included ANTLR4 program.
/tools/antlr4-csharp-4.6.1-SNAPSHOT-complete.jar -package <NAMESPACE-OF-YOUR-PROGRAM> -o <OUTPUT_DIR> -Dlanguage=CSharp_v4_5 <PATH-TO-GRAMMAR>
You can’t use the default ANTLR4 because it generates valid C# code, but that generated code is not compatible with the “C# optimized” runtime.
The ANTLR Service
We are going to rapidly skim through the structure of the C# ANTLR Service. It’s not that complicated, but if you don’t understand something you can read our ANTLR Mega Tutorial.
We setup ANTLR with a Listener, to gather the names to use for the hover information, and an ErrorListener, to collect any error in our DOT document. Then we create a simple ASP .NET Core app to communicate with the Language Server in TypeScript.
In Program.cs (not shown) we configure the program to listen on the port 3000, then we setup the main method, to comunicate with the server, in Startup.cs.
var routeBuilder = new RouteBuilder(app);

routeBuilder.MapPost("parse", context =>
{
    [..]

    AntlrInputStream inputStream = new AntlrInputStream(text);
    DOTLexer lexer = new DOTLexer(inputStream);
    CommonTokenStream commonTokenStream = new CommonTokenStream(lexer);
    DOTParser parser = new DOTParser(commonTokenStream);
    // the listener gathers the names for the hover information
    DOTLanguageListener listener = new DOTLanguageListener();

    DOTErrorListener errorListener = new DOTErrorListener();
    DOTLexerErrorListener lexerErrorListener = new DOTLexerErrorListener();

    lexer.RemoveErrorListeners();
    lexer.AddErrorListener(lexerErrorListener);
    parser.RemoveErrorListeners();
    parser.AddErrorListener(errorListener);

    GraphContext graph = parser.graph();

    ParseTreeWalker.Default.Walk(listener, graph);

    [..]
});

var routes = routeBuilder.Build();

app.UseRouter(routes);
We use a RouteBuilder to configure from which path we answer to. Since we only answer to one queston we could have directly answered from the root path, but this way is cleaner and it’s easier to add other services.
You can see that we actually use two ErrorListener(s), one each for the lexer and the parser. This way we can give better error information in the case of parser errors. The rest is the standard ANTLR program that use a Listener:
- we create the parser
- we try to parse the main element (ie.
graph) - we walk the resulting tree with our listener.
The errors are found when we try to parse, on line 22, the names when we use the LanguageListener, on line 24.
The rest of the code simply prepare the JSON output that must be sent to the server of the Language Server Protocol.
Finding The Names
Let’s see where we find the names of the elements that we are providing for the hover information. This is achieved by listening to the firing of the id rule.
In our grammar the id rule is used to parse every name, attributed and value. So we have to distinguish between each case to find the ones we care about and categorize them.
public override void ExitId(DOTParser.IdContext context)
{
    string name = "";

    if(context.Parent.GetType().Name == "Node_idContext")
        name = "(Node) ";

    if(context.Parent.GetType().Name == "SubgraphContext")
        name = "(Subgraph) ";

    if(context.Parent.GetType().Name == "GraphContext")
        name = "(Graph) ";

    if(!String.IsNullOrEmpty(name))
    {
        Names.Add(new Name() {
            Text = name + context.GetText(),
            Line = context.Stop.Line - 1,
            Start =  context.Start.Column,
            End = context.Start.Column + context.GetText().Length
        });
    }
}
We do just that by looking at the type of the parent of the Id node that has fired the method. On line 18 we subtract 1 to the line because ANTLR count lines as humans do, starting from 1, while Visual Studio Code count as a developer, starting by 0.
Summary
In this tutorial we have seen how to create a client of a Language Server for Visual Studio Code, a server with Visual Studio Code and a backend in C#.
We have seen how easily you can add features to your Language Server and one way to integrate it with another service that you already are using. This way you can create your language server as lightweight as you want. You can make it useful from day one and improve it along the way.
Of course, we have leveraged a few things ready to be used:
- an ANTLR grammar for our language
- a client and a server implementation of the Language Server Protocol
What is amazing is that with one server you can leverage all the clients, even the one you don’t write yourself.
If you need more inspiration you can find additional examples and informations on the Visual Studio Code documentation. There is also the description of the Language Server Protocol itself, if you need to implement everything from scratch.