")
Do you want to know more about an incremental parsing library used at GitHub and that was born out of failed software? Then, keep reading, because we are going to talk about Tree-sitter.
Tree-sitter is an incremental parsing library, which means that it is designed to efficiently update the tree, without throwing away the work already done. This is ideal for parsing a file that is being written in a code editor. If you are interested in knowing more about GLR, the kind of algorithm that powers Tree-sitter, you can read about our introduction to parsing algorithms. That explains what incremental parsing is.
Tree-sitter was created as part of Atom, the editor by GitHub that battled with VS Code and Brackets, a few years ago, for the title of best lightweight, cross-platform editor. As you know, Atom lost and VS Code won. However, Tree-sitter survived and it is still used at GitHub.
Tree-sitter is used at GitHub and creates efficient parsers. It also comes with support for syntax highlighting. So, it looks like a great fit for an editor. Here at Strumenta, we are fan of ANTLR, a robust and flexible parser generator. However, we found that Tree-sitter has its merits and in this article we are going to show you where it shines and how to use it.
For instance, Tree-sitter:
- has excellent performance
- comes with included support for syntax highlighting
- there are parsers available ready-to-use in many languages
In this tutorial, we are going to see:
- how to create a parser in Tree-sitter
- how to define rules to support syntax highlighting
- how to identify elements and tag them
- how to use the generated parser in Python and do things like walking the tree
You can find the repository with the code for this example at tree-sitter-story.
What is Tree-sitter designed for?
This is how the official documentation introduces it:
- General enough to parse any programming language
- Fast enough to parse on every keystroke in a text editor
- Robust enough to provide useful results even in the presence of syntax errors
- Dependency-free so that the runtime library (which is written in pure C11) can be embedded in any application
Tree-sitter was tailored for GitHub needs in supporting an editor. So it is a great software, worthy of such a company, but it has some peculiarities. It has great performance, but a bit of a complex setup. Tree-sitter is written in Rust, but the parsers are generated in C. Do not worry, you do not actually have to write C to use it, because you are supposed to use JavaScript to write grammars.
It is a parser generator tool: you write a grammar (in JavaScript) describing a language and then Tree-sitter (written in Rust) creates a parser (in C or WebAssembly) to handle that language.
You then use the parser in your favorite language, as long as there has bindings available for this language. There are many bindings available, official (Go, C#, Java, Kotlin, etc.) and community-supported. Bindings are essentially a bridge between two programming languages. You end up in an interface (for instance in Kotlin) allowing you to use a library or code written in one language (like C) naturally.
| What | Language Used | When You Should Care |
|---|---|---|
| Tree-sitter itself | Rust | If you want to contribute to the project |
| Grammar | JavaScript | If you want to create a new parser |
| Generated Parser | C compiled to native library/WebAssembly | If you want to run the parser |
| Client libraries | All that have bindings available | If you want to use the parser |
You can see look at the table for getting a summary of what you should care about for what you want to accomplish. The most important parts are relative to writing the grammar and running the parser.
You need to use JavaScript to write the grammar. Tree-sitter will generate C code and compile into a native library. If you want to use a parser, you do not need to care about JavaScript, you need to take care that the running environment can run the generated parser. If you are compiling the generated C code to a native library, you need to do that for the platform you care about. For instance, if you want to use the parser on macOS, you need to compile the code on a macOS system in order to generate a .dylib library.
You could also generate a WebAssembly (WASM) module to run in any platform that can handle WebAssembly. Usually these platforms are browsers, but there are other options.
It is written in Rust because that is a productive language. It outputs C, because that is a widely supported language. This allows to embed it in many software and define bindings for a variety of languages. It is also possible to consume WebAssembly, that allows to easily connect JavaScript and C code.
So, it is complex software that works well if you want to build editors. It has the performance necessary to be used in compilers and interpreters.
It is also used in static analysis: it provides parsing to implement partial symbol resolution in the online code viewer on GitHub. For instance, if you open a Java file on GitHub and select a property you can see the references and potential definitions on the sidebar. This system uses Tree-sitter based parsers.
This makes sense for GitHub because they are a company providing web software (hence the JavaScript) which also needs the performance of system software (hence the Rust/C).
Using Tree-sitter
Now that we understand what is Tree-sitter for, we can start using it. There are actually several ways to take advantage of it. If you are interested in just using an existing parser, you can use a library in many of the languages for which there are bindings. The tree-sitter organization on GitHub has parsers for many languages. As a side note, they are both official languages and community-provided ones.
This is a good reason to use Tree-sitter:
- there are parsers available for many languages
- if you write a parser in Tree-sitter, you can process your parser and all other languages supported by Tree-sitter in one pipeline
However, take notice the quality and integrations with the respective ecosystems varies, for instance the Python binding works, but the Kotlin one it does not work well. When we tried it, they were not generated.
If instead you want to build parsers, you need to use JavaScript.
So, let’s start by installing the tree-sitter-cli globally via NPM.
npm install -g tree-sitter-cli
There are other options, including downloading the binary from GitHub or using a Rust crate, but this is the easiest way to install the software.
You can now:
- create a folder for your project, like
tree-sitter-storyfor this tutorial - create the project with
tree-sitter init. The first time you run it on an empty directory it will ask you some questions to create the project. Subsequent times will do nothing because it detects that a project is already there
Running the command you will see something like this.
Once you run the command, you will end up with something like this.
A folder with all the files to run, test and compile the parser.
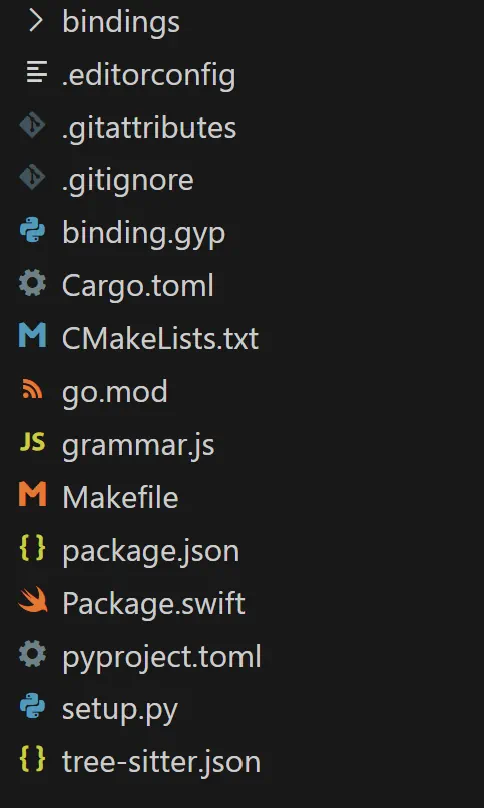
Exploring a Tree-sitter Project
It is useful to look around this newly created project, since the CLI relies on this project structure to fulfill its role. One thing that is missing from the generated project is a test/corpus folder. This should contain example files to validate your parser.
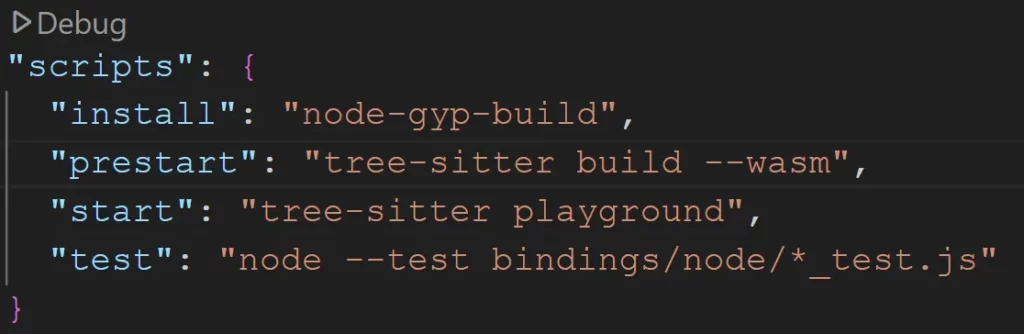
You can see a lot of language-specific build files, like CMakeLists.txt for C/CMake or pyproject.toml for Python. The C-related ones will build the main parser, while the other ones handle the bindings. You can control which bindings are created by going into the file tree-sitter.json and changing the bindings values.
"bindings": {
    "c": true,
    "go": true,
    "node": true,
    "python": true,
    "rust": true,
    "swift": false,
    "zig": false,
    "kotlin": false
  }
For instance, if you set swift to false and delete the Swift-related files, they will not be there when you run the command tree-sitter init --update. This does not seem to work perfectly though, because we tried to set kotlin to true, but nothing happened. You also cannot remove Rust or C.
The main project however is the JavaScript project, that relies on package.json. The file sets up the running of the tests and even to run the parser in sample editor (the command start).
You can do directly with the CLI, but the JavaScript project makes it easier. The main file you care about is grammar.js, which will contain your grammar. The default project has a grammar for a hello language, literally a language that accepts hello.
All you need to do now is to install the necessary dependencies with npm install.
The Tree-sitter Workflow
The CLI creates a working setup with a usable language, this means that you can already experience the basic Tree-sitter workflow:
- run
tree-sittergenerate to create the C parser under thesrc/folder. run npm test- run
npm startto launch a web editor to test your parser
Running the test and the web editor requires a C compiler and Emscripten (emcc) to compile the code to WebAssembly. If you have installed Docker on your system, running tree-sitter build --wasm will automatically pull and create a docker image that will contain Emscripten and will generate a WebAssembly module. If you are using Windows, it is better to use Windows Subsystem for Linux (WSL) to work with tree-sitter projects.
This is quite a simple workflow for such a powerful system. So, that is good. You could also run the command tree-sitter parse example.story to test the parser on a file. This would produce a parse tree, even if errors are present in the example file. This is useful to check that there are no errors, and also save you from the need to have Emscripten on your main development computer. However, it is complicated to analyze parse trees in terminal.
The playground web editor requires you to compile the generated parser in a WebAssembly module. So, if you cannot compile to WebAssembly in your development machine you will be forced to debug the grammar and explore the parser tree looking at the terminal.
Compare this view (from the terminal).
With this one (from the editor).
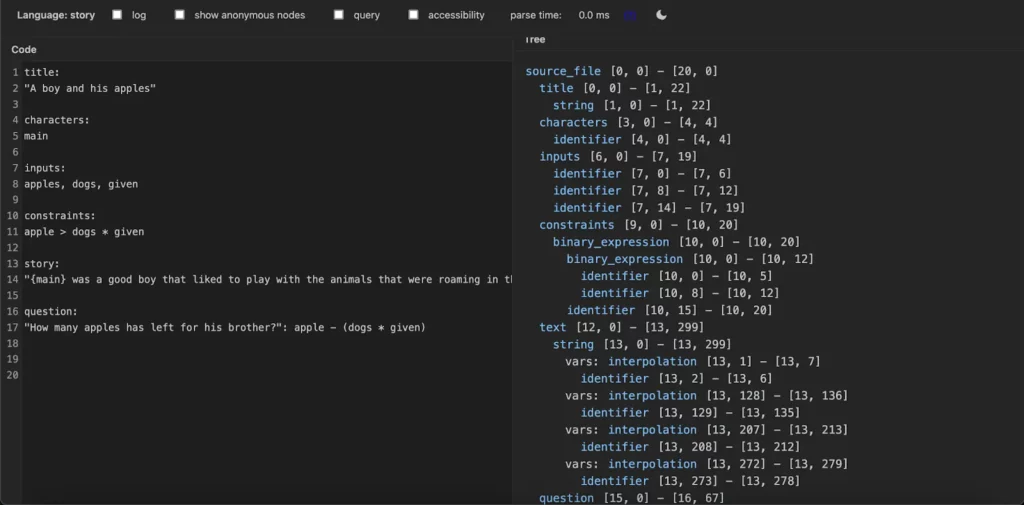
It is much more readable, and you can also click on the parse tree elements to highlight the source code that corresponds to them. In case you are wondering, the editor used for the playground is codemirror. You can use this editor by running tree-sitter playground, but you need to have a working grammar and generate a WebAssembly module.
Writing a Grammar
We now know how to use the software, how can you write a grammar? The short version is like in a parser combinator, but with a better organization. The longer version is the following section.
You write rules similarly to what you would do using a parser combinator, which is a software that provides parsing functions that you combine to parse things.
module.exports = grammar({
  name: "story",
  rules: {
    source_file: $ => seq(
      $.title,
      $.characters,
      $.inputs,
      $.constraints,
      $.text,
      $.question
    ),
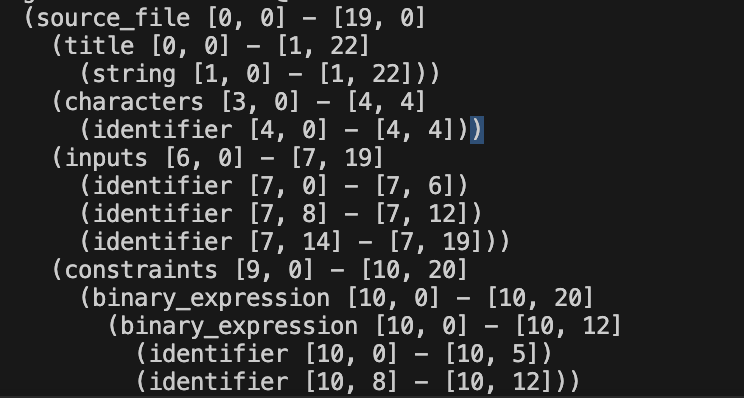
For instance, the start rule is source_file, which is also the first one you define. You can see that in our example the rule defines a seq(uence) of rules. This means that a file in our language must have all these elements in the correct order to be valid. The elements prepended by $. like $.title are a reference to other rules. What happens if the file is not valid?
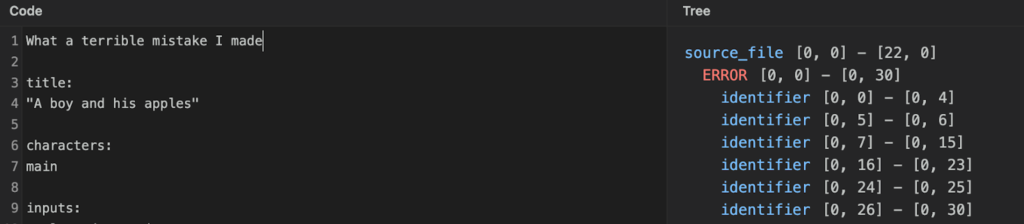
You get an error node, but the parsing continues unabated.
Parsing Lists
You can combine functions like seq, optional and repeat to parse something like a list of identifiers:
one, two, the_unbeareable_sadness_of_using_c
This is what they do individually:
- repeat parses zero or more of its arguments. If you want to parse at least one or more, you need to use repeat1.
- optional indicates that that part of the rule is optional
You can combine them with seq to parse a list in the rule. We do just that in _list, that we use when parsing the list of characters in our story and other rules.
    characters: $ => seq(
      'characters', ':', $._list
    ),

    _list: $ => seq(
      "(",
      optional(
        seq(
           $.expression, repeat(
              seq(",", $.expression)
           )
        )
       ),
      ")"
    ),
The rule _list shows how it is done:
- we start with
seq, because in tree-sitter a rule cannot match an empty string, so we start the sequence with delimiters like square brackets or parentheses. If you do not want delimiters you can make the list always contains at least one identifier. Basically, just the part between lines 8-12- this parses
(
- this parses
- we continue with
optional, because the list could be empty - we then use
seq - we continue with
$.identifier, on line 8, because we need to match the first element- this parses
one
- this parses
- then we use repeat because the first element can, but it does not have to, be followed by other elements
- we use
seq, on line 10, because these other elements are a sequence of identifiers, each separated by a comma- this parses
, two, the_unbeareable_sadness_of_using_c
- this parses
- we finally match the ending parenthesis
- this parses
)
- this parses
It seems complicated at first, but once you get the hang of it, combining rules became easy. And the availability of many ready-to-use grammars gives you the chance to see how to parse real programming languages.
One interesting think that we noticed is that Tree-sitter is stringent on forbidding to write rules that can match an empty string. When using a parser generator like ANTLR you may receive a warning about such rules, in Tree-sitter you cannot write rules like that all.
Parsing Expressions
Another common feature that you want to parse are expressions.
_expression: $ => choice(
      prec(1, seq('(', $._expression, ')')),
      $.identifier,
      $.number,
      $.binary_expression
    ),

    binary_expression: $ =>
      choice(
        prec.left(2, seq($._expression, ">", $._expression)),
        prec.left(2, seq($._expression, "<", $._expression)),
        prec.left(3, seq($._expression, "/", $._expression)),
        prec.left(3, seq($._expression, "*", $._expression)),
        prec.left(4, seq($._expression, "+", $._expression)),
        prec.left(4, seq($._expression, "-", $._expression)),
      ),
The main rule to accomplish that is _expression. It starts with the function choice, which means that the rule matches one of the options available. The first option is for parsing an expression between parentheses. That is what the seq('(', $._expression, ')' is for.
You can parse combined expressions in different ways. Imagine you want to evaluate an expression like:
1 + 2 * 3
Assuming you knew nothing about mathematics you could try to evaluate the expressions in the order that they appear, so 1 + 2 and then multiply the results for 3. However, we know that we must something different: you first need to evaluate the multiplication and then the addition, so you multiply 2 * 3 and then add 1. In other words, there is a specific order in which the expressions need to be evaluated, and your parser must be able to handle that.
This rule shows how you can do just that: it is wrapped in a prec method. There are also a prec.right and a prec.left method that could be used. The prec method indicates a precedence between expressions, the lower the first argument, the higher the precedence is. Higher precedence means that is picked before options with lower precedence.
If you do not use this method, the precedence for all options is set to 0. So, the way we have written the rules, it means that parentheses would have a lower precedence than other alternatives. This has no effect on this particular case, since the option with parentheses is not ambiguous with respect to any other option.
The binary_expression rules employs the method prec.left, which combines precedence with associativity. Associativity determines in which order expressions using the same operators are evaluated. For instance:
1 * 2 * 3
Do we mean (1 * 2) * 3 or 1 * (2 * 3)? By picking left associativity we pick the first interpretation. It is a similar concept to order of precedence but determine the order for expressions of the same type.
Most common mathematical operators are left-associative, but exponentiation is right-associative.
Lexing Rules
Before moving on to see the last interesting feature of our grammar, we need to see how Tree-sitter implements lexing: it does it with regular expressions, the end.
Ok, we need to tell something more. A parser rule tells the parser how the input is organized. For instance, what sequence of elements defines a list. However, the parser does not handle the source code directly. The parser handles tokens. The lexer transforms the source code into tokens using its own rules, the tokens are then evaluated using the parse rules.
Imagine this process applied to a natural language such as English. You are reading the single characters, putting them together until they make a word, and then you combine the different words to form a sentence. Words in English are like the tokens that are analyze to form the sentence (parser rule).
For instance, the sequence of character 91 becomes the token number, the sequence of characters if becomes a token if.
This is what you need to know about the difference between lexing and parsing to write Tree-sitter parsers, if you want to go deeper, we recommend reading our introductory article about parsing.
The way Tree-sitter defines tokens is with strings or regular expressions. We have already seen how you can use strings, like parsing expressions. We have indicated the tokens for operators (like ">" or “+”) directly into the parser rules.
This works well for tokens that you are going to use just once. For frequent tokens you want to define them separately.
For instance, this is how you create tokens for identifies and numbers.
    identifier: $ => /[a-zA-Z_]+/,

    number: $ => /\d+/
You can use regular expressions, as you would in regular Rust. Yes, this is not a typo. You are defining using the JavaScript syntax, so they are wrapped in slashes, but they are actually powered by the Rust regular expression engine.
This is relevant, because there the Rust engine has some limitations compared to that of JavaScript. In addition to that, they are far more stringent limitations related to performance needs.
You can only use regular expressions in the computer science sense. By that we mean that they follow the computer science definition of a regular language, so they do not support features like lookahead and lookaround. The short version is that you cannot define regular expressions that select elements based on other parts of the string, such as “find the second comma in this string”. We point you to the same introductory article we mentioned before, if you want to know more about what regular language means in computer science.
This is a design choice by the Tree-sitter designers to guarantee a certain level of performance. In fact, Tree-sitter grammars are LR(1) grammars, which means that the parser should be able to decide which rule to match only looking one symbol ahead of the current one that the parser is analyzing. This puts some restrictions on the rules you can write and this is one of them.
Another peculiarity of Tree-sitter lexing is that whitespace, like spaces or newlines characters, are already handled by the engine. So, you do not need to create specific rules to handle them. And what about elements where handling whitespace is necessary, such as indentation in Python? You need to define an external lexer (also called scanner) in C, using the Tree-sitter API.
This is quite different from a parser generator like ANTLR, where you can add custom code in any target language supported by ANTLR. Both methods have advantages and disadvantages:
- with ANTLR, you can write custom code in any language, but this also means that the whole grammar is not language-independent anymore. So, if you write custom code in Java in your grammar, you can only generate a parser in Java for your language
- with Tree-sitter, you must use C, which requires you to be proficient in it. On the other hand, the parsers are always generated in C, and interoperability with other language is achieved through bindings
Effectively this means that Tree-sitter is a perfect fit, only if your organization is already using C or it can handle it. For such users, Tree-sitter is a quicker and more efficient way of creating parsers usable in many languages.
Now, we can go back to looking at the parser.
A Simple Way to Parse Interpolated Strings
    _inner: $ => choice(
      field("text", token(/[ \r\n\.\,\?a-zA-Z]+/)),
      field("vars", $.interpolation)
    ),

    string: $ => seq(
      '"', repeat1(
        $._inner
      ) , '"'
    ),

   interpolation: $ => seq(
      '{', $.identifier, '}'
    ),
Our language also enables string interpolation. We use the rules string, _inner and interpolation to achieve that. The rule string does not use any new parsing function. We are parsing a sequence of elements starting with the double quotes and ending also with double quotes. In the middle there are one or more elements captured by the rule _inner.
This rule starts with a choice, so it matches one of two alternatives. The function field does not affect parsing per se, but the concrete syntax tree created by a tree-sitter parser. It allows us to give a specific name to each element matched by the subrule. In this case we name text the free text between the double quotes and vars the interpolated element.
There is another interesting part of this rule: we use the function token. Usually Tree-sitter create a separate token for each match of a token rule. For instance, the regular expression that is the argument of the function token matches all text, including words and symbol. If you put into a separate rule Tree-sitter will create separate text tokens between each interpolation.
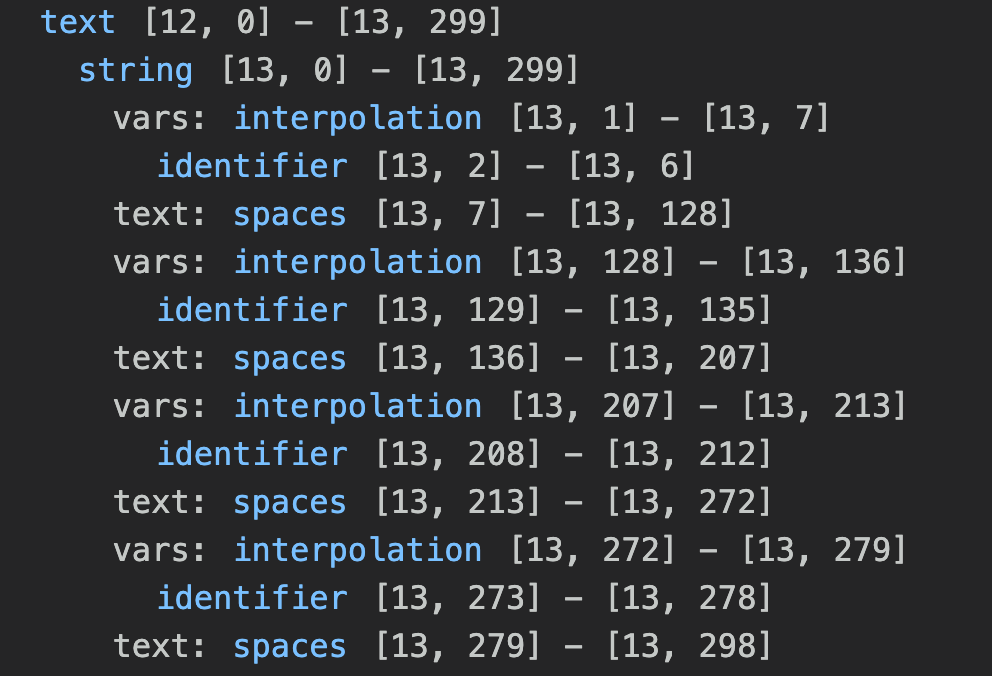
By using the token method, instead we create just one text token.
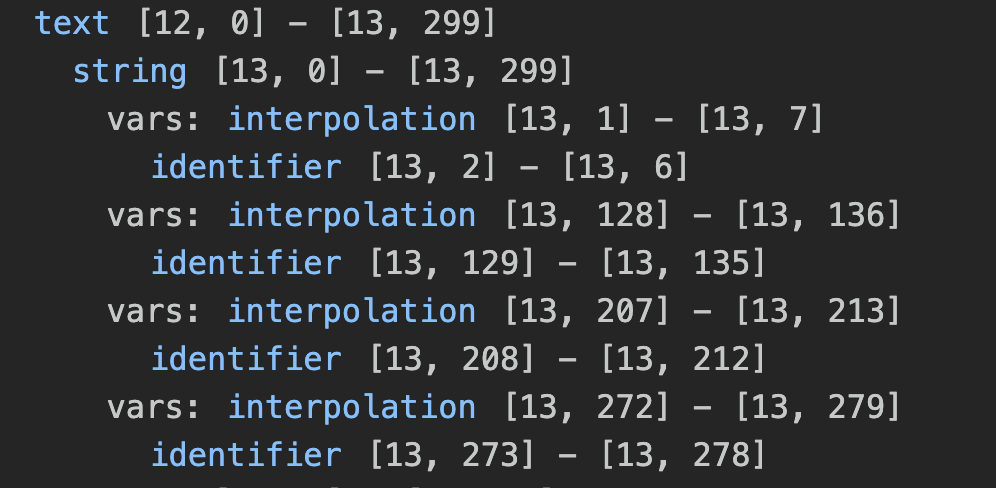
The token method accepts only terminal rules, so you cannot reference other rules. You need to define everything you need inside the token method.
Finally, the rule interpolation is just a sequence of one identifier wrapped between two angle brackets.
The Word Token
Tree-sitter uses context-aware lexing, which means that it performs lexing on-demand, during the parsing process. It tries to match the current input only with tokens that are valid in the particular context is parsing at the moment. That makes it more robust than your typical lexer technology, but this is not necessarily a good thing.
The problem becomes evident when you think about the following example. The language C# has an is operator, which checks whether an expression is compatible with the specified type. For example, the following code checks whether the variable c is a string.
c is string
So, writing this code is invalid.
c isstring
That is because a traditional lexer would match isstring as one identifier. Thanks to its context-aware approach, instead, Tree-sitter would correctly match both is and string. This makes some invalid code looks valid.
You can avoid this issue using a feature called keyword extraction.
You would first use the property word to identify a specific token before defining the rules.
module.exports = grammar({
  name: "story",
  word: $ => $.identifier,
  rules: {
     // ..
     identifier: $ => /[a-zA-Z]+/,
  }
In this case, we use word to identify the rule identifier. This will tell Tree-sitter that it should consider all literal tokens as keywords. For instance, given this rule:
   question: $ => seq(
      'question', ':', $.string,
      ':', $._expression
    ),
The literal question would become a keyword. During lexing, Tree-sitter will try to scan for identifier before trying to match the keyword and therefore would match isstring rather than is. This would allow it to correctly recognize the code as invalid.
Parsers Built For Editors
An interesting thing to note is that every rule that starts with an underscore will be invisible in the parse tree. We have seen examples like_list and _expressions. This allows you to both create a well organized grammar, but also make sure that the parse tree is still readable. This is a small feature, but it is a nice one, if you are building an editor.
You typically want to use this feature for repeatable fragments, like defining a list, or for nodes that capture a single choice among many options, like an expression, which can be one of many kinds of expressions.
This is not the only feature designed for editors. Tree-sitter comes with support for syntax highlighting and tagging elements. Both of these rely on defining rules inside specific files using query patterns.
You can think about tagging elements as a lightweight form of symbol resolution: you are going to define patterns to power a feature such as Go To Definition.
You are going to define these patterns using the query language: you are going to describe the shape of a tree that matches what you want. For instance, you are going to say that all identifiers inside an interpolated string are references.
Highlighting is Included
All you need to implement syntax highlighting is defining patterns and add a setting, Tree-sitter will do the rest. Let’s start with the setting to be added in tree-sitter.json, in the grammars section, next to injection-regex property.
"highlights": "queries/highlights.scm"
The path, name and extension of the file are the standard values for a Tree-sitter grammar. You can use whatever you want, but published Tree-sitter grammar will use this value.
You can now create the directory queries and the file highlights.scm and put there this content.
(identifier) @variable

[
  "title"
  "characters"
  "inputs"
  "constraints"
  "story"
  "question"
] @keyword


; Identifiers

; Literals

[
  (string)
] @string

[
  (number)
] @number

(interpolation
  "{" @punctuation.special
  "}" @punctuation.special) @embedded

; Operators

[
  ","
  ":"
] @punctuation.delimiter

[
  "("
  ")"
] @punctuation.bracket

[
  ">"
  "<"
  "+"
  "*"
] @operator
As you can see, it is all quite simple:
- you define a query to identify the nodes captured (eg.,
(identifier)) - you assign it a highlight name (e.g.,
@variable)
A query uses a Lisp-like syntax (i.e, an S-expression) to define a pattern that, if matched, will make Tree-sitter assign the highlight name to the nodes. To indicate a node, you put its name between parentheses. In the case of a literal token, you can just type the literal (e.g., “{“).
While you can make queries as complicated as you like, queries for syntax highlighting are fairly simple. You can see for yourself the queries for a real language like Ruby, are not much more complicated than what you see here.
(interpolation
    "{" @punctuation.special
    "}" @punctuation.special) @embedded
The query to highlight the interpolated element is the most complicated in our example. And even that is fairly simple. We are saying that inside an interpolation node there are curly brackets that must both be assigned the punctuation.special highlight name. The whole interpolation node should have the highlight for embedded.
We do not need to highlight here the identifier inside the interpolation node, since that is already highlighted by our first rule in the file, which captures all identifier nodes.
You can try to modify the query to give a specific name to the identifiers inside interpolation.
(interpolation
    "{" @punctuation.special(identifier) @number
    "}" @punctuation.special) @embedded
We are giving it the name number just to make it easily distinguishable in the following screenshot.

The interpolated identifiers are colored a light orange/brown. You can see the results of highlighting using the command tree-sitter highlight example-file.story. Assuming you have created an example-file.story with some code on your system.
If you restore the previous query, instead you get this result for the whole file.
All identifiers, inside or outside an interpolation are colored white.
What about the highlight names?
Are they arbitrary?
Who picked the colors?
We are going to answer all of your questions. If you try to run tree-sitter highlight you will be prompted to run
tree-sitter init-config
Which will create a standard configuration file with some default colors for standard highlight names. You can actually use any arbitrary name, but if you use standard ones you will not have to define colors for yourself or your users. So, there is a strong incentive to use standard names. You can find a list of standard name in the repository of tree-sitter highlight.
Tagging Elements
Queries also power another features called tags. You should start the same way of syntax highlighting, adding a property inside tree-sitter.json.
"tags": "queries/tags.scm"
You can then create the file queries/tags.scm and start writing your queries.
; Variable definition

(characters
	people: [
    	(identifier) @name
	]
) @definition.module

; Calls

(text
	(string
     	(interpolation
         	(identifier) @name
     	)
)) @reference.call
The principle is the same as for syntax highlighting: you define tree patterns and assign names along the way. You can see the list of standard names in the documentation. The patterns tend to me more complicated because the scope is different.
While it is clear what syntax highlighting does, it is not obvious what is tagging. We think the easiest way to explain is that it powers features like Go To definition in your editor.
It is not technically a form of symbol resolution, because you are not trying to solve the symbols. You are just trying to look at the tree in each file and collecting things that can be referenced, like modules or classes, and references, like method calls. An editor that supports Tree-sitter grammars can then look through these lists when you click the button Go To. It is the best you can do, with a standard approach and without having to actually perform language-specific symbol resolution. You can think of it as syntax resolution: gaining all the information you can just by looking at the tree itself.
Testing
Tree-sitter also comes with specific support for testing. There is testing for syntax highlighting and tagging, but we are going to take a look to testing for the grammar itself.
Using the magic of default directories, you can add test inside the directory test/corpus. The extension is not relevant, typically you use .txt. You do not want to use the extension for your language, because the file will not be a valid one for your language.
So, you create a file like test/corpus/structure.txt, the name should be meaningful to your test.
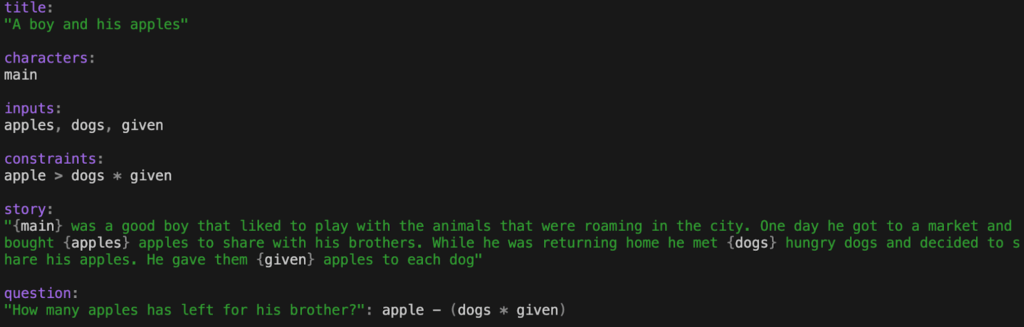
==================
Structure
==================

title:
"Hello story"

---

(source_file
  (title
	(string)
  )
)
Then you add three sections:
- name of the test, between the lines of
= - the example source code
- the tree that the parser should create when given the source code. The tree is defined like a query, but it should match the whole example
In case you are wondering, for this example we changed the grammar to have most elements as optional. We did this in order to make the example easy to see at once.
Setting Up the Parser in Python
We have seen how to define a grammar, including syntax highlighting and tagging elements. All that remains is to show how to use a parser.
Tree-sitter provides various binding, so we are going to test Python. A word of warning, not all Tree-sitter software (like the CLI) and libraries are released at the same time. For instance, if you try to run a parser generated with the latest CLI (version 0.25.2) and the latest tree-sitter library in Python, you would receive a warning like this one:
ValueError: Incompatible Language version 15. Must be between 13 and 14
Therefore, if you want to run our example, you should use the 0.24.0 version of Tree-sitter.
Assuming you have the right versions of the libraries, you can build the parser from the grammar with the command tree-sitter build. You should have already generated the grammar with tree-sitter generate.
You can now install your parser as a local library with:
python .\setup.py install
You would also need to install other requirements, if they are missing.
pip install setuptools

pip install tree-sitter
Finally Parsing
Once you have set up everything, parsing is easy.
import tree_sitter_story
from tree_sitter import Parser, Language

def parse():
   language = Language(tree_sitter_story.language())
   parser = Parser(language=language)

   # Example source code
   with open("./example-file.story", "rb") as file:
       source_code = file.read()

   # Parse the source code into a tree
   tree = parser.parse(source_code)

   # Walk the tree from the root
   walk_tree(tree.root_node)
All you need to do is to set your language and pass it to the standard Parser class of tree_sitter. Using the parse method, you obtain a CST (Concrete Syntax Tree) that you can walk.
The method walk_tree is not a standard method of Tree sitter, but it uses the three standard walking methods to walk the tree.
def walk_tree(node):
   cursor = node.walk()
   visited = set()
   depth = 0

   while True:
       if cursor.node.id not in visited:
           visited.add(cursor.node.id)

           print(f"{depth * ' '}({cursor.node.type}  "
                 f"Start: {cursor.node.start_point}, "
                 f"End: {cursor.node.end_point}"
                 f"Text: {cursor.node.text.decode()[0:12]} {'...' if len(cursor.node.text.decode()) > 12 else '' }"
                 f")")

       # Traverse the tree
       if cursor.goto_first_child():
           depth += 1
           continue

       while not cursor.goto_next_sibling():
           if cursor.goto_parent():
               depth -= 1
           else:
               return
These methods are:
goto_first_childgoto_next_siblinggoto_parent
Their names are self-explanatory, using them you can navigate any tree. That is simply because every node can have some children and at most one parent node. The root node, of course, has no parent.
These methods return false if they are not successful, for example goto_first_child return false if the current node has no children. If the node has no children the cursor cannot move to the first child of the current node.
The cursor is nothing else that the current node: when you start the walk the current node is the root node. Then the current node is changed by walking the tree.
Navigating with Queries
Usually you walk the tree to find some node you are looking for. Tree-sitter offers another way to accomplish that: using queries.
You can define a query and then ask Tree-sitter to find the matching nodes given a root node.
query = """(interpolation
           "{"
               (identifier) @interpolated
           "}"
           )"""

query_obj = language.query(query)
captures = query_obj.captures(tree.root_node)
for name in captures.keys():
   for node in captures[name]:
       print(node.text.decode())
You define a query just like you did when defining rules for syntax highlighting or tagging.
Next, you build the query object and obtain the results, for the given tree.root_node. We assume that you are re-using the root_node we obtained from parsing in the previous section.
You obtain a dictionary having as keys the name of the query elements (e.g. interpolated) and as values the list of nodes that matches the query.
If you run this code, it will print the list of identifiers inside the text string.
main
given
apples
dogs
Summary
We have explored Tree-sitter, a great parser generator library. We have seen how to create a parser, add support for syntax highlighting and tagging.
Finally, we have seen how to use the generated parser from Python; how to walk the tree and find specific nodes using queries.
That is not all there is to Tree-sitter, you can find more reading the official documentation. For example, one thing we did not show is how to add tokens using an external scanner, because that requires defining the scanner in C.
Tree-sitter is a good software, with excellent performance. It also comes with support for highlighting and tagging elements. This makes it great for its intended use: providing language support in editors or similar tools to navigate code. For instance, it powers the GitHub tool that allow you to find symbols in the online code viewer: semantic. They explained why they picked tree-sitter. They list many advantages, such as:
Secure and well-tested. We’ve actively invested in fuzzing and other security measures to properly deal with corner cases.
And some drawbacks:
Support for Unicode is currently lagging.
Of course, not everything listed there could be applicable to your use case, but it is a useful expert opinion on Tree-sitter strong and weak points.
In short, it is designed to quickly create parsers that you can use in a pipeline of software to handle generic concrete syntax trees. In theory, it would be great to use for things like providing code completion. However, unlike ANTLR, nobody created a generic code completion engine to get code completion for free from any grammar. So, we would probably use ANTLR for that. It is a bit slower and less robust to errors, but the advantage of having a ready-to-use code completion engine is hard to beat.
Another issue we encountered with tree-sitter it seems that is used mainly by GitHub. So, it is less tested in environments that they do not use. It is actively developed, which means that community supported parsers sometimes broke and nobody is tending to them. This is not an issue if you just care about your parser, but that means that the ecosystem is less valuable to you.
You can find the repository with the code for this example at tree-sitter-story.