")
In the world of transpiler development, a type of compiler that takes source code written in one programming language and converts it into another programming language, the ability to navigate between the original code and the generated code can greatly enhance the developer’s experience. In this article, we will explore a solution of using the Language Server Protocol to bridge the gap between two distinct programming languages; IBM RPG and Python programming language. The article will showcase the benefits and practical applications of this solution, and provide a comprehensive guide on how to implement it in your own projects.
This article presents a basic implementation of a Visual Studio Code extension that makes use of a Language Server and a Language Server Index to track the relationship between code generated by an RPG to Python transpiler based on the RPG parser and Python code generator. Both components, the parser, and the code generator have been developed using Kolasu, a Kotlin open-source framework created and maintained by Strumenta, designed to support the implementation of Abstract Syntax Trees (AST) providing functionality to define, navigate and transform the AST.
Kolasu is part of the StarLasu project that provides the same functionality in other languages such as Typescript and Python. It should be noted that the code presented is this article is not a full implementation of a compliant LSIF, and a more comprehensive implementation is beyond the scope of this article.The Language Server Index Format (LSIF, pronounced “else if”) is a file format for describing the structure of a codebase and the relationships between different elements within it. It is designed to enable developers to quickly navigate and understand large codebases, and to support features like go-to-definition, find-references, and so forth.
The Language Server Index Format
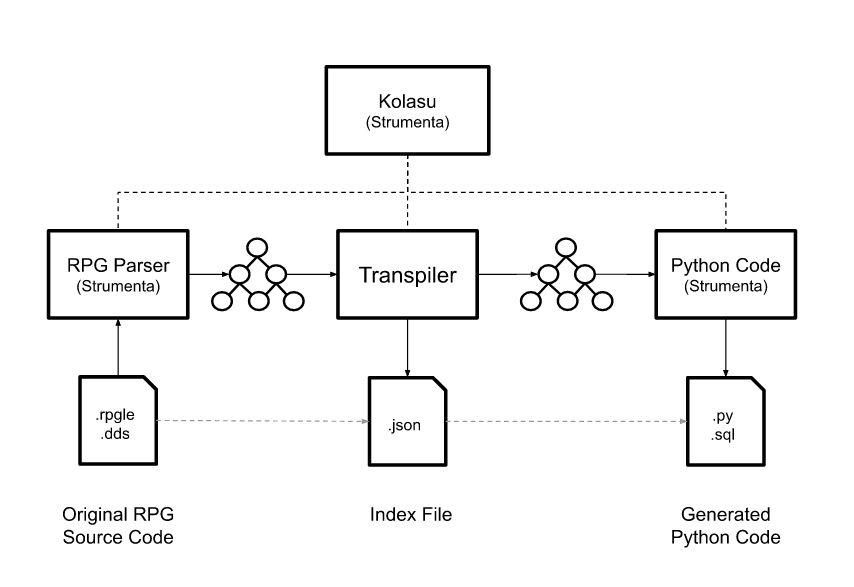
The main idea behind LSIF is to have a common language-agnostic format to represent code information that can be used in different programming languages. This allows for different tooling to be built on top of the same data, making it easier to share and reuse code intelligence across different IDEs and other tools. LSIF also provides a way to handle the scalability problem, The language servers need to analyze (parse) the codebase to provide code intelligence. Having a pre-generated index file allows for skipping the process of analyzing the codebase every time, which could be slow and resource-intensive. In short, LSIF aims to improve the developer’s experience by providing easy access to code intelligence information across different tools and languages and making it more efficient by using pre-generated index files. The following diagram provides an overview of the overall architecture presented in this article, in particular, the translation from an IBM RPG source code (.rpgle) to a Python source code (.py).
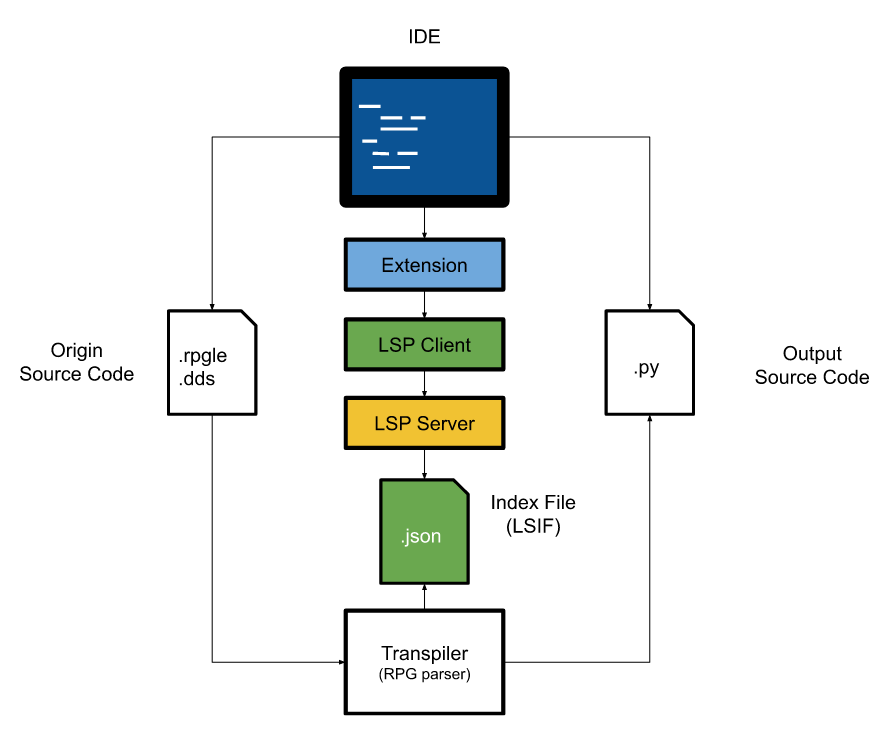
The IDE implements an LSP Client to communicate with the LSP Server. The message exchanged between the client and the server follows the standard LSP protocol. In addition, the IDE allows users to read and display the Original Source code and the Output source code. The transpiler is responsible for the source-to-source conversion and in addition to the output code it generates an index file (.json) which stores the cross-reference information between the original source code and generated code. In this particular case where an RPG program is translated into a Python program, the index file contains information about what Python statements have been generated from a particular RPG statement (or statements) and vice versa.
The Language Server Protocol
The main benefit of the Language Server Protocol is that it enables the implementation of cross-platform and cross-language development tools for code editors and integrated development environments (IDEs). This standardized protocol allows seamless integration of language-specific tools, such as code completion, go-to-definition, linting, and hover information, into a common development platform. It also defines a standard way for the client to provide context information to the server, such as the location of the cursor in the code of the currently open file. Additional information about the Language server protocol is available in this article.
The diagram below illustrates the message exchanged between the client and the server when a user opens a file in the IDE, then positions the cursor on a symbol and requests the symbol definition.
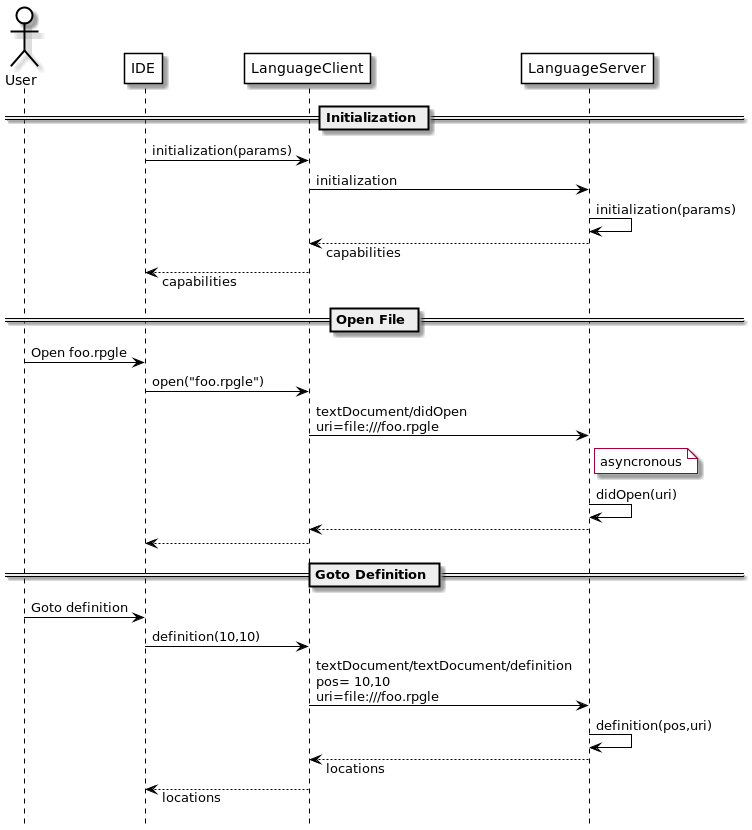
The initialization of the LSP is the process by which the language server and a client establish a connection and exchange information to prepare for communication.The initialization process has two steps:
- The client sends an initialize request to the language server, providing information about the client’s capabilities and the current state of the code editor, such as the location of the cursor in the code and the URI of the currently open file.
- The Language Server responds with a server capabilities response, providing information about the server’s capabilities, such as which languages it supports, additional information that the client needs to know, such as the version of the language server, the messages supported and any additional settings that can be configured.
Once the initialization process is complete, the client and server can begin sending and receiving standard LSP messages, such as requests for code completions, definition requests, or error diagnostics. In the second interaction, the user opens a file (foo.rpgle) and the IDE Language Client sends a didOpen message to the Language Server. The didOpen message contains information about the file that has been opened, such as the file’s URI. The Language Server uses this information to analyze the file and to compute code intelligence features. It’s important to note that the didOpen message is not used to open the file on the server side, it’s used to notify the server that a file is opened on the client side so that the Language Server can run the appropriate language-specific code analysis algorithms and provide the code intelligence features. In the next interaction with the IDE, the user positions the cursor in the code and selects the Goto Definition menu item. This action triggers the definition message which is sent by the client to the server to request the definition of a symbol at a specific location in the code. The request contains the file URI and the position of the cursor in the code. The server processes the request by analyzing the code and providing a response with the location of the symbol definition. The location can be in the same file or in another file, and can also contain multiple locations if the symbol is defined in multiple places. The code analysis required to compute the location of the definition may result in traversing many Abstract Syntax Trees which can be not very efficient. The use of pre-generated Language Server Index files can improve the performance and scalability of the language server. Additional information about the messages supported by the LSP can be found in the official documentation.
Cross-Language Code Navigation
In addition to the common code intelligence that can be implemented within the Language Server for development purposes (such as autocompletion and error checking), working with transpilers to migrate legacy code involves a lot of back-and-forth navigation from the original and the generated code. The LSP protocol does not include a specific message to map a source code to another source code, it would be necessary to develop a custom message. Although it is possible to implement custom LSP messages, to add new functionality to the language server or customize the behavior of the client it is required that the custom message follows the LSP message structure and format and ensures that both the client and server are compatible with the custom message. Another option would be to reuse an existing and already defined message adding additional parameters to trigger the new functionality, which is much simpler to implement. For example, to navigate from the RPG source code to the corresponding Python-generated code it would be nice to point to the statement of interest, right-click, and select Goto Generated Code.
The same functionality would be applied to the generated Python code to jump back to the Original RPG code.
To implement such functionality we can make use of the standard definition message appending an additional parameter to the file URI. There is a second advantage to this solution: when dealing with a Python file the IDE would interact with the Python Language server which does not support the cross-navigation functionality. I would be required to modify the Python language server, which is not an option. The simple way to implement this feature is to create a custom menu entry that sends both requests to our language server implementation.
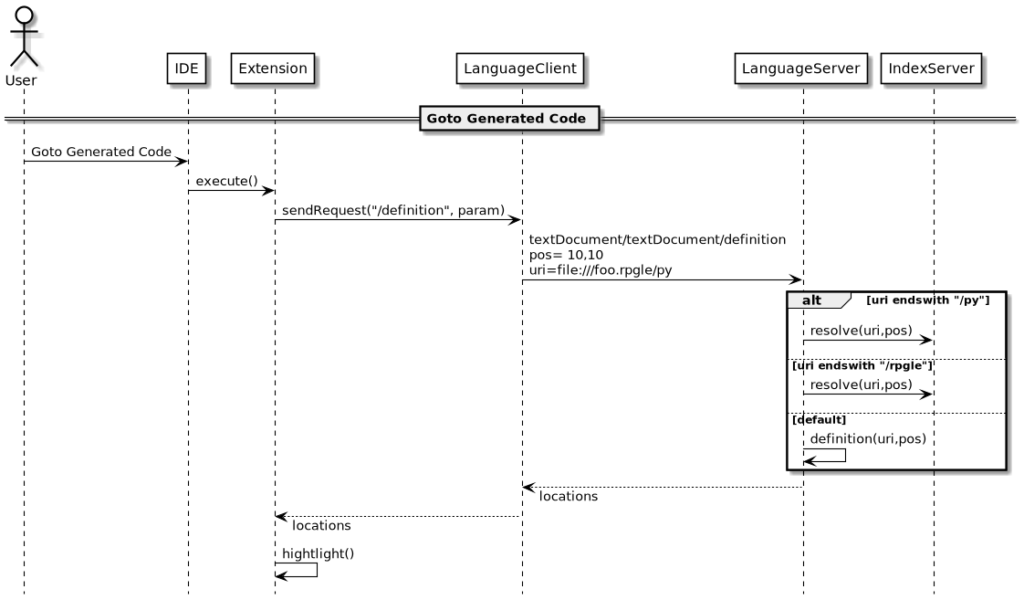
The extension implementation, based on the context will append a postfix “/py” or “/rpgle” parameter to inform the language server that the functionality requested is the cross-navigation between the source code. Based on the param the Language Server will retrieve the location and the ranges using the entries within the index, if the parameter is not specified it means the client requested a standard definition and the Language Server will return information about the symbol.
Structure of the Index
In order to understand the structure of the index it is necessary to provide a little background information about how transpilers work. The two main components are the Strumenta RPG Parser and the Python Code Generator, both based on the Strumenta open-source Kolasu framework. The Kolasu framework provides support for the AST definition, navigation, and transformation.
The RPG parser processes the input RPG source code, including the DDS required for symbol resolution and produces the AST representing the code. The generated AST is submitted to the transpiler that performs the necessary transformations to create the AST representation of the target code in Python. The structure of the Python AST depends on runtime, which Python libraries will support the runtime environment and it is usually a custom development. Optionally, in the case of DDS it is possible to generate the corresponding SQL for logical and physical RPG files. The transpiler is also able to generate the Index File for the cross-language reference leveraging on the features of the Kolasu. In Kolasu, each node of the AST contains position information about the position and the range of the statements in the original source code. This position information is populated during the parsing phase. The transpiler, while computing the target AST, which is also based on Kolasu, populates the origin property of the target AST node creating a link between the two AST.

After the code generation, in the target Python AST both the position and the origin are populated. The origin contains the position on the original RPG code and is simply copied for the original node; the position is calculated during the Python code generation. Now that the target AST contains all the required information it is possible to traverse the target Python AST and generate the cross-reference between the RPG and the Python code. The physical file structure of the cross-reference is basically a map that contains the URI of the file and a map of line numbers and source code ranges. The diagram below shows the structure of the index file for the previous example.
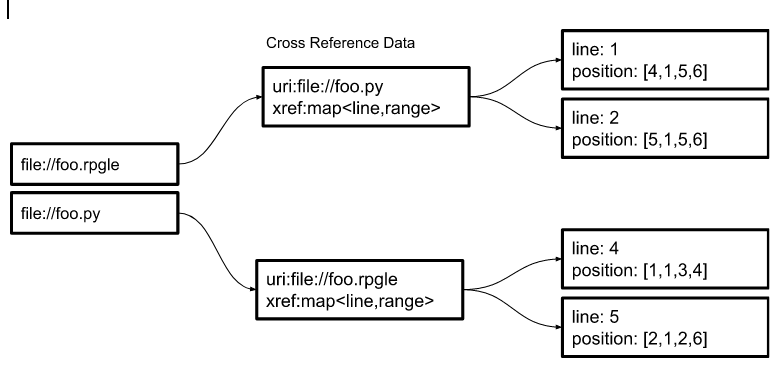
The repository contains a map of the URI of the files pointing to the Cross Reference Data which contains the name of the corresponding generated file URI and the map of the corresponding positions. The position map consists of the line in the original code as key and the position in the target code as the corresponding position. For example, by positioning the cursor at line 1 in the foo.rpgle file the Cross Reference Data contains the URI of the target Python file (foo.py), and line 1 corresponds to the code between line 4 column 1 to line 5 column 6.
LSP Client
The source code of the project is available on GitHub and includes the Visual Studio Code extension source code and the Language Server in Kotlin. The first step in the extension implementation is to set up the Language server client.
export async function activate(context: vscode.ExtensionContext) : Promise<void> {
  const initTasks: Promise<void>[] = [];

  /* Language configuration */
  vscode.languages.setLanguageConfiguration("rpgle", {});
  const lsConfig = vscode.workspace.getConfiguration("rpgle");

   initTasks.push(withSpinningStatus(context, async status => {
      await activateLanguageServer(context, status, lsConfig);
    }));
    await Promise.all(initTasks);
}
The activateLanguageServer function performs the initialization of the LSP client The Kotlin LSP server is written in Kotlin it is launched using the sample-xcode-server script located in the languageServer.path specified in the configuration. When the server is executed it performs the initialization sequence as mentioned early.
async function activateLanguageServer(context: vscode.ExtensionContext, status: Status, config: vscode.WorkspaceConfiguration) {
	console.log("Activating Language Server...");


    // The language server must be in the bin directory
	const languageServerPath : string =  config.get("languageServer.path")!;
    // The language server must be in the bin directory
    const startScriptPath = path.join( languageServerPath , "bin", "sample-xcode-server" + ((process.platform === 'win32') ? '.bat' : ''));
    console.info("language server path: " + startScriptPath)

    if (isOSnix()) {
        child_process.exec(`chmod +x ${startScriptPath}`);
    }

    const outputChannel = vscode.window.createOutputChannel("RPG");
    context.subscriptions.push(outputChannel);

    let env: any = undefined;
    const options = { outputChannel, startScriptPath, env };
    languageClient = createLanguageClient(options);

    // Create the language client and start the client.
    let languageClientDisposable = languageClient.start();
    context.subscriptions.push(languageClientDisposable);

    await languageClient.onReady();
}
The next step is to implement the two commands for the cross-code navigation, Go to Generated Code and Go to Original Code in the context menu available when right-clicking on the source code. To add a context menu item in a Visual Studio Code extension, you need to create a new command and register it with VS Code. Once the command is registered, it will appear in the context menu when the user right-clicks on the editor. In the package.json file of your extension, add the command name to the contributes.menus section. This will make the command appear in the context menu.
"commands": [
      {
        "command": "language-server.origin",
        "title": "Go to Original Code"
      },
      {
        "command": "language-server.target",
        "title": "Go to Generated Code"
      }
    ],
    "menus": {
      "editor/context": [
        {
          "when": "resourceLangId == rpgle",
          "command": "language-server.target",
          "group": "navigation"
        },
        {
          "when": "resourceLangId == python",
          "command": "language-server.origin",
          "group": "navigation"
        }
      ]
    }
The when clause allows specifying when the option in the context menu’ should be visible, in our case we want the Go to Generated Code available on RPGLE files and Go to Original Code when editing a Python file. In the extension code, we create a new function that defines the behavior of the command, in the activate function we register the command with VS Code by calling the registerCommand function and passing in the command name.
export async function activate(context: vscode.ExtensionContext) : Promise<void> {

        ...
	let gotoGeneratedCode = vscode.commands.registerCommand('language-server.target', async (files?: vscode.Uri[]) => {
		let fext = extractExtension(vscode.window.activeTextEditor?.document?.uri.fsPath!);
		if(fext == "rpgle") {
            executeCrossReferenceRequest("file://" + vscode.window.activeTextEditor?.document?.uri.fsPath+"/py")
        }
    } );


    let gotoOriginaldCode = vscode.commands.registerCommand('language-server.origin', async (files?: vscode.Uri[]) => {
        let fext = extractExtension(vscode.window.activeTextEditor?.document?.uri.fsPath!);
        if(fext == "py") {
            executeCrossReferenceRequest("file://" + vscode.window.activeTextEditor?.document?.uri.fsPath+"/rpgle")
        }
    });


	context.subscriptions.push(gotoGeneratedCode);
    context.subscriptions.push(gotoOriginaldCode);
	//context.subscriptions.push(disposable);

}
The executeCrossReferenceRequest perform the request to the language server to obtain the cross-reference data and to open and select the generated code. The client sends a textDocument/definition message to the server, with an additional py or rpgle parameter to specify the action required. The language server will access the index file to retrieve the location of the corresponding generated code returning the URI and the position within the code.
async function executeCrossReferenceRequest(uri : string) {
    let curPos = vscode.window.activeTextEditor!.selection.active;

    console.log(uri);
    console.log(curPos);

    let param = {
        textDocument : TextDocumentIdentifier.create(uri),
        position : curPos,
        partialResultToken : undefined,
        workDoneToken : undefined
    };

    languageClient.sendRequest("textDocument/definition", param)
        .then(
            (data : any) => {
                console.log(data);
                let fileUri = vscode.Uri.file(data[0].uri)
                let start = new vscode.Position(data[0].range.start.line - 1, data[0].range.start.character)
                let end = new vscode.Position(data[0].range.end.line - 1, data[0].range.end.character)
                vscode.window.showTextDocument(fileUri, { preview: true }).then((editor) => {

                    var range = new  vscode.Range(start,end);
                    editor.revealRange(range)
                    editor.selection = new vscode.Selection(range.start,range.end);

                    let timerId = setInterval(() => {
                        clearInterval(timerId);
                        editor.selection = new vscode.Selection(range.start,range.start);
                    }, 1000);
                })

                }
            )
        .catch(
            reason => console.log(reason) );
    }
LSP Server
The Kotlin language server is launched by the extension when it started and as described earlier in this article performs the initialization. During this phase, the server searches for the index files (with an extension idx) and submit the task to a worker pool.
class RPGLanguageServer : LanguageServer, LanguageClientAware, Closeable {
    ...
    private val workerPool : ExecutorService = Executors.newFixedThreadPool(Runtime.getRuntime().availableProcessors())


    override fun initialize(params: InitializeParams): CompletableFuture<InitializeResult>  = async.compute {
        LOG.info("initialize")

        val extensions = listOf("idx")
        params.workspaceFolders.forEach { ws ->
            val directory = File(URI(ws.uri))
            val files = directory.walk().filter { it.isFile && extensions.contains(it.extension) }.toList()
            LOG.info("Adding workspace ${ws.uri} to source path ${directory.exists()} ${files.size}")

            if(directory.exists()) {
                files.forEachIndexed { i, file ->
                    val progressPrefix = "[${i + 1}/${files.size}] ${file.name}"
                    val progressPercent = (100 * i) / files.size
                    progress?.update("$progressPrefix: Updating source path", progressPercent)

                    workerPool.submit(RPGParserRunner(file,this))

                    LOG.debug("Adding file ${file.absolutePath} to workspace")
                }
            }

        }
        progress?.close()
        val clientCapabilities = params.capabilities
        InitializeResult(serverCapabilities)
    }

    ...

}
The indexes are .json files that contain the cross-references between the source files and are loaded by the RPGParserRunner and stored within the Repository. The code presented in this example is loads only the index files, but in this phase, it would be possible also parse the source code, create the AST, resolve the symbols and add to the repository additional information to provide code intelligence such as hover, goto definition and so forth.
class RPGParserRunner(val file: File,val server : RPGLanguageServer) : Runnable {

    override fun run() {
        server.LOG.debug("Parser started : ${file.name} ${file.lastModified()}")
        val elapsed = measureTimeMillis {
            try {
                    if ("idx".equals(file.extension)) {
                        val xref = Klaxon().parse<CrossReference>(file)

                        xref?.references?.forEach { k, v ->
                            Repository.addCrossReference(k, v)
                        }
                    }
            } catch (e: Exception) {
                server.LOG.error(e.message)
            }
        }

        server.LOG.debug("Parser completed: ${file.name} in $elapsed ms")
    }
}
The Repository contains the cross-reference map which contains a map of CrossReferenceData for each document URI and the ranges relative to the code as explained in the section relative to the index structure.
data class RefPosition(
    val startLine   : Int,
    val startCol    : Int,
    val endLine     : Int,
    val endColumn   : Int)

data class CrossReference(
    val references : MutableMap<String,CrossReferenceData> = mutableMapOf()
)

data class CrossReferenceData(
    var uri : String = "" ,
    var crossReference  : MutableMap<String,RefPosition> = mutableMapOf()
)

object Repository {

    private val crossReferenceMap: MutableMap<String, CrossReferenceData> = ConcurrentHashMap<String, CrossReferenceData>()

    fun addCrossReference(name : String, xref : CrossReferenceData) {
        crossReferenceMap[name] = xref
    }
    fun getCrossReference(name: String): CrossReferenceData? {
        return crossReferenceMap[name]
    }

}
When the user selects one of the options on the context menu the server receives a textDocument/definition message containing the URI of the file and the position of the cursor. This information is used to look up the cross-references and returns the location of the original or generated code. The py and rpgle postfixes indicate that a cross-navigation request has been received.
class RPGTextDocumentService (val server : RPGLanguageServer) : TextDocumentService, LanguageClientAware, Closeable {

   override fun definition(params: DefinitionParams?): CompletableFuture<Either<MutableList<out Location>, MutableList<out LocationLink>>> {

        val line = params!!.position.line + 1
        val column = params!!.position.character
        var uri = normalizeUri(params.textDocument.uri)
        LOG.info("definition $uri $line,$column")

        val locations = definitionAt(line,column,uri,LOG)

        locations.forEach { it
            LOG.info("definition $it")
        }
        return CompletableFuture.completedFuture(Either.forLeft(locations))
    }
}

fun definitionAt(line: Int, column: Int, uri: String, LOG: Logger? = null) : MutableList<Location> {
    val locations : MutableList<Location> = mutableListOf()


    when {
        uri.endsWith("/py") || uri.endsWith("/rpgle") -> {
            val xuri = uri.substring(0,uri.lastIndexOf('/'))
            LOG?.info("xuri: $xuri")
            val xref = Repository.getCrossReference(xuri)
            xref?.apply {
                val targetURI = xref.uri
                LOG?.info("xuri Found")
                val elapsed = measureTimeMillis {
                    xref.crossReference.get("$line")?.apply {
                        val range =
                            Range(Position(this.startLine, this.startCol), Position(this.endLine, this.endColumn))
                        val location = Location(targetURI, range)
                        locations.add(location)
                    }
                }
                LOG?.info("index search time: $elapsed ms")
            }
        }

    }

    return locations
}
Summary
We went through a simple implementation of an index to navigate the relationship between the source and the generated code of an IBM RPG to Python transpiler.
Although is not a full implementation of a compliant LSIF, the index is accessed in the Language server and provides a very useful functionality to navigate the code. It is particularly useful if you are already familiar with VS Code extension development, and Language server development but it can be a good choice even for people interested in transpiler development using the Kotlin programming language.
You can find the source code for this article on GitHub.

