")
Sneak peek
Food. For many, one of the great pleasures of life. Some would argue that programming is also up there. Why not mix both? Have your cake and code it, too. We will build an editor with Kolasu and Language Servers.
In this article, we will design a domain-specific language for cooking recipes and build a code editor for it:
We will explore how to create an editor with syntax highlighting, error diagnostics, semantic validation, symbol navigation, code generation, and more.
All under 1000 lines of code by leveraging the power of open source tools: Kolasu, VSCode, and a newborn Strumenta plugin for creating language servers.
The entire codebase of the project is on GitHub. To keep the article lightweight, we will reference files from the repository and focus on explaining their most important points.
Let’s do this, byte by byte.
A language for cooking recipes
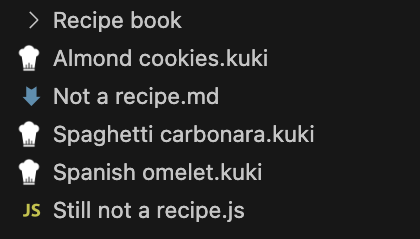
Let me introduce you to Kuki, a language for cooking recipes:
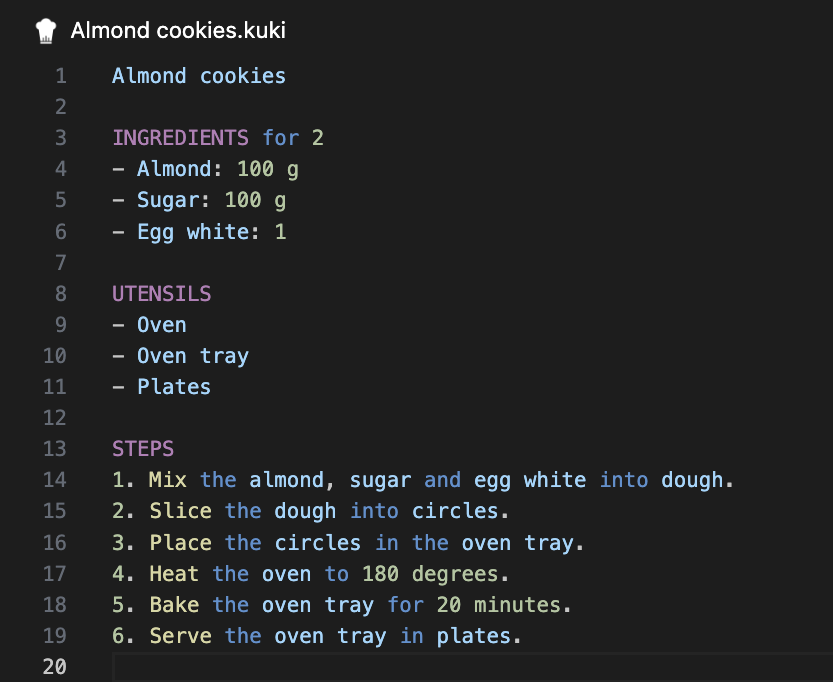
We have recipes for almond cookies, Spanish omelets, and even spaghetti carbonara, that will likely trigger some of my Italian colleagues. What can I say, it is spaghetti code after all.
We can model the domain with an AST. Recipes have a list of ingredients, utensils, and steps to prepare the dish. We have polymorphic steps to represent cooking actions like Mix or Bake.
Notice that we have dedicated nodes for item declarations and references:
data class ItemDeclaration(override val name: String): Node(), Named
data class ItemReference(val reference: ReferenceByName<ItemDeclaration>): Node()
This is useful for storing fine-grained position information and implementing symbol navigation later.
Items can be declared in the ingredients and utensils blocks, but also inside a step. For example, the following Mix step declares a dough item that is referenced in the next step:
1. Mix the almond, sugar and egg white into dough.
2. Slice the dough into circles
With the mental model of the code ready, we can follow the Chisel method to build the parser.
We create the ast Gradle submodule, define an ANTLR lexer and parser, and map the ANTLR parse tree to the AST model using a Kolasu transformer.
Nothing exceptional here, we add optional punctuation and English words to try to make the language more friendly and allow identifiers with spaces for ingredients like egg white or black pepper.
itemDeclaration: ID+;
itemReference: ID+;
itemList: THE? items+=itemReference ((COMMA THE? items+=itemReference)* AND THE? items+=itemReference)?;
Lastly, we create a Kolasu parser that given a string of code will parse it with ANTLR and return to us the transformed AST. We can check this with tests:
fun testAlmondCookies() {
    val code = File("../examples/Almond cookies.kuki").readText()
    val parser = KukiKolasuParser()
    val parsingResult = parser.parse(code)
    assertEquals(0, parsingResult.issues.size)
}
Tests are great for avoiding regressions, but having an editor lets us play with the code and get the issues reported in real-time.
Testing the language on an editor
With a Kolasu parser in hand, we can create a language server and a VSCode extension with the kolasu-language-server Gradle plugin—a new open-source initiative at Strumenta for facilitating the creation of language servers.
For the time being, the plugin only supports Java 18+. We are actively developing the plugin and supporting libraries. This article will focus on its first public release, version “1.0.0”.
First, we initialize the language-server Gradle submodule with the plugin. The plugin follows Gradle’s convention over configuration philosophy and expects a standard project configuration by default. However, most of the process can be configured by adding a languageServer configuration block in the Gradle build script.
In this tutorial, we will follow the expected standard layout and naming conventions. In particular, it is important to set the name of the project in the root Gradle project’s settings:
rootProject.name = "kuki"
The language server plugin adds two tasks to the project under the language server group:
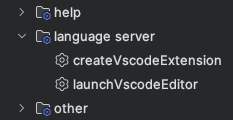
Running the createVscodeExtension generates an entry point file, we will customize it later.
It also creates a valid VSCode extension under build/vscode. We can test the extension by running the launchVscodeEditor task.
The task launches a code (VSCode) process that opens the examples folder of the project.
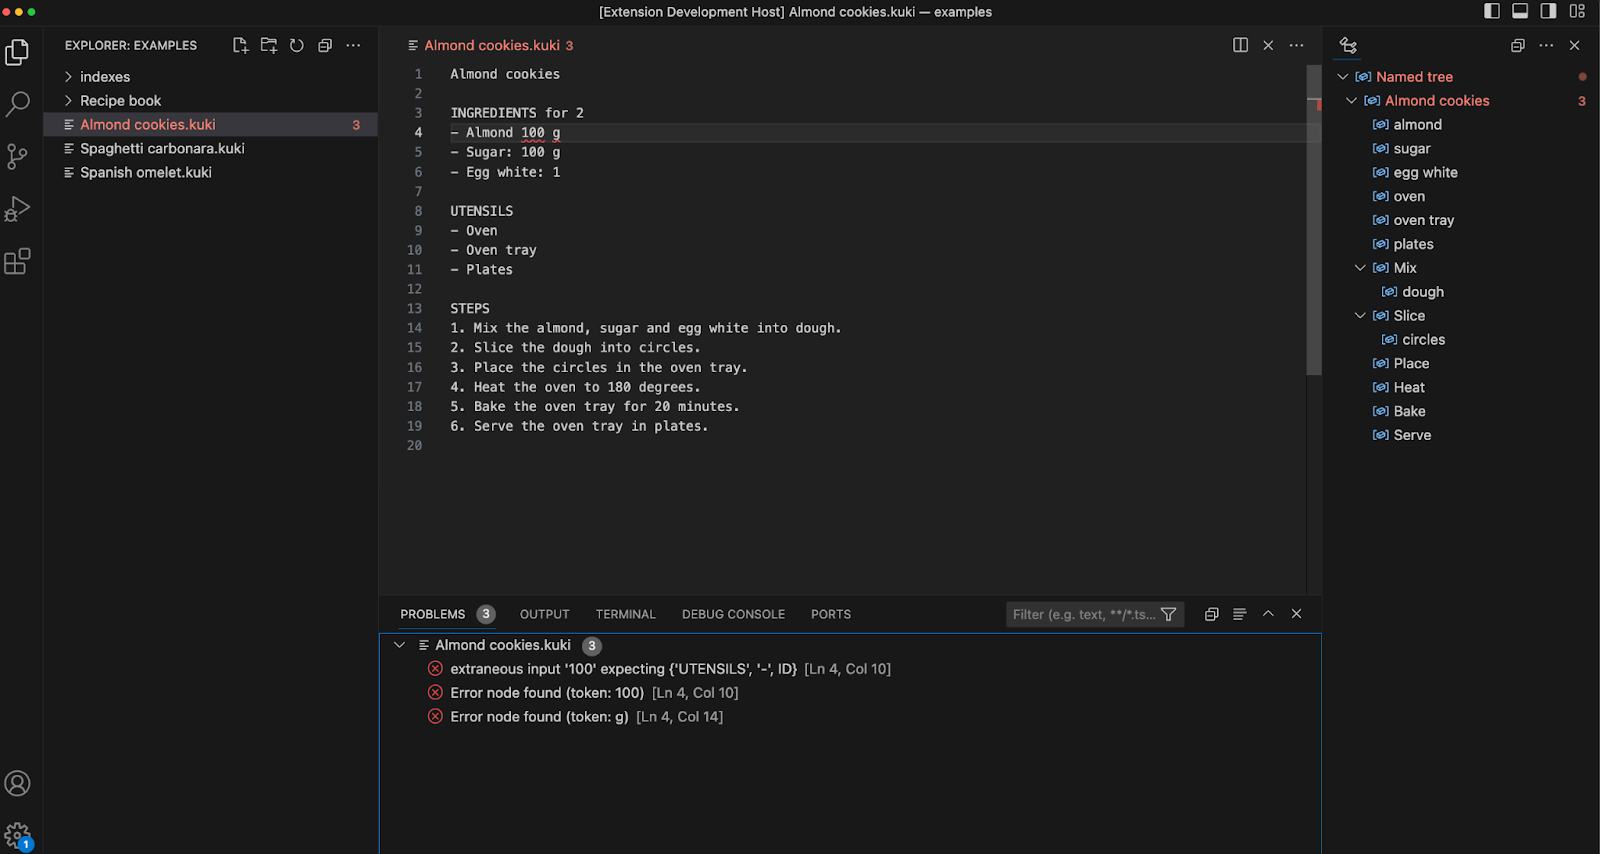
Now, we can edit the recipes in real-time and observe the parsing errors as diagnostics positioned over the code.
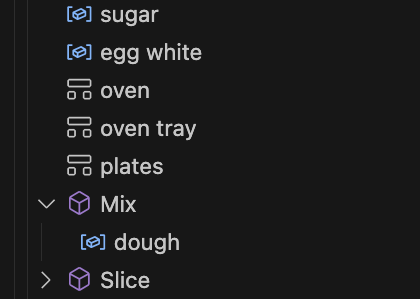
We can also navigate the code more easily by opening the outline view. Every node with a name has an entry in the outline hierarchy by default.
That’s a good start, but language servers can do much more.
Add some color
The more colors in a dish, the tastier it seems. Adding colors to an editor just makes the programmers more productive.
We can add syntax highlighting by specifying a Textmate grammar. If we place it at scr/main/resources/grammar.tmLanguage the plugin will pick it up automatically. For this language, we simply associate regular expressions with token categories:
<dict>
     <key>name</key>
     <string>variable.other.kuki</string>
     <key>match</key>
     <string>\b([a-zA-Z]+)\b</string>
</dict>
Then, the editor themes will map each token category to a color in their palette. Try changing themes quickly for some psychedelic action.
Similarly, we can specify a custom file icon for the recognized files by placing an image in src/main/resources/fileIcon.png. How about a chef hat?
We can reuse it as the logo of the extension by placing a copy in src/main/resources/logo.png.
Finally, let’s explore how to customize the outline generated by the language server. All the functionalities of the language server can be overridden by subclassing it. In this case, we want to override the symbol kind associated with each named node:
override fun symbolKindOf(node: Node): SymbolKind {
        return if (node is Step) {
            SymbolKind.Function
        } else if (node.parent is Utensil) {
         SymbolKind.Struct
    } else {
        SymbolKind.Variable
    }
}
Now, we can distinguish between ingredients, utensils, and steps in the outline:
Symbol resolution and symbol navigation
Many programming languages have variables that can be declared and referenced afterward. Our language Kuki is no exception: We declare ingredients and utensils and reference them in the preparation steps.
Kuki follows common semantic rules for variables:
- Each item can be declared only once
- Every item needs to be referenced in the preparation steps
- Items need to be declared before being referenced
Considering all variables are global in the file, we have implemented an ad hoc symbol resolver. It walks the tree depth-first keeping track of the declared symbols and creates an issue when the validation rules fail:
fun define (name: String, item: ItemDeclaration) {
    if (declarations[name] == null) {
=
        declarations[name] = item
    } else {
            issues.add(Issue.semantic("$name already declared", position = item.position))
    }
}
fun checkReferences (items: List<ItemReference>) {
    for (item in items) {
        val declaration = declarations[item.reference.name]
        if (declaration == null) {
            issues.add(Issue.semantic(item.reference.name + " is undeclared", position = item.position))
        } else {
            item.reference.referred = declaration
            referencedDeclarations.add(item.reference.name)
        }
    }
}
When symbols are correctly referenced, we resolve the symbol by setting their referred attribute. For more advanced languages, Kolasu has a declarative API for implementing symbol resolution and semantic validation.
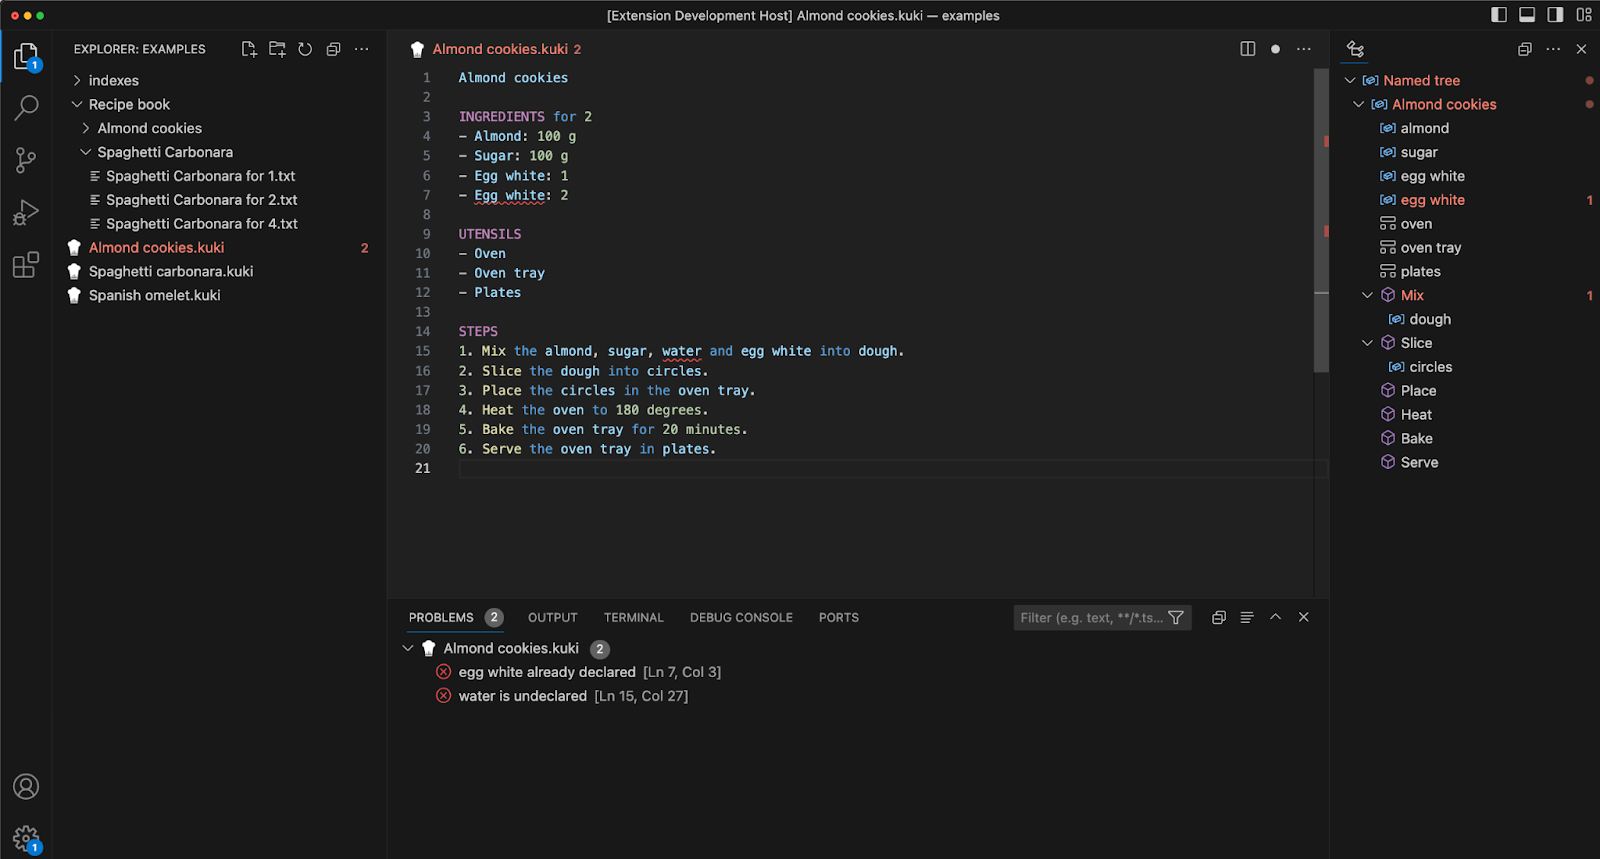
With these improvements, the editor will show error diagnostics when semantic validation fails:
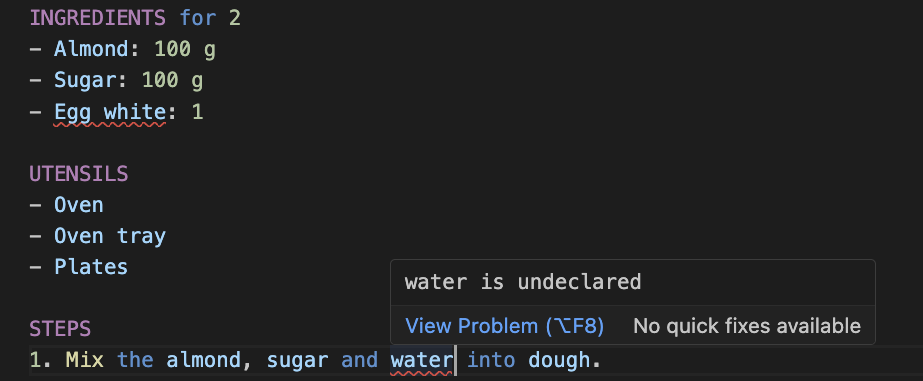
In this example, we get two issues:
- The symbol Egg white is never used
- The symbol water has not been declared before referencing it
However, we can enrich the editor further by enabling symbol navigation. The language server specifies its capabilities during initialization. Let’s override the initialize method to enable the Go to Definition and References features:
capabilities.setDefinitionProvider(true)
capabilities.setReferencesProvider(true)
Now, we can navigate by right-clicking a symbol and selecting Go to Definition or Find References. Alternatively, we can use the VSCode keybindings (F12 and Shift + F12 respectively). This feature becomes more and more useful the bigger the project gets.
Code generation
Finally, we will add a code generation module to support a full compiler pipeline: From parsing code to validating it and generating some output.
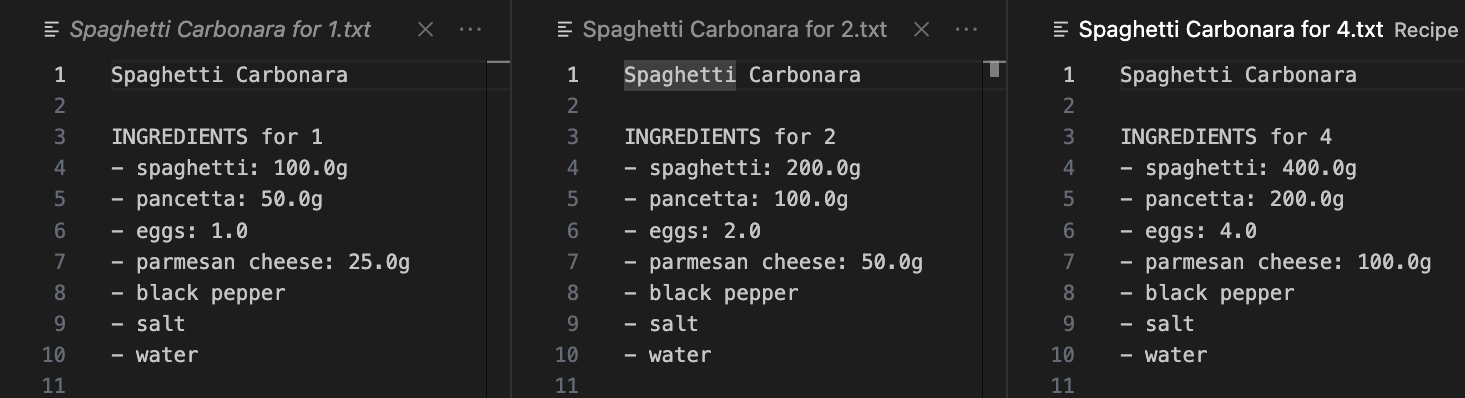
For our example, we will generate three versions of the recipe, adapting the ingredients for 1, 2, and 4 people. We will standardize the formatting and syntax of the generated recipes.
The code generator itself walks the tree and serializes it back to code using string templating. It repeats the process adapting the ingredients for 1, 2, and 4 people, and writes the output code to a file under the Recipe book folder:
for (amount in listOf(1, 2, 4)) {
    val file = File(URI(uri)).parent + File.separator + "Recipe book" + File.separator + tree.name + File.separator + tree.name + " for $amount.txt"
    val code = generateRecipeFor(amount, tree)
    File(file).parentFile.mkdirs()
    File(file).writeText(code)
}
For more complex scenarios, I suggest taking a look at Kolasu’s declarative API for code generation.
To integrate the code generator with the language server, we need to modify the KukiServer again. We can pass the code generator instance in the constructor:
class KukiServer : KolasuServer<Recipe>(KukiKolasuParser(), "kuki", listOf("kuki"), generator = KukiCodeGenerator()) {
and enable the save notifications in the server initialization:
capabilities.setTextDocumentSync(TextDocumentSyncOptions().apply {
    openClose = true
    change = TextDocumentSyncKind.Full
    save = Either.forLeft(true)
})
Now, whenever the user saves a Kuki file, the code generator will kick in and generate the recipe versions under the Recipe book:
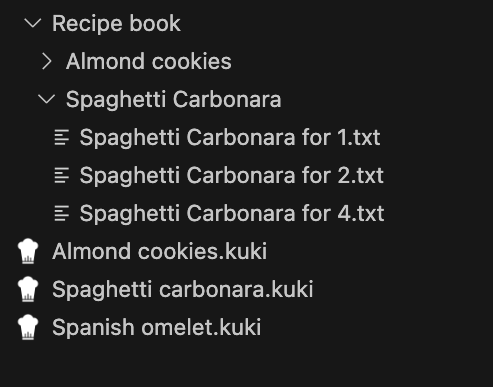
Here is what they look like:
Summary
We have learned how to create an editor for editing cooking recipes with symbol navigation, code generation, syntax highlighting, code outlines, and error diagnostics. Of course, the same procedure applies to different languages and domains.
But now that we have built a tool to digitize and edit recipes comfortably, how about adding more domain-specific features like:
- Finding recipes that use an ingredient
- Classifying vegetarian and celiac-friendly recipes
- Estimating the total time for preparation
- Computing the nutritional value starting from the ingredients
Then, we could fetch vegan recipes with aubergine that are low in fats and can be prepared in under 10 minutes. In the meantime, I will stick with my spaghetti carbonara.