")
Introduction
In this article, we will explore how to build a rich JSON validator website with Tylasu. As developers, most of us are familiar with JSON. It has become the go-to format to represent data. Chances are that, at some point, you have wanted to validate JSON data or ensure it contains all the information you expect.
Some existing websites like jsonlint or jsonformatter offer you that. But have you ever wondered how you could build such a website? Of course, there are a million ways to do it. But choosing the right tools can make the task easy, even fun.
Here at Strumenta, we build all kinds of tools related to languages, and data validators are no exception. In this tutorial, we will show you how to leverage the power of Tylasu, ANTLR, and Monaco, all open-source tools, to build a friendly JSON validator website. Here is what it looks like:
You can play with it online at https://strumenta.github.io/tylasu-tutorial
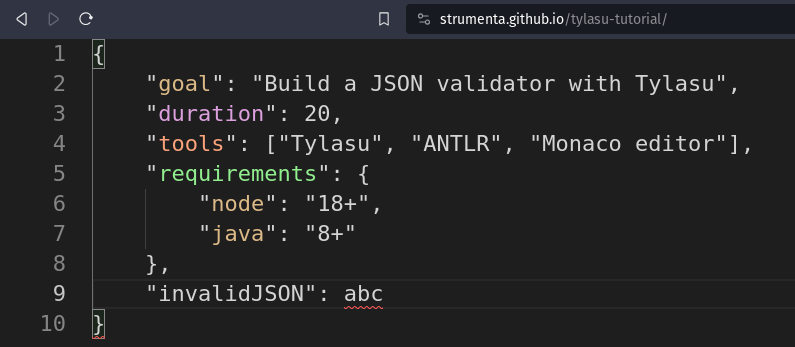
It is a website that looks and acts like an editor. In fact, it’s based on the Monaco editor by Microsoft. Whenever you type on it, it parses the code expecting some JSON. It displays error markers over incorrect code, and colors each member depending on the type of its value.
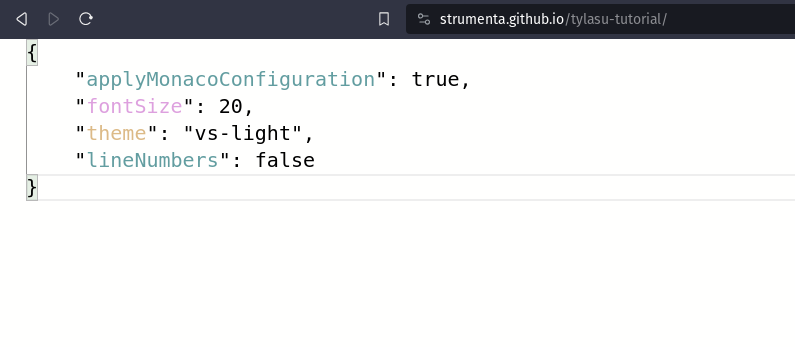
It even has a secret feature: if an "applyMonacoConfiguration": true member is present, the code will be interpreted as Monaco configuration and applied to the editor on the spot. Try changing the font size or the editor’s theme like this:
The complete codebase is on Github, with a dedicated git tag for each of the seven tutorial steps. We can use them to check our progress or skip over steps completely. Everything ready? Let’s start!
1. Creating the editor
We are huge believers in having something visual and interactive to play with as soon as possible.
So, let’s start with the editor.
It’s a regular HTML, CSS and JS static website:
<head>
    <link rel="stylesheet" href="index.css">
    <link rel="stylesheet" href="bundle.css">
    <script src="bundle.js" defer></script>
</head>

<body>
    <section id="editor"></section>
</body>
body {
    margin: 0;
}

#editor {
    height: 100vh;
}
import * as monaco from "monaco-editor";

monaco.editor.create(document.getElementById("editor")!, { theme: "vs-dark", fontSize: 22 });
The page has a single element, editor, that is styled to take up the whole viewport.
The code creates a Monaco editor inside this element with a dark theme and a bigger font size. We will give the user the ability to customize the editor later in the tutorial.
Of course, we need to bundle the TypeScript code with its dependencies into the bundle.js and bundle.css that the HTML file is expecting.
First, let’s install the monaco-editor node package as dependency:
$ npm install monaco-editor
Then, we’ll create the bundle executing the esbuild node package with npx:
$ npx esbuild index.ts --bundle --outfile=bundle.js --loader:.ttf=empty
And the website is ready!
We can serve it locally using the serve package:
$ npx serve . -p 3000
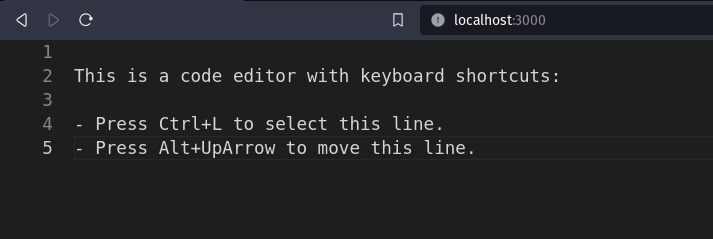
Now we can open a browser at http://localhost:3000 and enjoy typing some code.
Developers who are familiar with VS Code can use the same keyboard shortcuts here. In fact, Microsoft created Monaco to serve as the editor in VS Code.
2. Structure of the project
Now that we have tasted the cake, let’s take a moment to organize our files.
We’ll follow a standard project structure, that happens to be the same that Maven projects use in Java.
Let’s move the HTML and CSS to src/main/resources, let’s put index.ts under src/main/typescript and leave the package.json in the root folder with some useful modifications:
{
  "dependencies": {
    "monaco-editor": "^0.44.0"
  },
  "devDependencies": {
    "esbuild": "^0.19.8",
    "serve": "^14.2.1"
  },
  "scripts": {
    "all": "npm install && npm run createDistribution && npm run bundle && npm run serve",
    "createDistribution": "mkdir -p dist && cp src/main/resources/* dist",
    "bundle": "esbuild src/main/typescript/index.ts --bundle --outfile=dist/bundle.js --loader:.ttf=empty",
    "serve": "serve dist -p 3000"
  }
}
We don’t need access to esbuild and serve at runtime, so we can mark them as devDependencies.
Defining scripts inside package.json allows us to run tasks using npm run <task-name>.
In particular, the npm run all task will build the entire project from scratch by:
- Installing all the dependencies
- Creating a
distfolder and moving the HTML and CSS to it - Bundling the code and its dependencies into
dist/bundle.jsanddist/bundle.css - Serving the
distfolder at http://localhost:3000
Now, every time we make a change, we can run
$ npm run all
to serve the website with the latest changes applied.
3. Parsing the Code in the Editor
Let’s provide some feedback depending on the code the user types in the editor.
We will use ANTLR, an industry-standard tool for language recognition. ANTLR is very powerful and can understand everything from small DSL programs to full C++ projects. To keep the example familiar to most developers, we will use it to parse JSON, but feel free to experiment with other languages.
ANTLR takes formal language grammars as input and produces the source code of a parser as output. Thankfully, the official ANTLR repository includes many grammars of popular languages ready to be used, including one for JSON. Let’s say thanks and copy the json grammar into src/main/antlr/JSON.g4.
For anyone curious about ANTLR parsers, we have many resources available.
ANTLR for TypeScript comes in two packages:
- the
antlr4tspackage that we will use as a runtime dependency - the
antlr4ts-clidevDependency that generates the TypeScript files that parse the given grammar
Unfortunately, antlr4ts is not ready to be used on the browser out of the box. It expects to find node modules that do not exist in the browser like assert and process. We can walk around this issue by installing the assertnpm package and replacing the code process.env.NODE_DEBUG with false with esbuild:
{
  "dependencies": {
    "monaco-editor": "0.44.0",
    "antlr4ts": "0.5.0-alpha.4",
    "assert": "2.1.0"
  },
  "devDependencies": {
    "esbuild": "0.19.8",
    "serve": "14.2.1",
    "antlr4ts-cli": "0.5.0-alpha.4"
  },
  "scripts": {
    "all": "npm install && npm run createDistribution && npm run bundle && npm run serve",
    "generateParser": "antlr4ts -Dlanguage=TypeScript src/main/antlr/JSON.g4 -no-listener",
    "createDistribution": "mkdir -p dist && cp src/main/resources/* dist",
    "bundle": "esbuild src/main/typescript/index.ts --bundle --outfile=dist/bundle.js --loader:.ttf=empty --define:process.env.NODE_DEBUG=false",
    "serve": "serve dist -p 3000"
  }
}
A promising new node package called antlr4ng has been recently published with the intention to supersede antlr4ts. We will support it in the future, but for now, let’s stay on known territory.
Now npm run all executes the generateParser task that will create the JSONLexer.ts and JSONParser.ts files under src/main/antlr. We can use these to parse the code present in the editor:
editor.onDidChangeModelContent(() => {
    const code = editor.getValue();
    const characters = CharStreams.fromString(code);
    const lexer = new JSONLexer(characters);
    const tokens = new CommonTokenStream(lexer);
    const parser = new JSONParser(tokens);
    const tree = parser.json();
    console.log(tree);
});
This is the standard pipeline for a parser. It reads the code from a character stream, the lexer transforms it into a stream of tokens and finally the parser transforms the tokens into a tree of structured content.
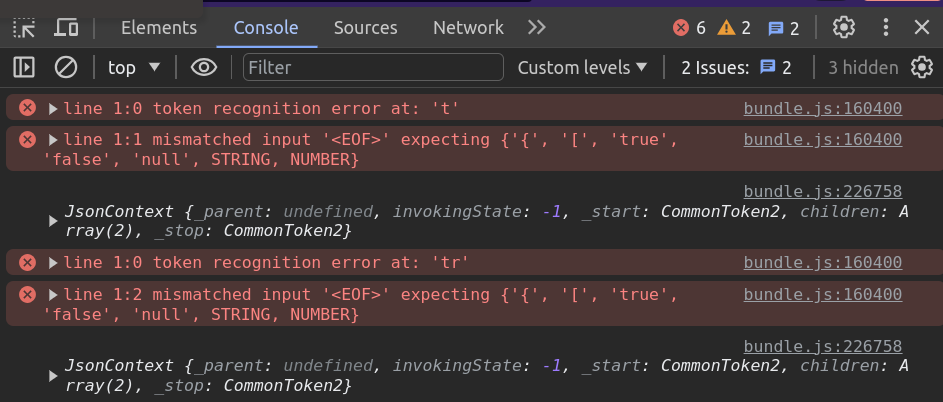
We should now see errors and parse trees printed on the browser’s developer console. We can confirm that when the code is valid JSON we get no errors:
4. Showing issues over the code
If you have played with the ANTLR parser, you may have noticed that neither the errors nor the resulting tree are very friendly. The trees are hard to mutate, and the nodes’ information is tied to the grammar rather than to what they represent. This is where our last piece comes in: Tylasu.
Tylasu is an open-source package to create and process beautiful abstract syntax trees (ASTs for short). It provides utilities to model nodes, their relationships, and transformations between them. It simplifies the creation of parsers to enable the development of sophisticated language engineering tools on top, like compilers or editors.
Let’s see how it can help us show friendly errors in the editor. First, we install the @strumenta/tylasu package and modify the bundle script one last time to disable loading the fs module on the browser:
{
  "dependencies": {
    "monaco-editor": "0.44.0",
    "antlr4ts": "0.5.0-alpha.4",
    "assert": "2.1.0",
    "@strumenta/tylasu": "1.4.5"
  },
  "devDependencies": {
    "esbuild": "0.19.8",
    "serve": "14.2.1",
    "antlr4ts-cli": "0.5.0-alpha.4"
  },
  "scripts": {
    "all": "npm install && npm run createDistribution && npm run bundle && npm run serve",
    "generateParser": "antlr4ts -Dlanguage=TypeScript src/main/antlr/JSON.g4 -no-listener",
    "createDistribution": "mkdir -p dist && cp src/main/resources/* dist",
    "bundle": "esbuild src/main/typescript/index.ts --bundle --outfile=dist/bundle.js --loader:.ttf=empty --define:process.env.NODE_DEBUG=false --external:fs && sed -i 13d dist/bundle.js",
    "serve": "serve dist -p 3000"
  }
}
Now, we can create a JSONTylasu parser at src/main/typescript/ast/parser.ts
export class JSONTylasuParser extends TylasuParser<Node, JSONParser, JsonContext, TylasuANTLRToken>
{
    constructor() {
        super(new ANTLRTokenFactory());
    }

    protected createANTLRLexer(inputStream: CharStream): Lexer | undefined {
        let lexer = new JSONLexer(inputStream);
        lexer.removeErrorListeners();
        return lexer;
    }

    protected createANTLRParser(tokenStream: TokenStream): JSONParser {
        let parser = new JSONParser(tokenStream);
        parser.removeErrorListeners();
        return parser;
    }

    protected parseTreeToAst(parseTreeRoot: JsonContext, considerPosition: boolean, issues: Issue[], source?: Source | undefined): Node | undefined {
        return undefined;
    }
}
It is basically a wrapper of the previous ANTLR parser code we had. However, it merges the result and the issues found in a nice ParsingResult object. We can remove the error listeners to no longer show them in the developer console. Instead, we will visualize them with Monaco right over the code, using the position information automatically provided by Tylasu:
editor.onDidChangeModelContent(() => {
    const code = editor.getValue();
    const parsingResult = parser.parse(code);

    visualizeIssues(parsingResult.issues);
});

function visualizeIssues(issues: Issue[]) {
    const diagnostics: monaco.editor.IMarkerData[] = [];
    for (const issue of issues) {
        if (issue.position) {
            diagnostics.push({
                severity: monaco.MarkerSeverity.Error,
                message: issue.message,
                startLineNumber: issue.position.start.line,
                startColumn: issue.position.start.column + 1,
                endLineNumber: issue.position.end.line,
                endColumn: issue.position.end.column + 1
            });
        }
    }
    monaco.editor.setModelMarkers(editor.getModel()!, "json", diagnostics);
}
This could already work as a JSON validator website, but thanks to Tylasu, we can do much better. How about coloring each object member depending on its type? For that, we need a deeper understanding of the code.
5. Chisel the parse tree
We start by modelling our ideal tree structure. In JSON, there are six types of values:
- 4 literal values: numbers, strings, booleans and null
- 2 collection types: arrays have ordered values and objects have pairs of name-values
We can create a class that extends the Tylasu Node class for each concept:
export class JSONValue extends Node { }

export class JSONNumber extends JSONValue {
    value: number;

    constructor(value: number) {
        super();
        this.value = value;
    }
}

export class JSONString extends JSONValue {
    value: string;

    constructor(value: string) {
        super();
        this.value = value;
    }
}

export class JSONBoolean extends JSONValue {
    value: boolean;

    constructor(value: boolean) {
        super();
        this.value = value;
    }
}

export class JSONNull extends JSONValue { }
The four literal value classes probably contain no surprises. They hold a value and provide a constructor for convenience. The array and object nodes are a bit more interesting:
export class JSONArray extends JSONValue {
    elements: JSONValue[];

    constructor(...elements: JSONValue[]) {
        super();
        this.elements = elements;
    }
}

export class JSONObject extends JSONValue {
    members: JSONMember[];

    constructor(...members: JSONMember[]) {
        super();
        this.members = members;
    }
}

export class JSONMember extends Node {
    name: string;
    value: JSONValue;

    constructor(name: string, value: JSONValue = new JSONValue()) {
        super();
        this.name = name;
        this.value = value;
    }
}
The main difference is they have fields that are nodes, also known as child nodes. In the current version of Tylasu, child nodes need to be initialized in the constructor. This requirement will be relaxed in the upcoming version of Tylasu.
Next, we define the parent-child relationships between nodes. Arrays and Objects may have multiple children, while Members have an individual child:
 constructor() {
        super(new ANTLRTokenFactory());
        this.createNodeDefinitions();
    }

    createNodeDefinitions() {
        registerNodeChild(JSONArray, "elements", true);
        registerNodeChild(JSONObject, "members", true);
        registerNodeChild(JSONMember, "value", false);
    }
Finally, we need to transform the ANTLR tree to our AST model. Thankfully, Tylasu includes helper classes to facilitate the conversion from ANTLR:
export const transformer = new ParseTreeToASTTransformer();

transformer.registerNodeFactory(ValueContext, (x: ValueContext) => {
    if (x.NUMBER()) return new JSONNumber(parseFloat(x.NUMBER()!.text));
    if (x.STRING()) return new JSONString(x.STRING()!.text.substring(1, x.STRING()!.text.length));
    if (x.text === "true") return new JSONBoolean(true);
    if (x.text === "false") return new JSONBoolean(false);
    if (x.text === "null") return new JSONNull();
});
As before, the four literal cases are simple. For nodes with children, we need to specify how to convert their children too:
transformer.registerNodeFactory(ArrContext, (context: ArrContext) => new JSONArray()).withChild(
    x => x.value(),
    (node: JSONArray, elements?: JSONValue[]) => node.elements = elements || [],
    "elements",
    ArrContext
);

transformer.registerNodeFactory(ObjContext, (context: ObjContext) => new JSONObject()).withChild(
    x => x.pair(),
    (node: JSONObject, members?: JSONMember[]) => node.members = members || [],
    "members",
    ObjContext
);

transformer.registerNodeFactory(PairContext, (context: PairContext) => new JSONMember(context.STRING().text.substring(1, context.STRING().text.length - 1))).withChild(
    x => x.value(),
    (node: JSONMember, value?: JSONValue) => node.value = value || new JSONValue(),
    "value",
    PairContext
);
With this information, the transformer will take care of walking over the entire tree and converting all the nodes. We just need to invoke it in the parseTreeToAST method of the parser:
protected parseTreeToAst(parseTreeRoot: JsonContext, considerPosition: boolean, issues: Issue[], source?: Source | undefined): Node | undefined {
    return transformer.transform(parseTreeRoot);
}
Now, parser.parse produces a tree with our ideal structure. Much nicer! It also includes types, position information, and child relationships. Also, each node has:
- an “origin” that remembers where the node comes from – in our case, an ANTLR parse tree node corresponding to a portion of source code. In other cases, nodes may originate from other Tylasu nodes after an AST-to-AST transformation, or may have been created programmatically;
- an optional “destination” node. When we apply multiple transformations, each intermediate node will also record what it’s been transformed into.
6. Colorize the members
Now that we have an AST, analyzing and processing the code becomes a breeze. To colourize the members, we can:
- Walk the root node
- Filter the
JSONMembernodes - Pick a CSS class name depending on the type of its value
- Create a Monaco decorator in the node’s name’s position with the selected class name.
We can realize the above steps with the following function:
function colorizeMembers(root?: Node) {
    if (!root) return;

    const newDecorations: monaco.editor.IModelDeltaDecoration[] = [];
    for (const node of root.walk()) {
        if (node instanceof JSONMember) {
            if (!node.position) continue;
            let className: string = "";
            if (node.value instanceof JSONNumber) {
                className = "number-member";
            } else if (node.value instanceof JSONString) {
                className = "string-member";
            } else if (node.value instanceof JSONBoolean) {
                className = "boolean-member";
            } else if (node.value instanceof JSONNull) {
                className = "null-member";
            } else if (node.value instanceof JSONArray) {
                className = "array-member";
            } else if (node.value instanceof JSONObject) {
                className = "object-member";
            }
            newDecorations.push({
                range: new monaco.Range(
                    node.position?.start.line,
                    node.position?.start.column + 2,
                    node.position?.start.line,
                    node.position?.start.column + 2 + node.name.length),
                options: { inlineClassName: className }
            });
        }
    }
    decorations = editor.deltaDecorations(decorations, newDecorations);
}
Now every object member in the editor will have a CSS class assigned depending on its type. We can customize their look in index.css:
.number-member {
    color: plum !important;
}

.string-member {
    color: burlywood !important;
}

.boolean-member {
    color: cadetblue !important;
}

.null-member {
    color: gray !important;
}

.object-member {
    color: lightgreen !important;
}

.array-member {
    color: lightsalmon !important;
}
Here we have just modified the color, but nothing stops you from changing fonts, size, or anything really. In fact, in the following, we’ll give the user the ability to customize the fonts and the colors of the editor itself.
7. Let’s add a little secret
Programming should always stay fun. Let’s take this chance to make the editor configurable on the spot by interpreting the inputted JSON as Monaco configuration.
If the input JSON is an object and contains the "applyMonacoConfiguration": true member, our secret feature will activate:
- If the input does not match the expected members or types, we will show validation errors
- Otherwise, we will apply the given configuration to the running editor:
function applyMo
```typescriptnacoConfiguration(root?: Node) {
    let diagnostics: monaco.editor.IMarkerData[] = [];

    const configuration = {
        applyMonacoConfiguration: JSONBoolean,
        fontSize: JSONNumber,
        theme: JSONString,
        lineNumbers: JSONBoolean
    };

    if (((root as JSONObject)?.members?.find(x => x.name === "applyMonacoConfiguration")?.value as JSONBoolean)?.value) {
        for (const member of (root as JSONObject).members) {
            if (!(member.name in configuration)) {
                diagnostics.push({
                    severity: monaco.MarkerSeverity.Error,
                    message: "Unexpected configuration member",
                    startLineNumber: member.position!.start.line,
                    startColumn: member.position!.start.column + 2,
                    endLineNumber: member.position!.start.line,
                    endColumn: member.position!.start.column + 2 + member.name.length
                });
            }
            else if (!(member.value instanceof configuration[member.name])) {
                diagnostics.push({
                    severity: monaco.MarkerSeverity.Error,
                    message: "Unexpected member type",
                    startLineNumber: member.value.position!.start.line,
                    startColumn: member.value.position!.start.column + 2,
                    endLineNumber: member.value.position!.start.line,
                    endColumn: member.value.position!.start.column + 2 + member.name.length
                });
            }
        }
        monaco.editor.setModelMarkers(editor.getModel()!, "json", diagnostics);

        if (!diagnostics.length) {
            editor.updateOptions(JSON.parse(editor.getValue()));
        }
    }
}
In this case, we only allow configuring the theme, the font size, and whether the line numbers are displayed. But of course, we could take this idea much further. Maybe even support the entire JSON schema specification. Or maybe create completely different validation rules.
The point is, that once we have an AST that fits our mental model, we can create any tool on top of it.
Conclusion
We’re done! We’ve gone over every bit of code present in the Github tutorial repo. But this is just the beginning.
ANTLR can parse all kind of languages. Monaco has all the features of the most used code editor in the world. Tylasu offers facilities to test and serialize ASTs to create professional and interoperable applications. The space of potential applications is huge.
Want more ideas on how to apply these new techniques? We have many articles on the topic.