
The code for this article is on GitHub: getting-started-blockly
In this article we are going to talk about Blockly, a library to create visual programming languages. The user writes code using blocks and the software transpiles it to your traditional programming language of choice. It gives the power of programming to people without any experience in coding.
We are going to see how it differs from Scratch and you can use it to simplify programming for your users. In fact, in this tutorial we are going to create a simple language that any person can use.
Scratch Compared to Blockly
If you just take a quick look at Blockly you might be forgiven for mistaking it for a clone of Scratch, the educational programming language based on blocks. Indeed, they look similar. However, there is a big difference between the two: Blockly is a JavaScript library, a tool; it is not a language.
There are also other differences. Scratch is primarily a programming language, and a platform, aimed at teaching programming to children between the ages of 8 and 16. Blockly is a library that brings a feature, visual programming, to any context you like.
While it is true that Blockly has also been mainly used for educational purposes, it is not the only reason for which it can be used.
Finally, as we mentioned in our article about Hedy, Scratch is fundamentally a closed system. The coding concepts you learn in Scratch are transferable, but the code itself is not. This is not true for Hedy or Blockly. In Hedy you end up learning Python, with Blockly you can transpile your code in a few different traditional programming languages.
What Is Blockly?
The Blockly library adds an editor to your app that represents coding concepts as interlocking blocks
Blockly is a library by Google, with all the technical support you can expect from such a company. So, you can do things that customize the look of the blocks or integrate it in a React or Vue app. In that sense, it is just like any other library.
This functionality and flexibility is great for bringing graphical programming to an audience that is not used to it. This just does not mean programming in a traditional sense, for example there is a tutorial that teaches you how to use it to create JSON files. You can also use it to allow the user to create patterns of sounds.
Why Use Blockly?
In this tutorial we are going to use it to create a simple programming language.
Why would you want to do that? The reason is the same for creating DSLs: programmers are great at programming, but not for everything else. So, you want to give experts the tools they need to define automations and programs themselves.
From this perspective, Blockly can be a great option to consider. Its graphical nature is immediately more accessible than your typical text-based DSLs. It is a matter of perception, too. The user effectively writes code, but it does that in a familiar environment and using tools that feel natural.
Its existence as a JavaScript library makes it much easier for you to create languages or to integrate it in other code.
JetBrains MPS is a great tool, but you need to go all in: everything is integrated in one platform, so you need to have a commitment to it. On the other hand you can start gradually with Blockly, for instance to allow users to program some simple aspects of a larger program that is still written in a traditional programming language.
Conversely, the default Blockly experience might be too accessible for use in an enterprise environment. What we mean is that Blockly is not a toy, but it looks like a toy, so it might be hard to persuade a CTO to use it for serious business purposes.
In short, Blockly excels when syntax is the main obstacle to programming. By using a visual approach, Blockly removes the need for precise use of parentheses, semicolons, indentation or similar hurdles. The user literally cannot make syntactical mistakes. It is easy to learn by trial and just see what works, so the user will be less likely to feel frustrated.
Our Objective
Imagine that you have a marketer that needs to optimize the returns from a newsletter. In his everyday work they need to create, test and optimize rules for sending email to subscribers. The problem is that each time they wants to try something it either needs to choose between basic and ineffective tools or asking for the help of a programmer.
The tools are good for the average user, but they can get better results. Programming is powerful, but he cannot do it on its own. And explaining things to the programmer takes time and frustration. They understand the logic of marketing, but they lack the tools to make the best use of their expertise. Is there any way to solve this? Let’s find out.
We want to offer our marketer a simple way to create algorithms to evaluate people according to their characteristics. For example, this could be useful to decide whether to send a specific marketing email to a user. Our target audience is people that are scared by terms like algorithm, so Blocky is a perfect tool to use.
The basic idea is that the marketer will create a method to assign a score to a user. It will also set a minimum passing score. Then the user will be evaluated according to the defined criteria and will either pass or fail. In a real application this scoring method would probably be tied to a larger program. For instance, if the user gets a passing score they will receive an email with an offer. However, in our example we will just design the scoring language and generate the code.
A Blockly App In Less Than 30 Lines of Code
Before diving in into our example, let’s try to understand how a Blockly project is organized. A Blockly project is based on blocks. You can think of these blocks as independent units of code. For each block, you define its structure, look and what code it generates. Therefore a Blockly program is nothing more than a combination of instantiated blocks. Crucially for this example, Blockly comes with a few predefined blocks to handle the basics elements, such as numbers.
To get a better feel for Blockly, let’s start with the simplest example possible.
<div>
    <div id="blocklyDiv" style="height: 480px; width: 480px;"></div>
    <button id="test">Multiply by 5</button>
    <div id="result">
</div>

<script src="https://unpkg.com/blockly"></script>
<script src="scripts/simple_main.js"></script>
We just need a container, in this case blockly-div. We also add a button to generate code from our app and a div where to place the result.
We load the Blockly library in the first script and our main code in the second one. The main code is disturbingly simple.
const toolbox = {
    'kind': 'flyoutToolbox',
    'contents': [
      {
        'kind': 'block',
        'type': 'math_number'
      }
    ]
  }

  var workspace = Blockly.inject('blocklyDiv', {
    toolbox: toolbox,
    scrollbars: false,
  });

  document.querySelector('#test').addEventListener('click', function(event){
    execute(event, workspace);
  })
We define a toolbox, which contains the list of blocks available to the user. In this example, we do not define any custom block, we just use the standard block for input a number of type math_number.
We then inject our toolbox in the div that we have defined before. This accomplish two things: it loads the toolbox and also returns the workspace. The workspace is essentially the equivalent of a code-file, it contains the blocks used in the current program. We need to save it, because we will execute in content.
Finally, we hook the test button to the function that will execute the code.
function execute(event, workspace) {
  var code = "5 * " + Blockly.JavaScript.workspaceToCode(workspace);
  var resultContent = document.getElementById("result");
  resultContent.innerHTML = eval(code);
}
To execute the code we literally just need three lines of code. The method workspaceToCode(workspace) transpiles the blocks defined in the supplied workspace. Now, we have JavaScript code: we execute it and shows the result in our div. In this most basic example possible the code generated by Blockly will be just a number, so we can multiply it by 5 to obtain our result.
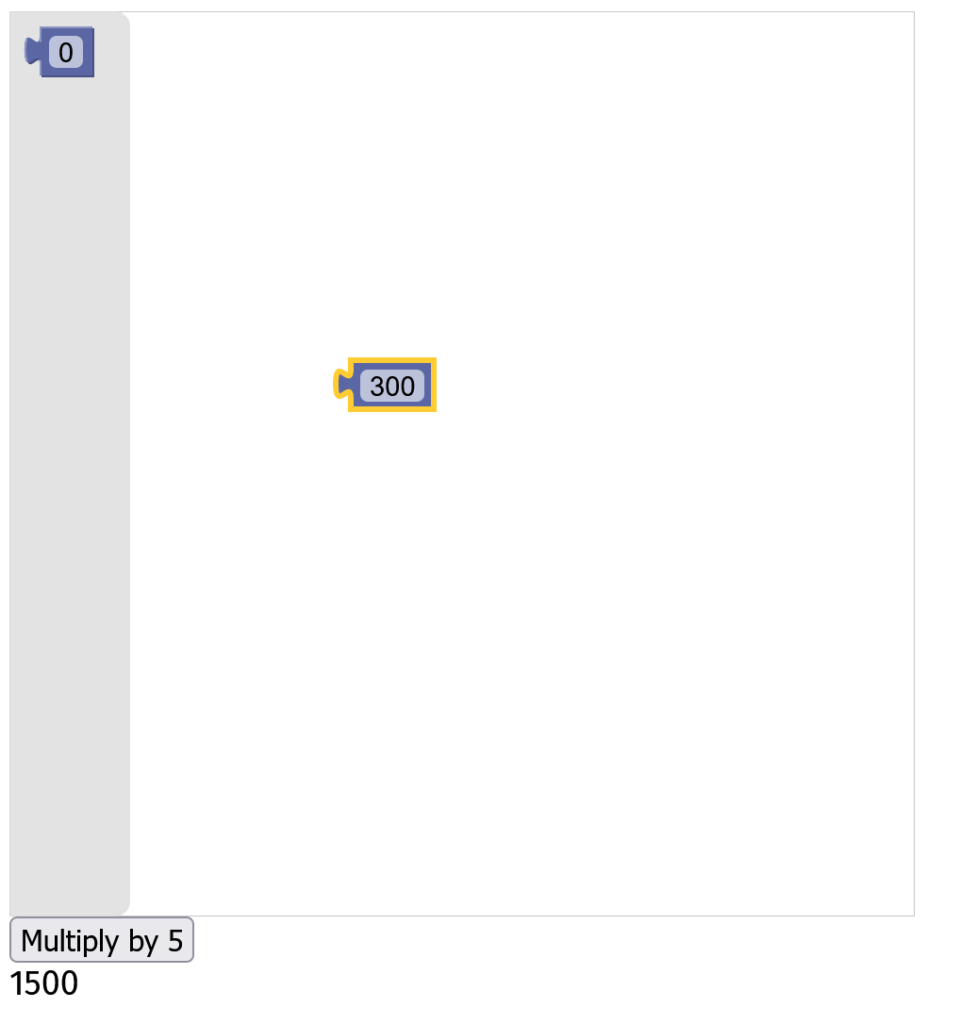
Of course, this is a very basic program. It only supports multiplying one number/block. This is not meant to show the potential of Blockly, just how easy it is to use it. And we did create a program in less than 30 lines of code. We can do much more with a more interesting example.
Setting Up a Blockly Project
Blockly is quite flexible and can be set up in the best way for your project. Being a JavaScript library, you can obviously just install it with npm. However, you can also use it by loading directly from HTML code, using the unpkg CDN.
<script src="https://unpkg.com/blockly"></script>
You can use any CDN you like, but unpkg is linked directly to the npm registry, so you know it is always in sync with the official release. We are going to use this second approach, because we do not need to use node, so this is easier.
The usefulness of this setup flexibility is compounded by the fact that you can use Blockly to generate JavaScript, but also other languages like PHP, Python, Dart or Lua.
Imagine that we want to use our scoring language on a PHP frontend application to let them generate scoring algorithms. Then we could take the same apps created by our marketing experts and use them on a node backend integrated with our newsletter software.
Our Main Page
We opted for using unpkg, so all we need now is an HTML page to contain our application.
<!DOCTYPE html>
<html>
<head>
<meta charset="utf-8">
<meta http-equiv="X-UA-Compatible" content="IE=edge">
<meta name="viewport" content="width=device-width, initial-scale=1">
<title>A Blockly-based Score Language</title>
<link rel="stylesheet" href="https://unpkg.com/bulma">
<link rel="stylesheet" href="styles/index.css">
</head>
<body>
<section class="section">
<div class="container">
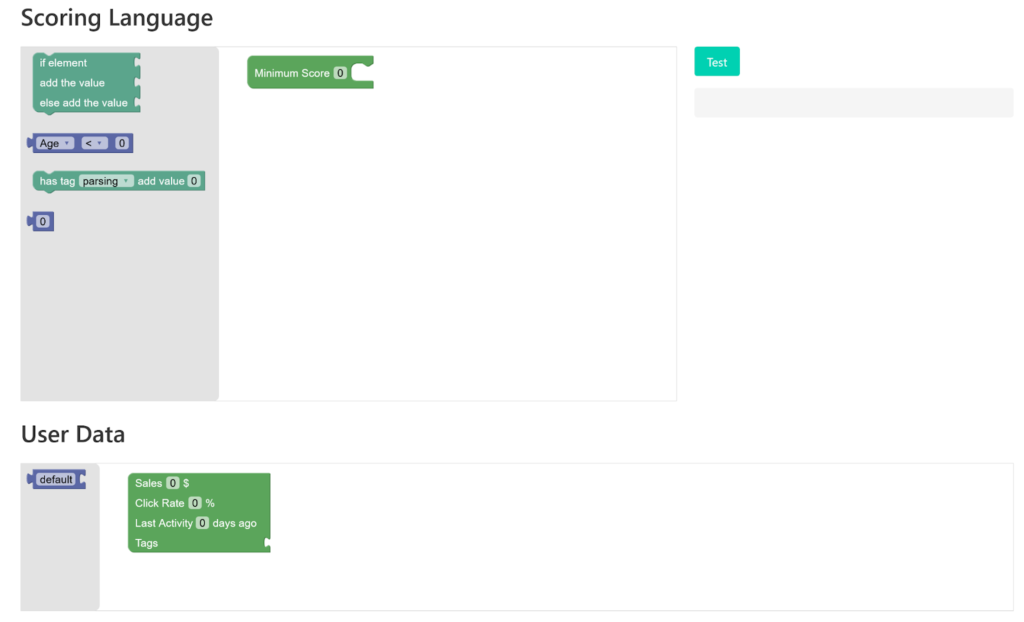
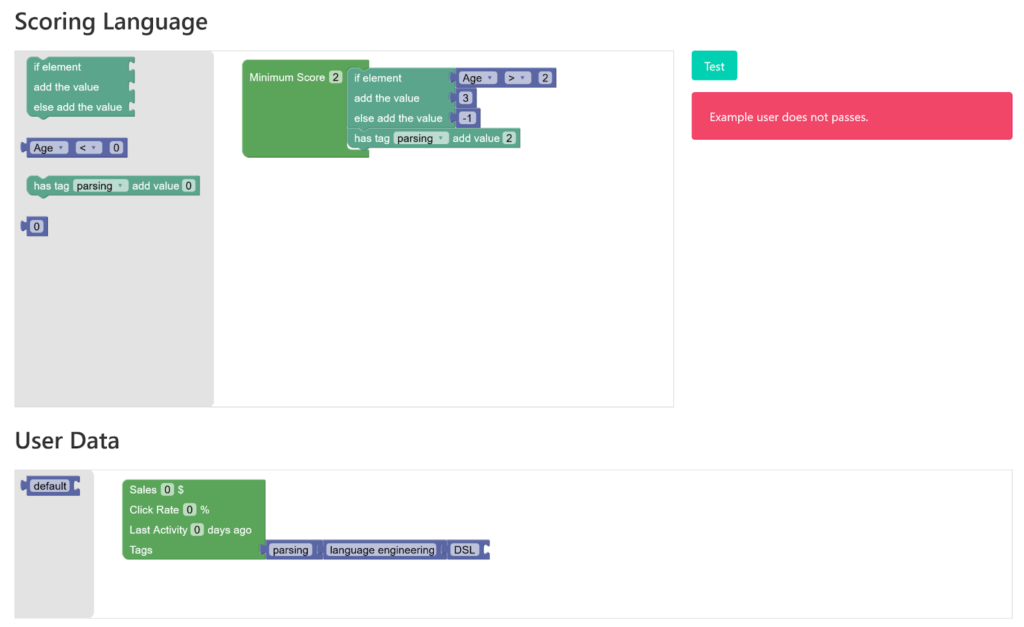
<h1 class="title">
Scoring Language
</h1>
<div class="columns">
<div class="column is-two-thirds">
<div class="blockly-editor">
<div id="blocklyDiv" style="height: 480px;">
<!-- blockly main toolbox -->
<!-- blockly main workspace -->
</div>
</div>
</div>
<!-- results here -->
</div>
<h2 class="title">
User Data
</h2>
<div class="columns">
<div class="column">
<div class="blockly-editor">
<div id="blocklyUser" style="height: 200px;">
<!-- blockly sample data toolbox -->
<!-- blockly sample data workspace -->
</div>
</div>
</div>
</div>
</section>
<script src="https://unpkg.com/blockly"></script>
<script src="scripts/scoring_blocks.js"></script>
<script src="scripts/main.js"></script>
</body>
</html>
On lines 8-9 we load our CSS framework (Bulma) and some custom styles. Towards the end of the body we load the Blockly library, some Blockly custom blocks and our main code.
Blockly custom blocks are essentially your language. They define the aspect and behavior of the custom components that your users will use to write programs in your language. In addition to your custom blocks, your users could always have access to standard blocks, such as if-else blocks or number blocks. You define which blocks your users can use, so you can include or exclude them as you see fit.
Inside the page you also see interesting comments such as <-- blockly main toolbox --> or <-- blockly sample data workspace -->. In place of these comments we would actually have some configuration sections written in XML, that will contain setup instructions for the toolbox and workspace.
Two obvious questions:
- What are toolboxes and workspaces?
- And why are there two sets of them?
We are going to answer the first question in the next section. The answer to the second one is easy: we want our clients to define a scoring algorithm for their users, so we need to also allow them to define sample users to test out the algorithm. So, we would actually have different Blockly environments.
Imagine this scenario: John works in marketing and it wants to define logic to choose who gets which emails. He does not want to learn how to code, but if he had a tool to describe this logic he could use it very well. That is because he understands the concepts and needs behind the task. We are going to give them these tools with Blocky. To accomplish this, he needs some kind of environment that allows him to create an algorithm and check the results on a hypothetical user. That is why we have two Blockly environments: one to create the algorithm and the other one to set some parameters for a sample user.
The interesting things to focus on right now are actually the divs in which these comments are inserted. If you want the Blockly workspace to appear you need to define a size in some way. You could create a resizable Blockly workspace with JavaScript code or you could create a fixed-size one with CSS, as we did. The important thing is that you set a size for your workspace.
Toolboxes And Workspaces
We keep talking about the workspace, but what is it? It is essentially the code file of your application. It contains the blocks used to define your program. The difference between a workspace and a traditional code file is that you generally only have one workspace for each program. This means that Blockly programs are mostly single-file programs, although, as we are going to see, you can easily combine the programs generated by different workspaces.
A toolbox instead contains all the blocks available to the user. There is no simple parallel between a toolbox and anything available in a traditional programming language. Given the graphical nature of Blockly-programming you need something to store and present the building blocks of Blockly code to the user. That is what the toolbox is for.
Both workspaces and toolboxes are configured in the same way: with XML code. You could also use JSON code, but for once XML seems to be better suited for the job. It creates a cleaner and more readable structure.
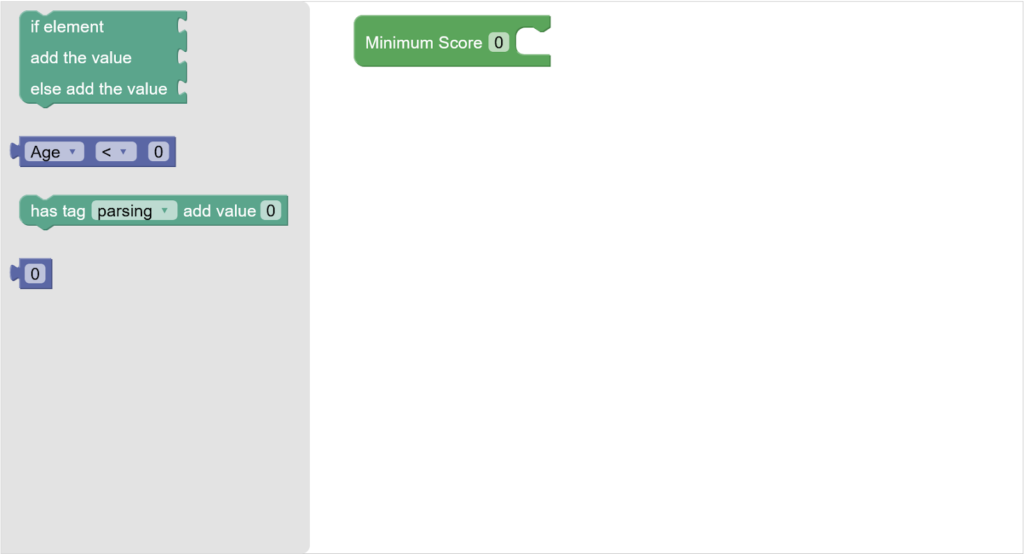
The Main Workspace And Toolbox
Let’s see the workspace and toolboxes for your program, starting with the main workspace.
<xml xmlns="https://developers.google.com/blockly/xml" id="workspaceBlocks" style="display: none">
<block type="scoring_block" id="6t)r:LY:Sm~!NcLp70@p" x="38" y="12">
            	<field name="minimum_score">0</field>
</block>
</xml>
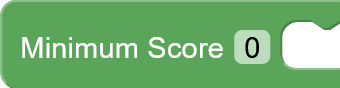
The main workspace has an id, necessary to find and load its content in our JavaScript code. Then there are the blocks. In this case we only have one block, which is essentially the main function of a scoring application. So, each time the user loads the page, the workspace will start with this block included.
Each block has a type, in this case scoring_block. The type defines the aspect and the behavior of the block. It is the most important attribute. You can also set a position, with the x and y attributes. The blocks also contain an id, in this case it is random because we generated it using the developer tools provided by the Block team. We are going to see these tools later.
Inside the block you might have different fields and values, depending on the block. Our scoring apps need to have a minimum score to understand if the user passes or fails the scoring, so here we provide a default value.
The toolbox is fundamentally similar, but with more blocks.
<xml xmlns="https://developers.google.com/blockly/xml" id="toolbox" style="display: none">
	<block type="condition_block"></block>
	<block type="features_list">
		<field name="feature">AGE</field>
	</block>
	<block type="has_tag">
		<field name="tag_value">0</field>
	</block>
	<block type="math_number">
		<field name="NUM">0</field>
	</block>
</xml>
This is the main practical difference between the two. Functionally they are the same: they contain blocks. Practically the toolbox can look much more complicated because it must contain anything the user might use.
Toolboxes can get really complicated also because they might be used to configure styling and organization. For example, you might want to separate blocks in categories, define default values, etc. Imagine you need to organize and show each statement in a language. It can easily get complicated.
Not in our case though, where all is nice and understandable.
Notice that it is not immediately obvious how the blocks will look and work just by looking at the toolbox configuration. You do need to mention all fields and options during configuration, only the one for which you need default values.
We use all custom blocks, except for math_number, which is a standard block designed to contain, you guessed it, numbers.
The User Sample Data
Our application is simple and so are our main workspace and toolbox. Even more simple is the user sample data section. All this second application must do is allow the user to define a user with the data it needs to test the scoring application.
<xml xmlns="https://developers.google.com/blockly/xml" id="userToolbox" style="display: none">
	<block type="block_text">
		<field name="INPUT_TAG">default</field>
	</block>
</xml>
<xml xmlns="https://developers.google.com/blockly/xml" id="userWorkspace" style="display: none">
	<block type="user_block" id="?OCI|E)9#uT!-9#sYHBo" x="38" y="13">
		<field name="SALES">0</field>
		<field name="CLICKRATE">0</field>
		<field name="AGE">0</field>
	</block>
</xml>
As you can see, this can be achieved prettily easily. The workspace contains the main block, the user_block, which contains a series of fixed fields (e.g. Sales, Clickrate, etc.) that can be set by the user.
The toolbox is also sparse: it has just one block to allow the user to add tags in the proper section.

The user workspace has a large width for a simple, practical reason: we want to avoid dealing with resizing or forcing the user to pan out, so we make it very wide. This way the user can have a reasonably large amount of tags without issue.
Creating Custom Blocks
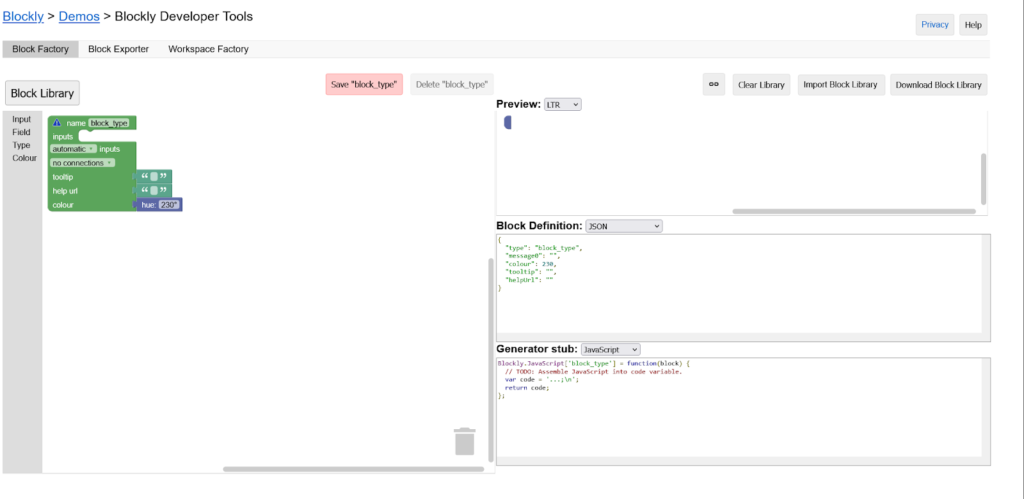
The blocks that we have seen have been designed with the Blockly Developer Tools. This is a set of Blockly-based tools designed to create blocks, workspaces and toolboxes. It is basically a language created with Blockly to design and configure Blockly blocks.
It is easier than creating them manually and also a good way to get a feel for the Blockly experience. This is the way recommended by Google for creating custom blocks and we agree.
Even if you might need to tweak the end result in some way, it is the best way to start the process. Another advantage is that you can get an idea of how blocks work, even if you do not have the time to read the extensive documentation.
You can immediately see that blocks are made of a definition and a generator. The definition contains the description of the block looks and its basic behavior. The generator defines how the block code will be translated into, say, JavaScript or PHP.
The definition can be either in JSON or JavaScript. You usually prefer JSON, since it is quicker and easier. However, you can also use a JavaScript fluent interface to define a block. You can also mix the two and define the basics in JSON and stuff like dynamic behavior in JavaScript.
The Main Block
Let’s see how the main scoring_block is defined.
{
    "type": "scoring_block",
    "message0": "Minimum Score %1 %2",
    "args0": [
      {
        "type": "field_number",
        "name": "minimum_score",
        "value": 0
      },
      {
        "type": "input_statement",
        "name": "algorithm"
      }
    ],
    "colour": 120,
    "tooltip": "",
    "helpUrl": ""
  }
It has a type attribute that sets the name of the block. The message0 attribute has both a syntactical and informational role. It contains the label that will appear in the block, but it also sets the number of inputs and fields available. If you try to remove one of %1 or %2, the block will be invalid and will disappear.
That might seem odd at first, but it makes sense if you think about it. You need a way to define the structure of the block, how its components appear, and the message0 attribute fills this role. The attribute args0 contains the elements that are mentioned as placeholders in the message0 attribute. So, in this case there are two placeholders and we have two elements.
You can add as many messageX and argsX attributes as you like. You would create additional messages to separate optional parts of the blocks or to facilitate localization of the block. That is because different natural languages might have different word order, so you could create different messages to handle this.
The elements inside args0 all have a type and a name. They are both important. The type identifies the type of the field, which in our case are all standard fields. The name is necessary to refer to the values of these elements, for example during the code generation phase.
The field prefix in field_number indicates the element is fully contained inside the block, the input in input_statement indicates that the element will contain an external block that will provide an input to this one.
If You Say So…
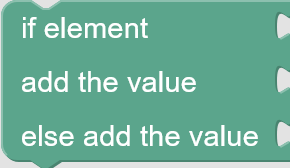
The condition_block allows users to assign a specific score when a certain condition is respected. For example, the user might want to assign a positive score if the user has been active for a long time and a negative one if it is a new user.
{
    "type": "condition_block",
    "message0": "if element %1 add the value %2 else add the value %3",
    "args0": [
      {
        "type": "input_value",
        "name": "condition",
        "check": "Boolean"
      },
      {
        "type": "input_value",
        "name": "do_this",
        "check": "Number"
      },
      {
        "type": "input_value",
        "name": "else_do",
        "check": "Number"
      }
    ],
    "previousStatement": null,
    "nextStatement": null,
    "colour": 160,
    "tooltip": "",
    "helpUrl": ""
  }
This block has a couple of interesting features. It has a previousStatement and a nextStatement. Their presence indicates that the block is a statement block and can have both a previous and a following statement block. You could assign a value to the attribute to restrict what type of statement can follow or precede the block. Although it is rare that you want to do it.
What is not rare is having a check attribute in a field. In fact, in this block each field has one. A check restricts what type of blocks can be connected to this field. Only blocks with a compatible type of output can be connected to the input.
Some Interesting Features

How can we indicate what type of output a block has, you ask? Well, I am glad you asked because our next block contains the answer. This block performs a check on some feature of the user. For instance, it allows to check whether the user has at least contributed 3 sales (in whatever implicit unit you want).
{
    "type": "features_list",
    "message0": "%1 %2 %3",
    "args0": [
      {
        "type": "field_dropdown",
        "name": "feature",
        "options": [
          [
            "Age",
            "AGE"
          ],
          [
            "Sales",
            "SALES"
          ],
          [
            "Click rate",
            "CLICKRATE"
          ]
        ]
      },
      {
        "type": "field_dropdown",
        "name": "comparison",
        "options": [
          [
            "<",
            "LESS"
          ],
          [
            ">",
            "GREATER"
          ],
          [
            "=",
            "EQUALS"
          ],
          [
            "≠",
            "DIFFERENT"
          ]
        ]
      },
      {
        "type": "field_number",
        "name": "feature_value",
        "value": 0
      }
    ],
    "inputsInline": true,
    "output": "Boolean",
    "colour": 230,
    "tooltip": "",
    "helpUrl": ""
  }
The answer to our question is near the end. The output attribute indicates that this block produces a Boolean output. The fact that this block has an output effectively means that it is an expression. So, it cannot be a statement. In Blockly a block can just be one of the two things, not both.
Another novel feature of this block is a new field: a dropdown. A dropdown defines a list of potential options that the user can choose from. Each option is defined by two values: a label and the actual value. The first one can be changed for each natural language of your users, the second one remains the same and will be used during code generation. By convention the second value is in UPPERCASE.
You can easily define a list of static options, but surely that is not always ideal. What if the options can change?
If Only You Had It

Well, you can actually have dynamic options, just see our new block. This block represents a check on the list of tags of the user. If the user has it, it gains some points, otherwise nothing happens.
{
    "type": "has_tag",
    "message0": "has tag %1 add value %2",
    "args0": [
      {
        "type": "input_dummy",
        "name": "tag",
      },
      {
        "type": "field_number",
        "name": "tag_value",
        "value": 0
      }
    ],
    "extensions": ["dynamic_menu_extension"],
    "inputsInline": true,
    "previousStatement": null,
    "nextStatement": null,
    "colour": 160,
    "tooltip": "",
    "helpUrl": ""
  }
If you look at the configuration of the block you might miss the dropdown. You might miss it because it is not there. What we have is a dummy input, which we will use to hook the dropdown and an extensions attribute. The dynamic_menu_extension is a standard extension in Blockly that can be used to change a block.
The available options are defined in JavaScript code.
Blockly.Extensions.register('dynamic_menu_extension',
  function() {
    this.getInput('tag')
      .appendField(new Blockly.FieldDropdown(
        function() {
          var options = [];
          options.push(["parsing", "PARSING"]);
          options.push(["DSL", "DSL"]);
          return options;
        }), 'tag');
  });
For the sake of simplicity, the options are actually defined statically, but since it is JavaScript code you could easily get it from some remote source. For example, you could download them from a list of tags defined in your newsletter software.
In the rest of the code we can see how you can dynamically define or modify a block. You first get a reference to an existing input and then you append a field.
The User Block
There are two other custom blocks in our code. Let’s see the user_block first.
{
    "type": "user_block",
    "message0": "Sales %1 $ %2 Click Rate %3 %% %4 Last Activity %5 days ago %6 Tags %7",
    "args0": [
      {
        "type": "field_number",
        "name": "SALES",
        "value": 0
      },
      {
        "type": "input_dummy"
      },
     [..]
This is the beginning of the user_block, which is used to define the sample user data. It has a few pairs of a valid field and a dummy input. This makes the structure of the block a bit convoluted. However, it is necessary simply for aesthetic reasons.
This is the user_block as it appears with them.
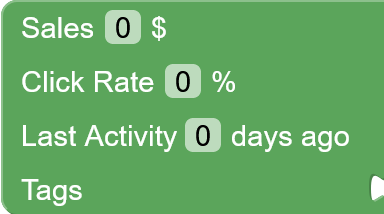
If we remove them, we get a cleaner and simpler structure.
"message0": "Sales %1 $ Click Rate %2 %% Last Activity %3 days ago Tags %4",
However, we also get something that looks like this.

This is not a tragic change, but we prefer the first option. So, we add some dummy inputs to force the block to stack the items vertically.
How to Input an Array

Finally, we take a look at our last block, the block_tag. This block is used to add a tag for the sample user.
{
    "type": "block_tag",
    "message0": "%1 %2",
    "args0": [
      {
        "type": "field_input",
        "name": "tag",
        "text": "default"
      },
      {
        "type": "input_value",
        "name": "input_tags"
      }
    ],
    "output": null,
    "colour": 230,
    "tooltip": "",
    "helpUrl": ""
  }
The components themselves are easy to understand, we have already seen them. What is interesting is how they are combined. We know that the block represents a tag, that is what the field tag is for, it even comes with a default text.
What is the input_tags input for, though? It is necessary to allow the user to append another block/tag before the block itself. This way we can build a chain of tags.
If we removed the tag input that is what the block would look like.
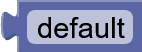
There will be no input notch, so we could not attach any other tag. Notice that the input is on the right. while the output is on the left. At a first glance this might seem counterintuitive, since in western languages we write from left to right, so the ideal flow is left-to-right. However, this makes sense if you think about it that the other way around would leave the first block, where this block puts its data, on the left.
This is a nice observation, but many of you might think: we have a list of tags, why not just use a list input to insert the tags?
Why We Cannot Just Use a Simple List
Your first instinct might be to think that there is no easy way to create a list in Blockly. That is not true, actually, there are a few default blocks to make lists.
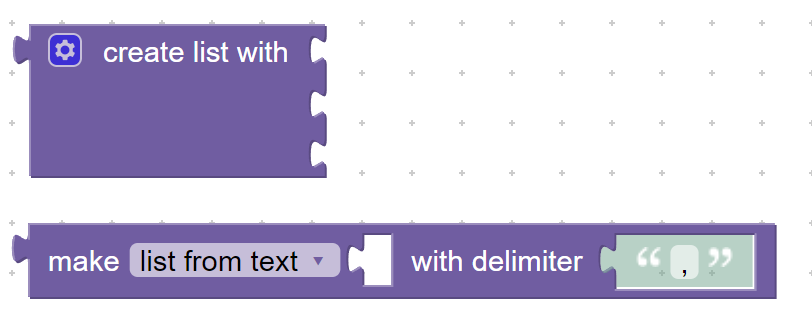
However, we feel that this approach might be a bit complicated for our target audience. They would be easy to use for a programmer, but not ideal for people that are not familiar with programming concepts. The second one makes perfect sense to me and you, but it looks nonsensical to the average person.
The first one is more promising. We have a block for a list to which we can attach a series of individual tags. The list of tags has a graphical representation that makes sense. You do not need to understand arrays or lists in the computer science sense to make use of it. The problem is what happens when you need to add more than 3 tags.
The user might expect the list to automatically grow when they gets it to three tags or when they tries to add a fourth tag toward the end of the list. But this does not work. What you have to do is to open an additional per-block toolbox that allows you to change the number of items. Then you add a tag.
I am not saying that this is a bad approach. It adds a great deal of flexibility and optionality in handling complexity for blocks. It is easy to see how this approach makes possible a greater complexity in blocks by presenting it in steps. For example, this is the best way to handle the default if-else block. This approach makes it easy to add an else sub-block or an infinite series of else if sub-blocks.
However, it is not the right fit for our use case. It would be too much to ask our users to handle this level of complexity just for the little reward of one more tag. So, we let the user add the tags in a more natural way.
It Is Our Job to Handle The Complexity
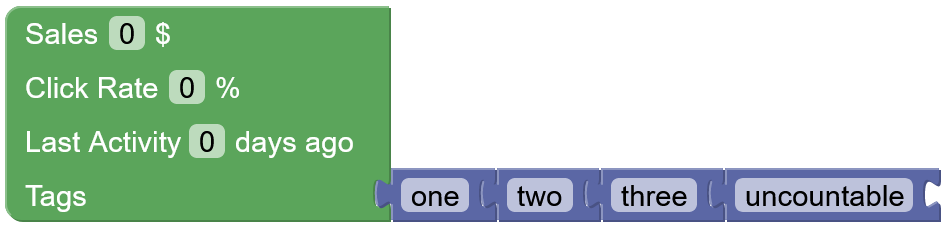
This makes the life of our users easy, but it makes our own harder. To understand why, we can think back at the definition of the block. Each block_tag has an input and an output. The output is simply the tag itself, nothing weird there. However, the input is the series of previous tags.
This is the result of the structure we have defined. The net result is that the input_tags will contain a nested series of tags.
tag="one" input_tags="(tag="two" input_tags="(tag="three" input_tags="(tag="uncountable" input_tags="")")")"
This is a textual representation of the last tag (tag one) in the previous image. It has a tag value of one, but an input_tags value containing all the previous tags.
The structure of the result depends on the way we have defined the blocks relationship. However, the actual textual representation depends on how we choose to generate the code. So, let’s look at the code generation for the block.
  Blockly.JavaScript['block_tag'] = function(block) {
    var tag = block.getFieldValue('tag');
    var input_tags = Blockly.JavaScript.valueToCode(block, 'input_tags', Blockly.JavaScript.ORDER_ATOMIC);
    var code = 'tag="' + tag + '" input_tags="' + input_tags + '"';
    return [code, Blockly.JavaScript.ORDER_NONE];
  };
In this code we collect the values of the two elements and then we create a string representing them. We collect the value of the field tag with the simple standard method getFieldValue.
To get the value of the input element we use something else. The method valueToCode is used to get the value of other blocks. The end result is the same: you get a string representing the block generated according to your rules. However, its behavior is different. The reason is its last argument, the precedence argument. We do not actually use this feature for our example, but it is important to understand it for your endeavors.
We have already seen that blocks that output a value can be thought as expressions, while the ones that do not can be thought as statements. The connections between expression blocks can be thought as operators.
Therefore the precedence argument defines an order of precedence that is used to combine two expression blocks in the proper way. The list of operator precedence depends on the generated language. That is because this is designed to correctly represent the expression code in the chosen target language.
To understand how this works, we would just quote the documentation.
If the order value returned by the sub-block is weaker than or equal to the order value for the order argument of the parent block, then the valueToCode function will automatically wrap the contents of the sub-block’s code in parentheses to prevent it from being ripped apart by the parent block’s code.
Basically, this automagically deals with parentheses, ensuring that they do not mess with our expressions.
We also have to use the operator precedence indication to return our code for this block. That is because this is an expression block, so the block will feed its generated code to a block that uses the valueToCode method.
The actual code we generate, in the code variable, might seem weird and confusing. In fact it is: it makes it easier to show how a series of tags is organized, but it is harder to use. It would not be complicated to use recursion to disentangle the generated mess, however there is a better way. So, we are going to change the generated code into this.
var code = [ "'" + tag + "'" , (input_tags || "''") ];
This will generate an array of nested tags, which may look complicated, but it actually generates something like this.
‘one’,’two’,’three’,’’
This is a string, not an array, because the output of code generation for an expression block is always a string, but it can be trivially transformed into an array.
Our User
We do that and other things in the generation of the user block.
Blockly.JavaScript['user_block'] = function(block) {
    var number_sales = block.getFieldValue('SALES');
    var number_clickrate = block.getFieldValue('CLICKRATE');
    var number_age = block.getFieldValue('AGE');
    var value_tags = Blockly.JavaScript.valueToCode(block, 'Tags', Blockly.JavaScript.ORDER_NONE);
    var code =  'var user = {\n' +
                '    SALES: ' + number_sales + ',\n' +
                '    CLICKRATE: ' + number_clickrate + ',\n' +
                '    AGE: ' + number_age + ',\n' +
                ‘  TAGS: ' + "[" + tags.split(',').filter(tag => tag.length > 2) + "]" + ',\n' +
                '    hasTag: function(tag) {\n' +
                '        return this.TAGS.includes(tag.toLowerCase());\n' +
                '    }\n' +
                '};\n';
    return code;
  };
The generation is pretty straightforward. We get the code from the tags blocks and we manipulate them to get our list of tags. The rest of the code is used to generate the rest of the user object.
Our user object also has a function that will be used by the has_tag block that we have already seen.
Blockly.JavaScript['has_tag'] = function(block) {
    var dropdown_tag = block.getFieldValue('tag');
    var number_tag_value = block.getFieldValue('tag_value');
    var code = 'if (user.hasTag("' + dropdown_tag + '")) {\n score += ' + number_tag_value + '; }\n';
    return code;
  };
This is the corresponding code generation. We implement it as a basic if check and add the score if the check passes.
Notice that both this block and the previous one return a simple string. That is because they are statements, so we do not need any special care for handling expressions.
You can look at the rest of code generation directly in the repository inside the file scoring_blocks.js. It is pretty straightforward.
The only thing to mention is that all the block definitions are added with the function Blockly.defineBlocksWithJsonArray.
Wiring All Up
We can now see the main JavaScript file that puts all of this together.
// Load Main Block
var toolbox = document.getElementById("toolbox");

var workspace = Blockly.inject('blocklyDiv', {
  toolbox: toolbox,
  scrollbars: false,
});

var workspaceBlocks = document.getElementById("workspaceBlocks");

Blockly.Xml.domToWorkspace(workspaceBlocks, workspace);

// Load User Data Block

var userToolbox = document.getElementById("userToolbox");

var userWorkspace = Blockly.inject('blocklyUser', {
  toolbox: userToolbox,
  scrollbars: false,
});

var userBlocks = document.getElementById("userWorkspace");

Blockly.Xml.domToWorkspace(userBlocks, userWorkspace);

document.querySelector('#test').addEventListener('click', function(event){
  executeScoring(event, userWorkspace, workspace)
});
To set up a Blocks program we have to do a few simple things. We need to load the workspace and toolbox definitions. We start doing that by getting references to the HTML elements containing these definitions on lines 2 and 8. On line 4 we configure the workspace and inject it into the right HTML element. We then take the reference to the workspace configuration and we load it into the workspace object that we previously created.
We repeat the same process for the workspace containing the sample user.
Finally, we connect a button with id test to the function that will transpile our scoring blocks code into JavaScript.
Actually Executing Code
To actually execute the code we need to use the function executeScoring.
function executeScoring(event, userWorkspace, workspace) {
    Blockly.JavaScript.addReservedWords('code');
    var code = Blockly.JavaScript.workspaceToCode(userWorkspace);
    code += Blockly.JavaScript.workspaceToCode(workspace);

    try {
      var resultContent = document.getElementById("result");
      eval(code);
      if (scoreUser(user)) {
        resultContent.innerHTML = "Example user passes.";
        resultContent.className = "notification is-success";
      }
      else {
        resultContent.innerHTML = "Example user does not passes.";
        resultContent.className = "notification is-danger";
      }

    } catch (error) {
      console.log(error);
    }
}
We can do it very easily. In fact, we just need to call the method workspaceToCode to trigger the generation. The rest of the code is fairly obvious. We execute the code with the standard eval function. This is not very safe but it works for our example. In a production environment the Blockly team suggests using the JS-Interpreter project.
In case you are wondering it would be also trivial to store the code in the workspace for later use, instead of generating. You could do that with the method Blockly.serialization.workspaces.save(workspace)).
The last thing to mention is the first line. The method addReservedWords is used to indicate to Blockly any variable name or other reserved name used in your code. So it can rename it, if it finds it in the generated code.
We have not seen this functionality, but Blockly allows the user to define variables. This method makes sure that any variable defined in our own code that uses Blockly does not conflict with the ones defined by the user inside Blockly code.
Summary
The code for this article is on GitHub: getting-started-blockly
This is not a short article but we have just scratched the surface of the potential of Blockly.
From a practical point of view, Blockly occupies an interesting niche between Excel and low/no-code platforms. Low-code platforms come in all shapes and sizes, ranging from essentially smart excel services to powerful systems to create data applications.
You need a developer to create a Blockly language and to wire it to the rest of your infrastructure. But it is much easier to fit Blockly in your infrastructure than any enterprise no-code platform. It is more flexible and open, you can find the best way to make it work for you.
In exchange for that effort, a user of Blockly can get something that is more powerful and tailored for their use than a bunch of Excel files or a low-code platform. It is easier to customize than your typical low-code platform, which is usually designed for a specific type of application. The more complex your code becomes, the easier is to use Blockly compared to Excel. That is because an app based on Excel often gets messy. It ends up working in arcane and confused ways to overcome the limitations of Excel. With Blockly instead you can create a tailored application for a specific need.
You now know how easy Blockly makes to create your visual language, but it can do much more. We have just mentioned that it supports variables, but it has a lot of other ways to extend it and improve it. For instance, you can easily add a new generator, i.e., a new language in which to transpile blocks. It does not even need to be a programming language, in fact Google created a tutorial to show how to generate JSON from blocks.
You can continue your journey in discovering Blockly looking at these resources:
- the main Blockly website with its documentation
- a series of tutorials on Blockly Codelabs
- a repository of Blockly sample code which also contain starting templates for Vue, Node, etc.