
Recently I have been looking for the right issue tracker for my needs and I compared a few tools including Jira, Trello, Asana and Redmine. You can read about it here.
Redmine was almost good enough but I wanted to be able to quickly add and edit tasks. Installing plugins for Redmine seem painful so I used the Redmine API instead. Basically, I can run a separate web application which interacts with my Redmine installation.
The code is available on GitHub: https://github.com/ftomassetti/redmine-reactive
Using Redmine API to interact with a Redmine installation
What I want to do is to use the Redmine API to build a new HTML page where I can show the display the data I have in Redmine. Redmine offers REST APIs over XML and JSONP.
Now, if you want just to read information from a Redmine installation you can do that through JavaScript even if you JavaScript is served on a different domain. So you can have a simple HTML file with some JavaScript and open that local file to get a custom view of a Redmine installation installed elsewhere, for example on your server.
If you want instead to write changes into Redmine you need to do PUT and POST calls. You cannot do them through JavaScript from a different domain. So the workaround is to build a tiny Python web application that do the PUT and POST calls to your Redmine application. You local application will call with the local Python webserver and let it forward the request to Redmine. Now, this sounds stupid to me but this is a consequence of the mechanism preventing cross-domain scripts.
First: getting a list of projects
As first thing I need to get a list of projects from Redmine. To do that we just need to a few lines of Javascript on our API Key. The API Key can be found in you profile. The JS code is displayed below
        $.ajax({
            url: window.base_url + "/projects.json?key=" + api_key,
            type: 'GET',
            crossDomain: true,
            dataType: 'jsonp',
            success: function (data) {
                $.each(data.projects, function (index, project) {
                    if (project.status === 1) {
                        $("select").append('<option value="' + project.id + '">' + project.name + '</option>');
                    }
                    ;
                });
            },
            error: function () {
                alert('Failed!');
            },
        });
We display the list of projects in a combobox, just like this:

Second: getting a list of issues
Now, every time someone select a project we want to load the list of corresponding issues in a table. So we add this code:
        $("select").change(function () {
            var projectId = $("select option:selected").attr('value');
            loadIssues(projectId);
        });
And this is the code to actually load the issues:
        var loadIssues = function(projectId) {
            $.ajax({
                url: window.base_url + "/issues.json?key=" + window.api_key + "&project_id=" + projectId,
                type: 'GET',
                crossDomain: true,
                dataType: 'jsonp',
                success: function (data) {
                    $("tbody#issues").empty();
                    $.each(data.issues, function (index, issue) {
                        $("tbody#issues").append("<tr issueId='" + issue.id + "'><td class='project'>" + issue.project.name
                            + "</td><td class='idCell'>" + issue.id
                            + "</td><td class='subject'>" + issue.subject
                            + "</td><td class='action'><button class='delete'><img src='/static/images/delete.png' width='20' height='20' /></button></td></tr>");
                    });
                    $(".delete").click(function () {
                        var issueId = $(this).parent().parent().attr('issueId');
                        deleteIssue(issueId);
                    });
                },
                error: function () {
                    alert('Failed!');
                },
            });
        };
Ok, that is it, you can now see the issues of your project in a separate page!
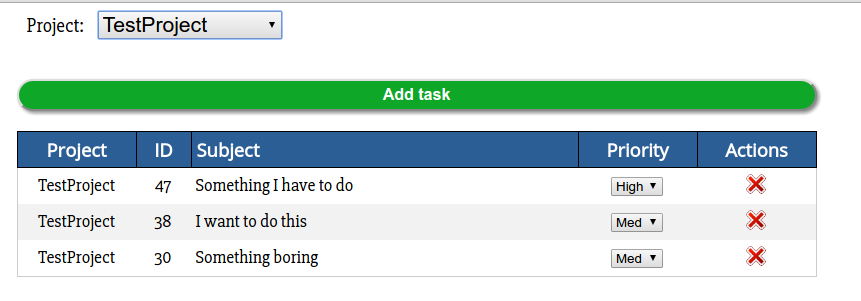
This is what it looks like. We did not see how to add the priority but the code is available on GitHub.
Adding issues
We have seen at the beginning that we need to go through a server to do write requests to Redmine. To do that I have created a very simple flask application in Python. I also took advantage of the python redmine library.
To create a new issue we need this code on the server:
@app.route("/commands/create_issue", methods=["POST"])
def create_issue():
    redmine = Redmine(app.base_url, key=app.api_key)
    data = request.json
    issue = redmine.issue.new()
    issue.project_id = data['project_id']
    issue.subject = data['subject']
    issue.save()
    return "OK"
And we need to call it from JS when we click on the “Add issue” button:
        $("#create").click(function () {
            var projectId = $("select option:selected").attr('value');
            createIssue(projectId, 'New issue');
        });

        var createIssue = function (projectId, subject) {
            $.ajax({
                url: "/commands/create_issue",
                type: 'POST',
                data: JSON.stringify({project_id: projectId, subject: subject}),
                headers: {
                    'Accept': 'application/json',
                    'Content-Type': 'application/json'
                },
                success: function (data) {
                    loadIssues(projectId);
                },
                error: function () {
                    alert('Failed!');
                },
            });
        };
Fairly easy, isn’t it?
Conclusions
After that I have added the possibility to edit the subject of issues and assign the priority from the list.
In practice I can use it like this.
So, if you cannot find the perfect project management tool do not desperate: you can improve the existing ones by adding the views you need.
