
Introduction
textX is a suite of Python modules and tools to quickly develop text-based domain-specific languages. Compared to heavyweight language workbenches such as Jetbrains MPS, Eclipse Xtext or Spoofax, textX is less powerful and not as feature-rich; however, it’s directly usable in Python with minimal effort as it’s just another Python library, and it has a really modest learning curve. We will talk about a quick Domain-Specific Languages in Python with textX.
At the end of this tutorial, we’ll have written a small domain-specific language and a syntax highlighting extension for Visual Studio Code that understands our language.
In particular, similarly to our article about ANTLR in C++, our language will be capable to describe colored shapes. After all, graphics are fun and immediately rewarding! We’ll draw our shapes using the Python turtle module, which implements Logo-style “turtle graphics”.


Setup
In order to get started, we need of course to have Python 3 installed on our system. The commands that we’ll show here are for Unix-like operating systems, but with the necessary adaptations, the same concepts could work on Windows systems too.
Note: recent versions of OSX bundle Python 3 out of the box, but it doesn’t include the turtle graphics module. So, we recommend installing Python from the official website.
Of course, we’ll also need textX; however, we’ll install it together with the textX-LS extension for integration with Visual Studio Code. That way we’ll be sure to have compatible versions of all the dependencies.
textX-LS is under development at the time of writing, so we’ll be using the bleeding edge version from GitHub. If you’re not interested in Visual Studio Code integration, it probably makes sense to skip this part and install the latest version of textX directly.
To build the client part of textX-LS we need node.js. If it’s not already present on your system, you can download it from the official page.
So, we’ll clone textX-LS from GitHub:
git clone https://github.com/textX/textX-LS.git
And we’ll install and build the required components according to the README:
python -m venv env && source env/bin/activate
pip install -r requirements.txt
cd client && npm i
Note that the actual commands will vary according to the system, for example, we may have to write python3 and pip3 respectively.
Our Language
Our language uses turtle graphics, so we’ll call it Turtle. We want to use it to describe a scene which is a collection of shapes that our little turtle will draw for us. For each shape, we’ll write:
- the name of the shape
- an optional line color (defaults to black)
- an optional fill color (defaults to white)
- a sequence of lines that define the borders of the shape.
In turn, we’ll define each line as a combination of direction and length; each line will start where the previous line ends.
Finally, when we’ve defined a few shapes, we’ll want to tell the turtle which ones to draw and where; so, our scene description will end with a few drawing instructions for the turtle, each consisting of a shape and an optional starting position (which defaults to (0, 0), the center of the drawing canvas).
In the end, a scene will look like the following:

and it will produce an image like this:
Defining the Metamodel
One key idea in textX is that we use the same meta-language to define both the grammar and the structure of the abstract syntax tree (AST). TextX builds the AST, which it also calls a model, out of Python objects of dynamically generated classes.
So, we’ll now proceed to write our metamodel in a text file named turtle.tx.
Here, we won’t be giving a comprehensive introduction to textX. Instead, we’ll quickly sketch our graphics language, touching only on the parts of textX that are relevant to it. In fact, our goal is to give an impression of what it means to work with textX. If you like it, then you may want to look into the official documentation, which is well written and includes a few good tutorials.
We’ll proceed in a bottom-up fashion, so as to start with the simplest rules.
At any point in our journey, we might want to check the correctness of our metamodel and to inspect a visual representation of it, to see if we’re doing things right. TextX got us covered: in fact, it can generate a DOT representation of a metamodel, which we can turn into an image using Graphviz or other tools.
This is the incantation for doing so on *NIX systems:
textx generate turtle.tx --target=dot --overwrite
dot -Tpng -O turtle.dot
Note the –overwrite parameter. Without it, textX doesn’t overwrite a dot file if it already exists.
This is an edited rendition of the output:

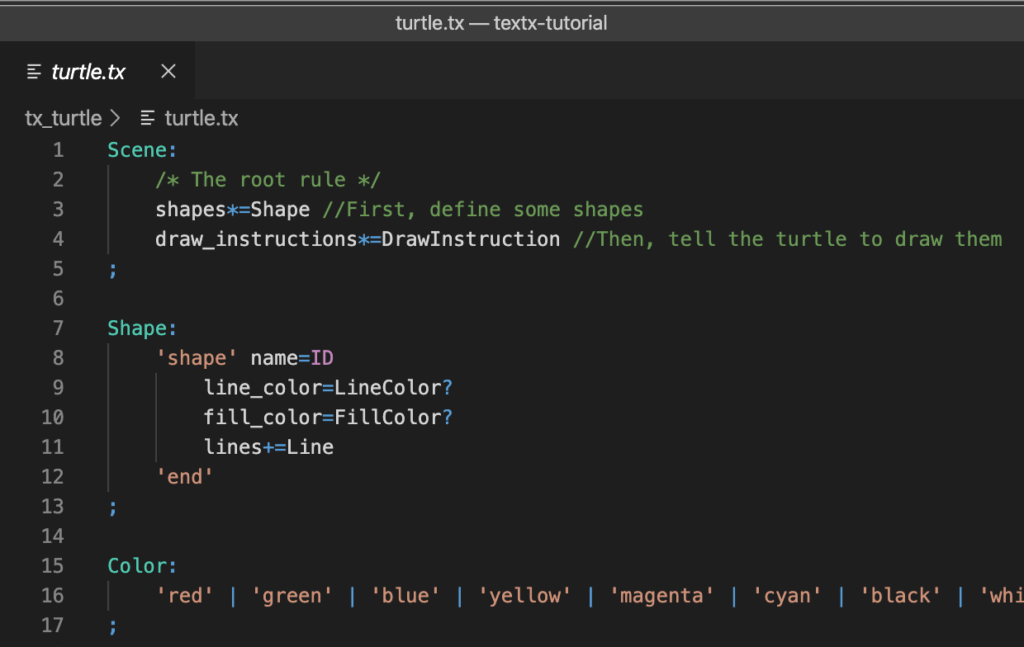
Colors
We’ll now start shaping our language. Recall that our shapes allow specifying a line and a fill color. So, let’s define those, starting from the specification of a Color:
Color:
    'red' | 'green' | 'blue' | 'yellow' | 'magenta' | 'cyan' | 'black' | 'white' | /#[0-9a-f]{6}/
;
We can see that a rule has a name with a capital initial letter, followed by a colon; then come the contents of the rule, indented, and finally a semicolon on its own line. The content is a list of expressions that must match in order for the rule to parse correctly. Here we see literal string matches such as 'red', as well as a regular expression match for hexadecimal RGB color specifications.
Let’s now use the above rule to define the fill color and the line color:
LineColor: 'lines'
    color=Color
;

FillColor:
    'fill' color=Color
;
Each of these two rules will match a literal string (lines or fill) and then a color as we’ve defined it previously.
We’ve also given a name to the color that we’ve just matched, with color=. Remember that we’re not defining just the grammar, but the abstract syntax tree as well. By assigning the matched color, we’ve added a color property to the AST nodes for LineColor and FillColor. We’ll make use of that later.
Lines
Similarly, we can now define lines. Recall that a line is a direction and a length. To make things more interesting, we’ll allow expressing a direction in two ways: either with a cardinal point as on a compass or as an angle with respect to the previous line:
Line:
    'line' direction=Direction length=INT
;

Direction:
    bearing=Bearing | angle=Angle
;

Bearing:
    'E' | 'NE' | 'SE' | 'W' | 'NW' | 'SW' | 'N' | 'S'
;

Angle:
    degrees=FLOAT ('°' | 'deg')
;
There’s some interesting stuff going on here. First, we could notice the INT and FLOAT matches: those are built-in shortcuts for regular expressions that match integer and floating-point numbers respectively, but in addition to that, they produce numeric properties in our model nodes. We can also declare our own shortcuts and type mappings, but we’ll leave that out of this article.
Then, we might notice that the bearing definitions are ordered in a strange way. We’ve chosen an order among many possibilities, but with the property that a string precedes its substrings. For example, NE comes before N. This is necessary because the parser chooses the first match and doesn’t backtrack, so if we had put N before NE, the NE option would never be reached and the parser would fail to recognize the string, “NE”. In fact, Arpeggio, the parser used by textX, is a PEG parser – this means that the choice operator is deterministic and ordered.
Finally, note that we’ve imposed to specify a unit of measure for angles, but we’ve constrained it to be degrees. Adding other units of measure and setting a default unit is left as an exercise for the reader.
Shapes
Now that we have colors and lines, we can put them together in a shape, and in doing so, we’ll use other features of the textX meta-language:
Shape:
    'shape' name=ID
        line_color=LineColor?
        fill_color=FillColor?
        lines+=Line
    'end'
;
Let’s start at the top and move down. After the ‘shape’ string match, we encounter an ID match. ID stands for identifier, and it’s another of those built-in regular expression matches; however, an ID property will also allow us to refer to a given shape in other places, as we’ll see later.
So, our shape now has a name. Let’s move on to the other properties. Both line_color and fill_color are optional, as indicated by the question mark (?) after each rule match.
Then we encounter the lines and another operator that we haven’t seen so far: += (plus followed by equals). It has two effects:
- in the grammar, it declares that one or more Line rules must match;
- in the abstract syntax tree, it declares a property of type list, containing the references to the parsed Line objects.
Of course, there’s also a zero or more operator, which is *= (star followed by equals).
Just like in other rules, we’ve defined a precise ordering of the constituents of each expression/declaration; here, for example, the line color must come before the fill color. However, textX also has an operator for unordered repetitions. We’ll leave that as an exercise to the reader.
Draw Instructions
We’ll now describe how we’ll tell our turtle to draw the shapes we’ve defined. We’ll say to it: could you please draw the shape some-shape, at position x, y? Thanks. So, this is how we might do it:
DrawInstruction:
    'draw' shape=[Shape] position=Position?
;

Position:
    'at' x=INT ',' y=INT
;
We’re seeing nothing new regarding the position; instead, let’s focus on the shape. What do the square brackets mean? Recall that we’ve given each shape a name (an ID). [Shape] indicates to match the ID of a given shape, and to include the referenced shape in the AST.
In practice, textX does a limited form of symbol resolution for us out of the box. Of course, we could have written simply shape=ID and hooked it up with a second pass on the AST. However, textX can do it automatically, and it even supports plugging our own strategy for symbol resolution.
Putting It All Together
TextX metamodels start with the root rule. This is the parser’s entry point rule and defines the root node of our model. So, for Turtle, the root will be a Scene comprising some Shapes and some draw instructions:
Scene:
    shapes*=Shape
    draw_instructions*=DrawInstructions
;
Finally, to the benefits of our ninja turtle developers, we’ll allow Java-style comments inside the source, so that they’ll be able to include human-readable information that won’t end up polluting the AST. For this kind of thing, textX treats the rule called ‘Comment’ in a special way, if it’s present in the metamodel: it will try to match it between other matches and it will discard the matched text. So, we can add support for comments like this:
Comment:
    /\/\*(.|\n)*?\*\// | /\/\/.*?$/
;
These rather cryptic regular expressions match either multiline /* ... */ comments or line comments starting with //.
With that, our little language is complete. We’ll propose some exercises to extend it at the end of the tutorial. But first, we have other things to see.
Interpreting the Model
So far, we’ve concentrated on the definition of our language – both concrete and abstract syntax in one go, thanks to textX. However, syntax is only part of a language; now we need to give it semantics, that is, a meaning – an interpretation of it. So, we’ll now write a little interpreter in Python.
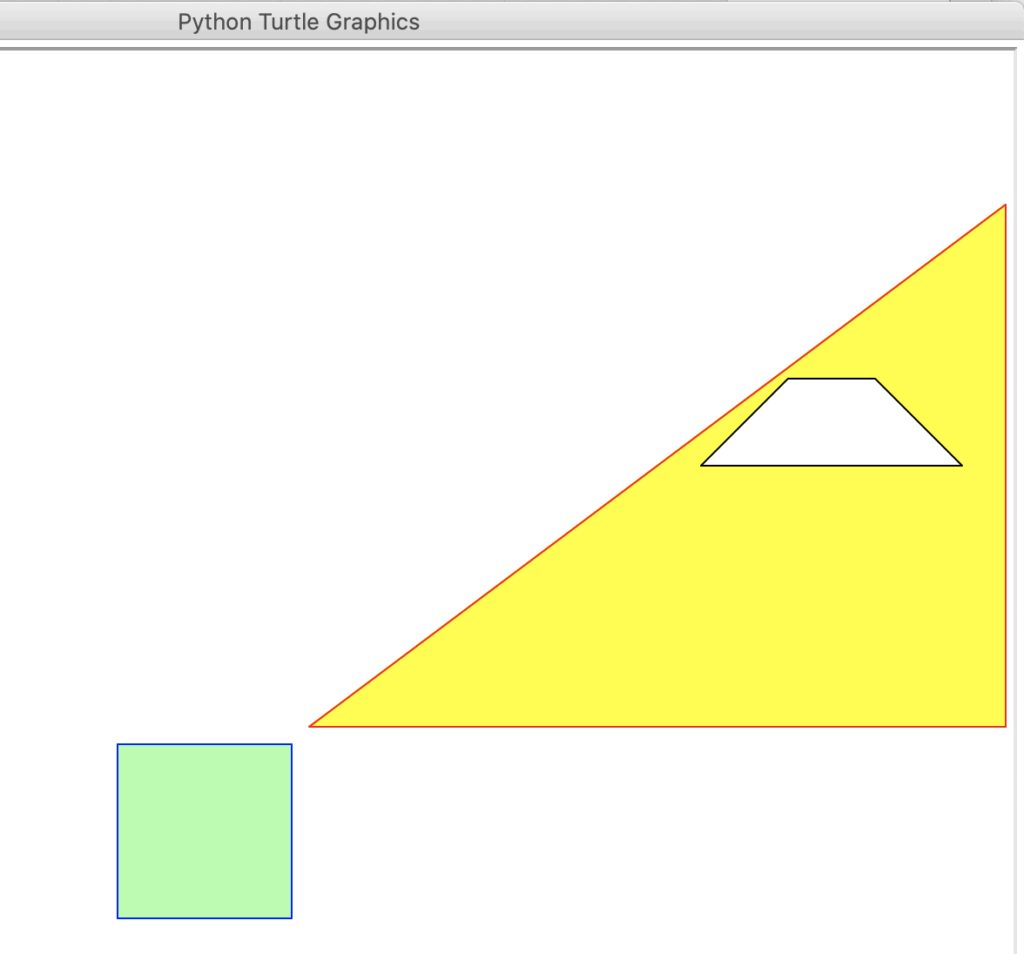
This will be our test program:
/*** triangle_and_square.turtle ***/

shape triangle
    line red
    fill yellow
    line E 400
    line N 300
    line 126.9° 500
end

shape square
    line blue
    fill #aaffaa
    line S 100
    line W 100
    line N 100
    line E 100
end

shape black_and_white
    line E 150
    line NW 71
    line W 50
    line SW 71
end

draw triangle //The default position is 0,0, the center of the canvas
draw square at -10, -10
draw black_and_white at 225, 150
This will be the result:
Parsing the Model
The first step in interpreting a model stored in a file is building it from its textual source, that is, parsing. However, before we can do that, we have to parse and load the metamodel – the definition of the format of our models:
from textx import metamodel_from_file
turtle_meta = metamodel_from_file("turtle.tx")
Once we’ve obtained the metamodel, we use it to parse the model and build an AST:
scene = turtle_meta.model_from_file("triangle_and_square.turtle")
If everything goes well, scene will refer to the root of the model, i.e., the scene that we’ve described earlier. If we introduce an error – say, a spurious ‘x’ character at the beginning of the file – we’ll get a parsing exception:
textx.exceptions.TextXSyntaxError: None:3:1: error: Expected '/*(.|n)*?*/' or 'shape' or 'draw' or EOF at position triangle_and_square.turtle:(3, 1) => 'tle ***/ *x shape bl'.
Working with the Model
The model thus created is nothing more than a tree of Python objects, with properties as we’ve defined them in the metamodel. So, we can inspect it using standard Python tools, from crude print calls to fancy debuggers.
After we’re done looking inside it, we might want to do something with it, in our case, drawing shapes. So, we could start from the root scene and loop over the draw instructions:
for d in scene.draw_instructions:
    turtle.up()
    turtle.goto(d.position.x if d.position is not None else 0,
                d.position.y if d.position is not None else 0)
    draw_shape(d.shape)
For each shape, first, we move the turtle’s pen up so that it doesn’t draw anything while we proceed to the shape’s initial position; then, we actually draw the shape. Remember that the position is optional and defaults to (0, 0).
Now we can define our shape-drawing function:
def draw_shape(shape):
    turtle.pencolor(shape.line_color.color if shape.line_color is not None else 'black')
    turtle.fillcolor(shape.fill_color.color if shape.fill_color is not None else 'white')
    turtle.down()
    turtle.begin_fill()
    for l in shape.lines:
        draw_line(l)
    turtle.end_fill()
Nothing particularly fancy to see here. We’ve lifted some work off to another function, draw_line:
def draw_line(l):
    bearing = l.direction.bearing
    if bearing == 'N':
        turtle.setheading(90)
    elif bearing == 'NE':
        turtle.setheading(45)
    ...etc...
    else:
        turtle.left(l.direction.angle.degrees)
    turtle.forward(l.length)
And that’s it! We just have to remember to clean up after we’ve done drawing:
turtle.hideturtle()
turtle.done()
This way, the window will stay open and will only show what we’ve drawn.
Editor Support on Visual Studio Code
Now that we’ve got a beautiful language, we’ll want developers to use it and build awesome stuff. However, these days, unlike the real programmers of old times, developers expect all kinds of fancy tools to aid them in their work. Our DSL might be super terse and expressive, but if to work with it you’re stuck with black-and-white Vi (or Emacs), probably raw Python is still going to have an edge.
Thus, we’ll now implement a base level of integration of our language into Visual Studio Code. Specifically, we’ll focus on syntax highlighting. However, our approach will make it easier to add semantic code completion in the future. (VSCode already provides basic code completion using the text content of the file being edited, out of the box, for all file types).
For this, we’ll use the textX-LS project. The result will look like this:
Packaging Turtle as a Python Module
Before we start tinkering with VSCode, we’ve got a preliminary step to do: to package our language as a Python module. Note that here we’ll only package the Turtle language (metamodel) for further use by other tools; we’re not packaging the interpreter, examples, or other artifacts. We’ll leave this out of the tutorial, but we encourage readers to experiment.
So, let’s start by creating a directory and storing our language metamodel there. Of course, we’ll also modify the interpreter to load the metamodel from the correct place. Assuming all the files we’ve written so far lay flat in a single directory, we might do it like this:
mkdir tx_turtle
mv turtle.tx tx_turtle
Once we’ve got a directory dedicated to just the language definition, we’re ready to add the necessary plumbing for packaging.
First, let’s add a file called __init__.py in the tx_turtle directory with the following contents:
from os.path import dirname, join

from textx import language, metamodel_from_file

@language("Turtle", "*.turtle")
def turtle():
    "A language for drawing shapes using Turtle Graphics."
    return metamodel_from_file(join(dirname(__file__), "turtle.tx"))
The purpose of the turtle function, decorated with @language, is to register the turtle language with textX when the module is installed. That way, tools building on textX will know about it. In particular, we’re telling textX that our language is called Turtle and the default extension of its source files is .turtle, and we’re associating our metamodel with it.
Next, we’re going to write a package descriptor for Turtle, which is a bit of a tedious process. We can use the following as a template:
import codecs
import os

from setuptools import find_packages, setup

PACKAGE_NAME = "tx-turtle"
VERSION = "0.1.0"
AUTHOR = "Alessio Stalla"
AUTHOR_EMAIL = "[email protected]"
DESCRIPTION = "The Turtle language for drawing shapes with Turtle Graphics"
KEYWORDS = "textX DSL python domain specific languages turtle graphics"
LICENSE = "MIT"
URL = "https://github.com/Strumenta/textx-tutorial"

setup(
    name=PACKAGE_NAME,
    version=VERSION,
    description=DESCRIPTION,
    url=URL,
    author=AUTHOR,
    author_email=AUTHOR_EMAIL,
    keywords=KEYWORDS,
    license=LICENSE,
    packages=find_packages(),
    include_package_data=True,
    package_data={"": ["*.tx"]},
    install_requires=["textx_ls_core"],
    entry_points={"textx_languages": ["turtle = tx_turtle:turtle"]},
    classifiers=[
        "Development Status :: 2 - Pre-Alpha",
        "Intended Audience :: Developers",
        "Intended Audience :: Information Technology",
        "Topic :: Software Development :: Libraries :: Python Modules",
        "License :: OSI Approved :: MIT License",
        "Operating System :: OS Independent",
        "Programming Language :: Python :: 3 :: Only",
        "Programming Language :: Python :: 3.5",
        "Programming Language :: Python :: 3.6",
        "Programming Language :: Python :: 3.7",
        "Programming Language :: Python :: 3.8",
    ],
)
We’ll save this in a file called setup.py located above the tx_turtle directory. Our final layout will thus be:
<project root>
  setup.py
  tx_turtle
    __init__.py
    turtle.tx
  ...other files...
Buried among all the information in the package descriptor file, we can see some interesting bits:
install_requires=["textx_ls_core"]declares the textX-LS-Core package as a dependency; we’ll need that for the VSCode integration.entry_points={"textx_languages": ["turtle = tx_turtle:turtle"]}tells the system which is the entry point of the package: the “turtle” textX language, declared by the function “turtle” in the directory “tx_turtle”.
Note: the package textx-dev provides a scaffolding command for setting up project files interactively from the command line.
Installing the Turtle Language
Now, we can install the Turtle language locally, so that the other textX-based tools will know about it. We’ll use the standard Python pip facility for that, from our project directory where setup.py lives:
pip install .
On some systems, the command might look slightly different; for example, on the author’s OS X Catalina box, the following works:
python3 -m pip install .
Check the right syntax with your system. After Pip has done its thing, it should output something along the lines of:
Successfully installed tx-turtle-0.1.0
We can further check that the language is installed with:
$ textx list-languages
Turtle (*.turtle)             tx-turtle                     A language for drawing shapes using Turtle Graphics.
textX (*.tx)                  textX                         A meta-language for language definition
Turtle is there, so everything is working so far! As a bonus, we can now generate visual representations of our models as well:
rm triangle_and_square.dot
textx generate triangle_and_square.turtle --target=dot
dot -Tpng -O triangle_and_square.dot
And this will be the result:
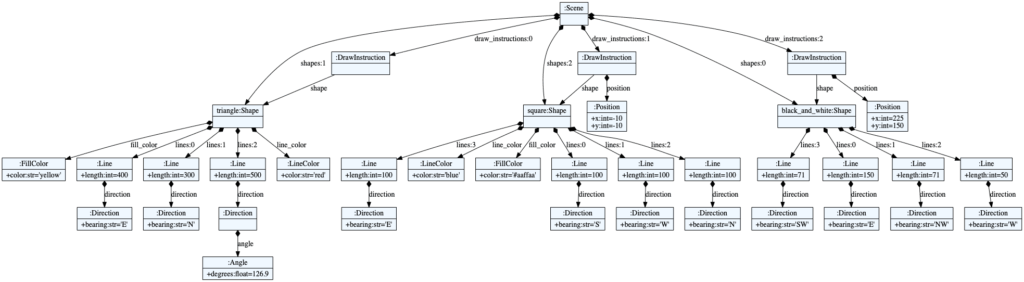
We can see the expressiveness of our language in action. That’s a fairly complex scene already, and it’s generated from just over 20 lines of code, not counting comments and empty lines.
Integrating with Visual Studio Code
We’re now ready to integrate our language into VSCode. As the first step, we’ll install the textX-LS extension from the marketplace. Assuming everything is set up correctly, we’ll just click on the green “install” button and VSCode will do the rest.
Now, opening VSCode, we should have a new, empty textX panel:

Let’s now open our project folder (where we’ve put setup.py earlier). Right-click on setup.py and choose “Install textX project”. After a few instants, voilà! The language is installed, and we can verify it by opening the sample program, triangle_and_square.turtle, that we’ve written earlier. If everything is working, we should see keywords, numbers, and identifiers with different colors.
What if I don’t like the colors? In Visual Studio Code, language extensions only control the type of the tokens in a file: this is a number, this is an identifier, this is a keyword and so on. The match between a type of token and its presentation is the responsibility of another component, the theme. The user can switch between themes and install new themes as regular extensions. However, we won’t digress into how to define a theme.
Preparing for Distribution
Up until now, everything that we’ve done only works on our machine. However, we might want to share our work with fellow developers. We’re talking specifically about our VSCode extension; we won’t touch on how to package the Python code itself, as there are good tutorials on that already.
In the Setup section, we’ve already established a development environment for textX-LS. We can verify that it’s ready to package our extension:
textx list-generators
This should output something along the lines of:
any -> dot                    textX                         Generating dot visualizations from arbitrary models
textX -> dot                  textX                         Generating dot visualizations from textX grammars
textX -> PlantUML             textX                         Generating PlantUML visualizations from textX grammars
textX -> vscode               textx-gen-vscode              Generating VS Code extension for installed textX projects.
textX -> textmate             textx-gen-coloring            Generating textmate syntax highlighting from textX grammars
Note, in particular, the textx-gen-vscode generator.
We have a final step to do in order to package the extension, and that’s adding the vsce executable to our PATH. vsce is included as part of textX-LS and we can find it here:
textX-LS/client/node_modules/.bin/vsce
We should have built the client back in the Setup section.
Packaging the Extension
We’ve now got everything in place for packaging the VSCode extension for distribution. We’ll issue a final command, from our project directory:
textx generate tx_turtle/turtle.tx --target=vscode --project_name tx-turtle --vsix True
If everything goes well, we’ll find a tx-turtle.vsix package in the current directory. Users will be able to install it in Visual Studio Code from the Extensions panel, choosing “Install from VSIX” from the menu:

And that’s it!
Of course, we can also publish the extension on the Visual Studio Code marketplace.
Bonus: TextMate
VSCode is not the only option that we can give our users. In fact, textX-LS also includes a generator for TextMate language grammars. The setup is the same that we’ve used so far and the command is similar:
textx generate tx_turtle/turtle.tx --target=textmate --name tx-turtle
However, this will not create an installable package – it will merely write the TextMate grammar (a JSON document) to standard output. We’ll have to save it somewhere and tweak it to our liking.
To Sum It Up
In this tutorial, we’ve built from scratch a DSL for drawing shapes, complete with an interpreter in Python and editor support in Visual Studio Code and TextMate. Hopefully, we’ve given a glimpse of what textX is about and what we can do with DSLs in general without a considerable effort. The source code is available on GitHub.
TextX is a good choice when the speed of development and the integration with Python are key concerns, and when the language is close enough to what textX supports best: a regular, deterministic structure, where whitespace is not significant and lexical containment matches logical containment (in other words, where the abstract syntax tree has a close resemblance with the parse tree). This covers a wide range of languages, such as DSLs for data definition, configuration, etc. However, more free-form languages, such as general-purpose programming languages or DSLs with idiosyncratic syntax, may not be the perfect target for textX.
Further Reading and Exercises
At the time of writing, textX-LS is under active development and it’s not complete yet. Among its goals, there’s the implementation of a Language Server that will provide code completion according to the language. So, be sure to follow the project on GitHub.
Also, those who wish to learn more should definitely read the entire textX documentation site. And perhaps learn about more complex tools such as Xtext and MPS.
As a final note, we’re leaving some ideas for extending and improving the Turtle language:
- Extend the interpreter so that it takes the program to run as a command-line argument.
- Handle different units of measure for angles.
- Add support for arcs in addition to straight lines.
- Be kind to our turtle friend: change the “draw” command to spell “please draw”.
- Next, allow for more complex phrases, that still have to contain the words “please” and “draw”. For example, the language might support both “Oh dear turtle, please draw for me this shape:” and “Will you draw a shape for me, please?”. Think about how to express that in the parser and what the limitations are.
- Shape validation: check that each shape has more than one line and refuse to draw it if it’s not the case, with a meaningful error message.
- Currently, if the lines of some shape don’t delimit a closed surface, one invisible closing line is added automatically by the turtle module, and only the delimited part is filled. Provide an “auto-close shape” feature that will add a visible closing line if it’s missing, in the same color as the other lines of the shape.
- Allow adjusting the speed of the turtle, with a default for the scene and the possibility to override it for each shape.
- Composition: allow shape definitions to include other shapes.
- Inheritance: allow shapes to be defined by copying from another shape and changing colors, zoom and/or rotation.
- Encode positions as complex numbers rather than couples of integers.
Read more:
If you want to read more examples of Domain Specific Languges, you can read our article The complete guide to (external) Domain Specific Languages.
And if you would rather have a DSL designed and built for your domain than do it yourself, take a look at our DSL design and development service.