")
Let’s take a look at MPSServer: a tool to make MPS accessible remotely. MPSServer: enabling integration with MPS. It permits not only to build web editors for MPS but it can be used in several other interesting scenarios. For example, creating diagrams from MPS models or a simplified automated build mechanism.
In this article, we will see what use cases can be supported by MPSServer, and which new possibility it enables.
To make things more practical we are also going to show some demos and share some code so that you can get a concrete feeling of what it means to actually use MPSServer.
We will also briefly discuss how MPSServer works internally, without going into too many technical details. We just want to give you a feeling about the architecture so that you can understand better how to use this technology.
The companion GitHub repository is https://github.com/Strumenta/mpsserverdemo
The basic idea behind MPSServer
Now, what is MPSServer trying to do? The basic idea is that MPSServer is aiming to transform MPS into a web service. In other words, we want to make the capabilities of MPS available to external systems by using standard protocols, such as HTTP and WebSockets. That’s it.
What about the other MPS and Web stuff?
MPSServer is part of a series of tools to bring MPS to the web. In particular, it is related to WebEditKit but not only, so in this section we discuss how MPSServer fits in this panorama.
WebEditKit is a framework that we can use to write web editors that communicate with an MPS instance through MPSServer. Frequently we talk about MPSServer and WebEditKit together because they can be combined but today we will focus on MPSServer exclusively.
MPSServer and WebEditKit are part of several initiatives to bring MPS to the web. Markus Völter has recently written a great article on this topic, presenting the whole landscape and describing the different tools, including the role of MPSServer and WebEditKit. So if you want to have a complete overview of all the initiatives to bring MPS to the web, take a look at that article.
As someone who has been involved with MPS for more than one decade. I remember that when I started looking into MPS, the idea of bringing MPS to the web was already on the roadmap. Ten years later the official initiative from JetBrains is not yet available but in the meantime, other members of the community have provided different approaches. It is nice to see that nowadays we have different alternatives. So a lot of progress in this community and I think this is very good.
Also, some of these tools can work together and complement each other. We believe for example, that MPSServer can be combined with Modelix to obtain a more capable solution.
What is MPSServer?
Technically speaking, MPSServer is a plugin for MPS. You install it into MPS and start it.
When the MPSServer plugin is loaded it starts a web server. Being loaded as an MPS plugin MPSServer runs within MPS, so it can receive requests from the external world and serve them, by calling the internal MPS APIs.
MPSServe can also monitor the internal state of MPS and, for example, listen for changes to models or new events happening within MPS in order to communicate them to the external world.
You can start it in two different ways:
- Programmatically, for example as part of CI tasks or in scripts
- From within the MPS IDE. You typically want to do that during development
Installation
Now, how can you get MPSServer?
First of all, you should notice that MPSServer is an open-source project available on GitHub: https://github.com/strumenta/mpsserver. We are also providing packages on Maven Central, so you can get it from there. There are different ways to install it, we will see all of them.
Installation using Plugins Repository
For quick experiments, the simplest way to get MPSServer is to install it in your MPS IDE.
In the future, we could make it available in the official plugins marketplace, for now, we created a new plugins repository at https://mps-plugins-repo.strumenta.com/updatePlugins.xml. You can add it and search for MPSServer core and install it.
This video will show you the whole process:
Installation using Gradle
Typically in projects you may want to configure build scripts that permit to build everything from the command line. You will need this to run automated tests on the CI.
In this case, you typically want to install a certain version of MPS into your project as a project library, so that it can be loaded both by your MPS IDE, but also from the headless MPS you will download and run from command line tasks.
To do this we will use a gradle plugin to:
- Download MPS Server
- Add it to the project libraries
- Start MPS Server from the command line
Now, when running MPSServer from the command line you would typically also need to build your languages. This used to require defining build modules, which are a bit messy and hard to learn. It typically involves hours of cursing against the build language and the build system for MPS languages: it is my least favorite part of MPS. To avoid this pain we evolved MPSServer so that it can be configured to trigger a build of the project without build modules. It is basically invoking programmatically “Make project”, as you could do from the MPS UI.

The gradle configuration looks like this:
plugins {
	id 'com.strumenta.mpswizard' version '1.0.5'
	id 'com.strumenta.mpsserver' version '1.1.17'
}

repositories {
	mavenLocal()
	mavenCentral()
}


mpsWizard {
	mpsVersion = "2020.3.3"
	useMPSServer = true

	MPSServerVersion = "2020.3-13"
}

mpsserver {
	makeProject = true
	mpsServerVersion = "2020.3-13"
	extensionsPath = "com.strumenta.workflow"
}
The tasks you are interested in to are:
- ./gradlew setupMpsProject
- ./gradlew launchMpsServer
Use cases supported by MPSServer
In this section, we will look at the possible usages of MPSServer.
Before we dive into these specific usages, I would like to say that MPSServer is a quite flexible component that can serve different use cases. We have identified some of them but we think that as a community, we can find more ways to benefit from MPSServer and use it in more and more contexts.
The three main use cases we are identified are these:
- The first one is to make it possible for an external system to work with MPS and to consume the capabilities of MPS. Mainly accessing the data that we have in MPS, but also requesting MPS to perform a calculation or operation. For example, we could invoke an interpreter available within MPS.
- The second use case is to plug external editors into MPS. They could be web editors but also other desktop applications
- We finally have a third use case that is a bit more advanced and less obvious. And this is for supporting the automatic processing of MPS models like, for example, what we do in typical CI systems.
Let’s discuss each of them in detail.
Use Case 1: Consuming data
The video below shows a demo and discuss how to launch it on your machine:
In this use case, we are basically consuming data in capabilities from MPS.
To a certain extent that this mechanism is a replacement for using generation. As you probably know you can define model-to-model and model-to-text transformation in MPS. So why in some cases you may want to use MPSServer instead?
First of all, because there are cases in which we don’t want just to generate something, but we also need to have access to MPS to perform some calculation that depends on user choices or values that are available at runtime. Suppose that we have a language to describe a workflow and we want to actually execute the workflow. So we want to create an application when we do not modify the workflow, but we use it and we interact with it. We want to let the user press a button to execute a certain step. Then we may arrive at a point in the workflow where the user has to make a decision, and we want to show a popup to the user to allow them to make this decision, and then we would like to ask MPS to which step we should move next. To this, we could use an interpreter written in MPS and execute, driven by user input captured outside MPS. We could not do that with a generator because the generated code could not interact with the interpreter at runtime.
In other cases, I still want to use MPSServer instead of generation because it’s simpler. For example, we can do an HTTP request or WebSocket request and get data in JSON. Then we can rapidly build a web application that processes the JSON and throws elements on the screen or draw a diagram using a library like dagre-D3. That’s very fast and simple to implement using MPSServer while generation requires a bit more knowledge about our MPS work. Generation works very well for advanced use cases but it’s not trivial to learn and requires some training. So for simple scenarios, using MPSServer getting the information in JSON and working with it is just simpler.
Let’s take a look at the code of our first demo, which you can find in the directory uc1_docsystem.
The HTML code looks like this:
<h1 id=title></h1>
<svg height=400 width=800>
    <g/>
</svg>
<ol id=steps></ol>
We have:
- An empty title
- An empty SVG canvas
- An empty ordered list
In out script we execute this code:
const answer = fetch('http://localhost:2904/models/com.strumenta.workflow.sandbox.examples/6439756077573116110');
answer.then((value => {
    value.text().then((text)=>{
        const data = JSON.parse(text).value;

        // Set the title as the name of the workflow
        document.getElementById("title").innerHTML = data.properties["name"];

        createGraph(data);
        populateList(data, calculateIdsToIndex(data));
    });
}));
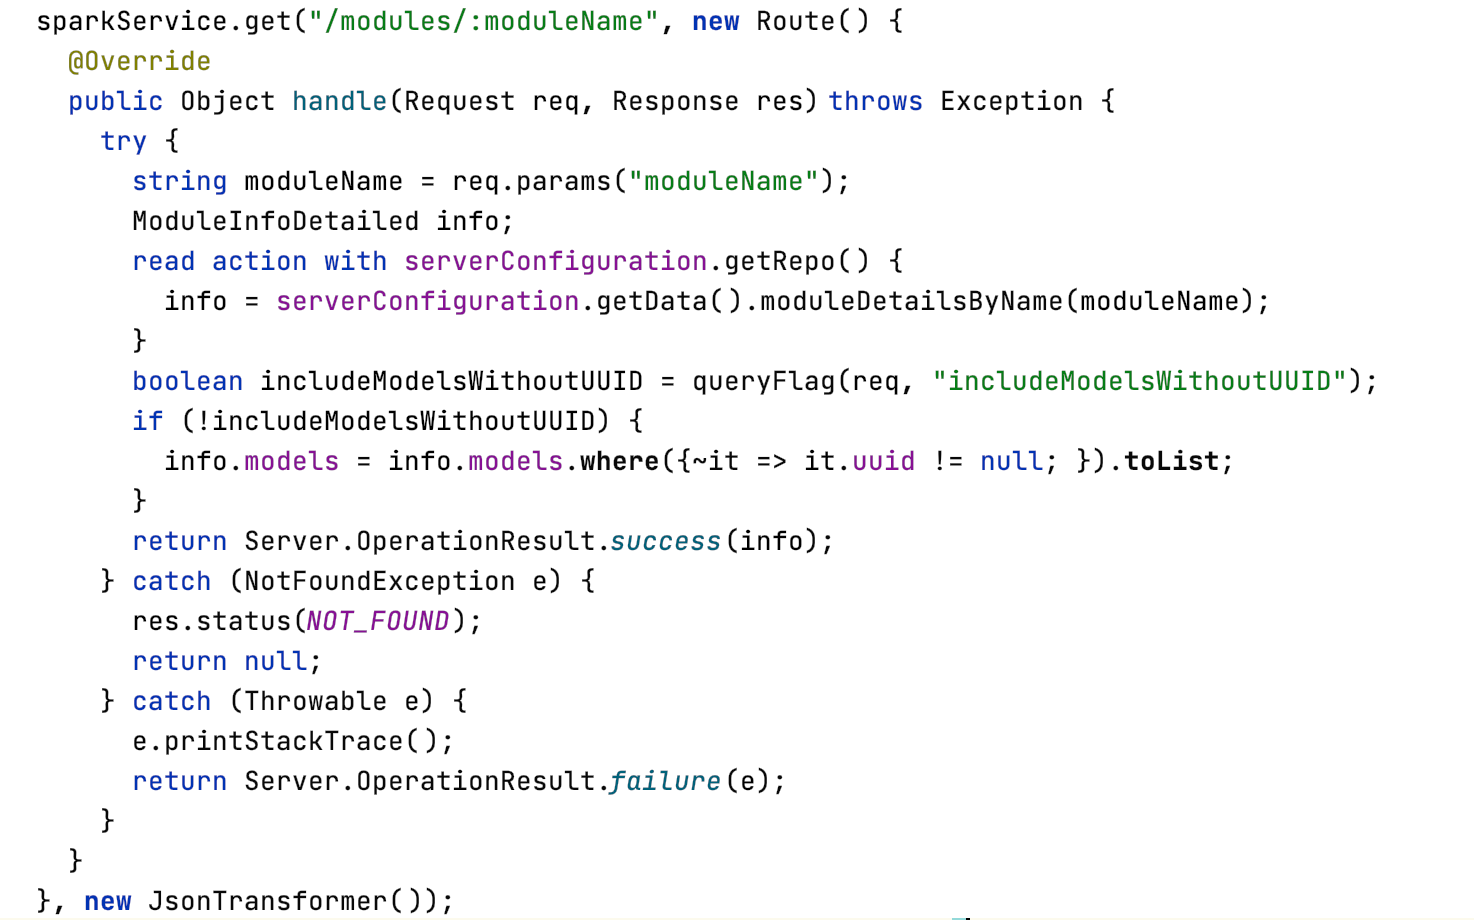
We ask MPSServer to give the content of a certain node, in this case, an entire workflow. This particular address is composed by specifying the name of the model and the ID of the node we are interested in. How to find the node ID? Using the inspector:

This works for nodes with no proper inspector defined. Alternatively, you can use the MPS console:

Once we get the data:
- We set the title
- We draw the graph
- We populate the list
Setting the title is just a matter of taking the name property of the root node (i.e., the workflow itself) and writing it into the #title tag.
Creating the graph is more involved. For doing this we use Dagre-d3:
function createGraph(data) {
    const g = new dagre.graphlib.Graph();
    g.setGraph({rankdir: "LR"});
    g.setDefaultEdgeLabel(function () {
        return {};
    });

    for (let i = 0; i < data.children.length; i++) {
        const child = data.children[i];
        if (isStartNode(child)) {
            g.setNode("node_" + child.id.regularId, {shape: "circle", label: ""});
        } else if (isActionNode(child)) {
            g.setNode("node_" + child.id.regularId, {label: child.properties["description"], width: 80, height: 10});
        } else if (isEndNode(child)) {
            g.setNode("node_" + child.id.regularId, {shape: "circle", label: "", style: "fill: #333"});
        } else {
            // node not to be represented in the graph
        }
        for (let linkIndex = 0; linkIndex < child.children.length; linkIndex++) {
            const link = child.children[linkIndex];
            g.setEdge(modelNodeToGraphNodeId(child), modelNodeToGraphNodeId(link.refs["target"]));
        }
    }
    const svg = d3.select("svg"),
        inner = d3.select("svg g"),
        zoom = d3.zoom().on("zoom", function () {
            inner.attr("transform", d3.event.transform);
        });
    svg.call(zoom);

    const render = dagreD3.render();
    d3.select("svg g").call(render, g);
}
We iterate over the children of the workflow (i.e., the single steps). Based on their type we drag different elements in the graph. We then connect them appropriately. Finally we do the rendering and configure the possibility to zoom and move the graph.
Finally we populate our list.
function populateList(data, idsToIndex) {
    for (let i = 0; i < data.children.length; i++) {
        const newLi = document.createElement("li");
        const c = data.children[i];
        if (isStartNode(c)) {
            const targetIndex = idsToIndex[c.children[0].refs.target.id.regularId] + 1;
            newLi.innerHTML = "We <i>start</i> by going to step " + targetIndex;
        } else if (isActionNode(c)) {
            const targetIndex = idsToIndex[c.children[0].refs.target.id.regularId] + 1;
            newLi.innerHTML = "We <b>do</b>  " + c.properties["description"] + ". Then we go to step " + targetIndex;
        } else if (isEndNode(c)) {
            newLi.innerHTML = "With this we consider the workflow completed.";
        } else {
            newLi.innerHTML = "unknown step";
        }
        document.getElementById("steps").appendChild(newLi);
    }
}
To populate the list we iterate again over the children of the workflow (i.e., the single steps). For each step we add a certain description into our newly created li tag, and we append it to our list of steps. That’s it.
Use Case 2: External editor
The video below shows a demo and discusses how to launch it on your machine. This time we see how to launch it from the command line, without the need to open MPS. This is also the mechanism you could use to launch it as part of CI:
The second use case regards the definition of editors working with MPSServe. Now, these editors can be very different. The most obvious goal is to support web editors. In that case, we will run MPSServer on a server and we will have multiple users connecting through their browser so that they can all collaborate by sharing a common instance of MPSServer. In this case, they would be able to work on the same workspace, so that they could perform collaborative editing similarly to what happens with Google Doc for example. But there are also other possible editors that can be built. For example, one could run MPSServer locally and use some editor implemented as a desktop application, also running on his own machine. For example, we know of a company that has built a C# application, and from that C# application they want to communicate to MPS to edit the same models that they can edit in MPS but with graphical editors, they had previously built. In this scenario, they can do that by running MPSServer locally on the machine or the single developer or user.
To support external editors you need to expose a significant number of MPS functionalities. You need a way to get the data out of MPS. But then you also need a way to get updates if you want to support collaborative editing, so you need to have changes to be propagated to all the people that are connected to the same server. So, if two persons, Alice and Bob, are connected to the same MPSServer this will happen: when Bob executes a command, the command is communicated to MPSServer and MPSServer will notify Bob back describing the changes. When this happens the editor in front of Bob is updated, but also the editor Alice is using is updated as well. In this way also Alice will see the data changing in front of her and she will be aware of the work Bob is doing.
All editors that are not trivial, will also need more advanced information like the type of a certain expression, or get the list of errors associated with a certain node so that we can display them in our editor. Now, this is a not-so-small set of features that we need to expose, MPSServer supports all of them, as we have so far used it primarily to build web editors.
Let’s now take a look at the code of our second demo, which you can find in directory uc2_tableeditor.
Let’s take a look at the build script we use to launch MPSServer from the command line:
plugins {
	id 'com.strumenta.mpswizard' version '1.0.6'
	id 'com.strumenta.mpsserver' version '1.1.18'
}

repositories {
	mavenLocal()
	mavenCentral()
}


mpsWizard {
	mpsVersion = "2020.3.3"
	useMPSServer = true

	MPSServerVersion = "2020.3-13"
}

mpsserver {
	makeProject = true
	mpsServerVersion = "2020.3-13"
	extensionsPath = "com.strumenta.workflow"
}
We use two gradle plugins we developed, so that we can configure MPSServer very easily.
There are some similarities with the code we have seen for the first demo, but this is a bit more advanced.
We start by calling an init function:
function init() {
    loadModel();

    window.ws = new WebSocket("ws://localhost:2904/socket");
    ws.onopen = function (event) {
        ws.onmessage = function (event) {
            let msg = JSON.parse(event.data)
            console.log("Received", msg.type, msg);
            if (msg.type == "AnswerPropertyChange" || msg.type == "ExecuteActionAnswer") {
                reloadDiagram();
            }
        }
    };
}
This functions does two things:
- It loads the initial version of the model
- It configures what to do when certain notifications are received from MPSServer: reloading the diagram
Let’s now take a look at loadModel.
function loadModel() {
    const answer = fetch(`http://localhost:2904/models/${modelName}/6439756077573116110`);
    answer.then((value => {
        value.text().then((text)=> {
            const msg = JSON.parse(text)
            if (msg["success"] === false) {
                alert("data not obtained: " + msg["message"]);
                return;
            }
            const data = msg.value;
            document.getElementById("title").innerHTML = data.properties["name"];
            const idsToIndex = calculateIdsToIndex(data);
            createGraph(data);
            fillTable(data, idsToIndex);
        });
    }));
}
We can see that we get the data describing the model and we use it to create the graph, as we did in the first demo.

In this case we also fill a table.

The code to draw the graph is the same we have seen before, but let’s take a look at the code to fill the table:
function fillTable(data, idsToIndex) {
    const tbody = document.getElementsByTagName("tbody")[0];
    const headersRow = document.getElementsByTagName("thead")[0].children[0];
    for (let i = 0; i<data.children.length; i++) {
        const child = data.children[i];
        addCell(headersRow, "-> " + child.properties["id"]);
    }
    for (let i = 0; i<data.children.length; i++) {
        const child = data.children[i];
        const currentId = child.id.regularId;
        const newRow = document.createElement("tr");

        addCell(newRow, child.properties["id"]);
        const hasDescription = child.properties["description"] || false;
        const descriptionCell = addCell(newRow, child.properties["description"] || "-");
        if (hasDescription) {
            descriptionCell.setAttribute("data-id", child.id.regularId);
            descriptionCell.contentEditable = "true";
            descriptionCell.addEventListener('keyup', function (e) {
                const nodeId = e.target.getAttribute("data-id");
                const value = e.target.innerHTML;
                setDescription(nodeId, value);
            });
        }

        const connectedIndexes = [];
        for (let linkIndex=0; linkIndex<child.children.length; linkIndex++) {
            const link = child.children[linkIndex];
            const targetId = link.refs["target"].id.regularId;
            const targetIndex = idsToIndex[targetId];
            connectedIndexes.push(targetIndex);
        }

        for (let j=0; j < data.children.length; j++) {
            const cell = document.createElement("td");
            const input = document.createElement("input");
            input.type = "checkbox";
            input.setAttribute("data-source-id", currentId);
            input.setAttribute("data-target-id", data.children[j].id.regularId);
            input.checked = connectedIndexes.indexOf(j) != -1;
            input.addEventListener('change', function(e) {
                if (this.checked) {
                    link(e.target.getAttribute("data-source-id"), e.target.getAttribute("data-target-id"));
                } else {
                    unlink(e.target.getAttribute("data-source-id"), e.target.getAttribute("data-target-id"));
                }
            });
            cell.appendChild(input);
            newRow.appendChild(cell);
        }

        tbody.appendChild(newRow);
    }
}
We want to start by creating the first row, containing the headers. We need a column for each node we have in the workflow, to represent a link to the node.
Then we also want to create a row for each node present in the workflow. The cell representing the description of the node is made editable and when the user presses a key we will trigger the function setDescription.
The code of setDescription is simple:
function setDescription(nodeId, value) {
    ws.send(JSON.stringify({
        type: "RequestForPropertyChange",
        node: {
            model: modelName,
            id: {
                regularId: nodeId
            }
        },
        propertyName: "description",
        propertyValue: value
    }));
}
We just send a message to MPSServer to let it know that we want to update the property of a node. MPSServer will then notify us with a message of type “AnswerPropertyChange”. That message will cause the diagram to be reloaded.
Let’s now go back to the function fillTable. When we create the cells representing the connection within nodes we add an event listener on the checkboxes. When they are selected or unselected we consequently add or remove a link by calling the functions link and unlink.
Link and Unlink look pretty similar one to another:
function link(sourceId, targetId) {
    ws.send(JSON.stringify({
        type: "ExecuteAction",
        node: {
            model: modelName,
            id: {
                regularId: '6439756077573116110'
            }
        },
        action: "link",
        params: {
            'sourceId': sourceId,
            'targetId': targetId
        }
    }));
}

function unlink(sourceId, targetId) {
    ws.send(JSON.stringify({
        type: "ExecuteAction",
        node: {
            model: modelName,
            id: {
                regularId: '6439756077573116110'
            }
        },
        action: "unlink",
        params: {
            'sourceId': sourceId,
            'targetId': targetId
        }
    }));
}
They both send a message to MPSServer. In this message, they ask to execute a certain action to the MPS node representing the workflow. The action is named “link” in one case and “unlink” in the other. They also specify two parameters: the ids of the nodes to link or unlink.
These actions are not actions natively available in MPSServer. They are extensions we built for this demo. We could add or remove links using primitive APIs of MPSServer, but given they require a bit of logic we preferred to implement such logic in MPS and expose them as actions.
We can see the code in MPS:

But how does MPS know how to find this extension? It would simply look for all modules in his search path. The search path for extensions is specified in the build.gradle file when starting from the command line or in the launcher panel when launching MPSServer from within MPS:

When we start MPSServer from the command line we can verify in the logs that the extension was found and loaded:
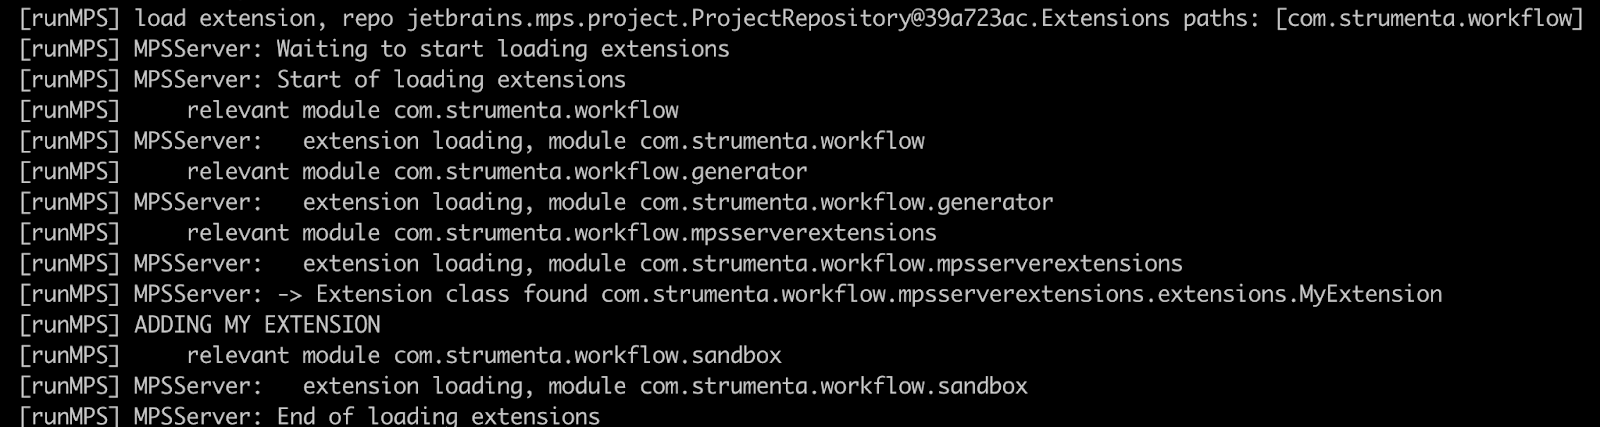
Note that in this case, the extension was present in the project, so MPSServer needed to build the project before trying to load the extension, and we have configured it accordingly.
This was all the code we had for today. We hope it was enough to give you a feeling of what it means to work with MPSServer.
Use Case 3: CI
The third use case we have in mind for MPSServer is a bit more advanced. We are currently adopting it for a client of ours and it seems to bring some benefits.
We developed with our client a DSL to describe activities to be performed by public servants.
When the creator of these activities completes the design, they want to export the activity in a specific format, based on XML. Take these export files and deploy them on an interpreter that will allow executing the activity. The export could be performed from within the MPS IDE but we also want to be able to execute the export on a server, without any manual intervention.
We are discussing different scenarios; one of them requires exporting regularly, all the activities at a given time or maybe when they are marked as completed. We could do that with traditional techniques, so without MPSServer. These techniques would be required to build modules that generate ANT scripts, which we would typically wrap into Gradle scripts. The whole process is complex, boring, and leads to problems that are difficult to debug. If you have heard MPS people talk about the build module you will know that this is not the best part of MPS. So why we could take the build modules route:
- It would be a pain to create
- It would be a pain to maintain
- It would also be extremely slow as an export would take several minutes
We have now implemented a solution based on MPSServer that is way simpler and takes just a few seconds. In a sense, we have on these build server we had an instance of MPSServer that is always running and when the system requires to MPS to support a certain activity:
- we trigger the build either automatically or manually on a web interface
- The CI asks MPSServer will programmatically to checkout corresponding project,
- The CI asks MPSServer to checkout a certain version of the project from the versioning system
- The CI asks MPSServer to export a certain activity
- The result returned to the CI is provided to the user: either stored in some artifacts repository or displayed in a web interface
All of this will happen in a matter of seconds and it is way simpler to implement.

MPSServer’s architecture
Now we can take a look at the implementation of MPSServer. My point here is just to show you how simple the design of MPSServer is.
Basically, we can remember that MPSServer is an MPS plugin. When it is started it starts a web server from within MPS. This web server supports many routes that serve all sorts of possible needs. For example, we have routes to get the list of languages available in MPS, the list of modules that list of solutions, or we can get the detail on a single model or a single node, we can change a single node, for example, we can add a child, we can set the property, we can also trigger intentions. We can even control the associated Git repository, if any. So we can perform remotely a push or pull.
We can control all sorts of MPS APIs. Essentially we receive a request and we serve that request by calling some internal MPS API. So the design is fairly simple.
We can receive requests from the external world not only through HTTP requests, but also through WebSockets. And we use WebSockets because this permits a dual-direction communication so that the user can communicate some operation that he wants to do like changing a node, but we can also notify it about changes that are pending MPS because someone else is changing the model.
In the case of WebSockets messages, we have, in a way, a big switch, we look at the type of message we receive, and we serve the request. As you can see, the design is very simple.

The server is also designed to be extensible. There is a mechanism to define new extensions, one can register a new extension that creates new routes, or serve new WebSocket messages, and so it’s possible to expand the MPSServer.
Combining MPSServer and Modelix
I would like to talk about the possible ways to combine MPSServer and Modelix. There are two possible ways that they can collaborate.
- The first one is when MPSServer takes advantage of the model sync capabilities of Modelix.
- And the second one is when we use MPSServer as a sort of remote control for Modelix.
Now, regarding the first use case, we may consider the fact that both Modelix and MPSServer listen to models within the MPS instance that they are installed in and they react to these changes. For example, we could have the scenario in which we build our editor with WebEditKit. Let’s suppose that we’ve built diagram-based web editors and when the user clicks somewhere on the diagram, it adds a node. The editor communicates to MPSServer that you want to add a node. MPSServer will call the internal MPS APIs in response to this request and create the node. At this point, both MPSServer and Modelix are both serving the model and both will be notified.
MPSServer we let the web application know that a new node has been added. So the view can be refreshed and the new node can be displayed to the user. But Modelix will also notice this new node being added and will store this information in its remote model database. So this was the first scenario.
The second scenario is the one in which we use MPSServer to control the Modelix configuration. For example, we could create an admin interface showing the available Modelix repositories and then asks MPSServer to connect to one instance of Modelix. We could then identify a certain version and then load it into an MPS instance controlled through MPSServer. In this scenario, MPSServer knows about Modelix, but not the other way around.
The first scenario is very useful to support collaboration. We could install MPSServer on a server and we have multiple web applications connecting to the same server. They would all collaborate on the same workspace and see the change performed by each other because they all synchronize with the single MPSServer.

But in the case that we are very successful, and so we want to connect not just a few web clients but want to connect many web clients to MPSServer at some point, we will not be able to serve all of them with a single instance of MPSServer. So we will need a
have multiple instances. But these multiple instances will need to synchronize with each other. The way they can do that is simply by installing Modelix and start the model in synchronization so that we will have multiple MPSServer that Modelix will synchronize with a single model database. In this way, we could serve many, many web clients through a few MPSServer instances, all synchronizing to the single model database.
And so this should allow for scalability.

History and status of MPSServer
MPSServer was started in the summer of 2018. At that time we wrote the first POC, to verify that the idea was working and we built some simple demo.
In spring 2020, we were working with a client of ours on an important use case. We then built the bulk of MPSServer.
We demoed the result of that project in this presentation:
Since then, we have kept evolving MPSServer adding new features and porting it to newer versions of MPS. Recently we had a new spike in development because we are working on integration with certain aspects of Modelix. The development has mainly been done by me and my colleague Alessio Stalla. We also had contributions from Sergei Koščejev and from Pedro Molina.
Now, regarding the status of the project: the project is two years old, the design is very simple and in practice, MPSServer works. There are always new APIs that we may want to expose, more flexibility that we want to add, a few bugs here and there. But we do not expect the project to change significantly.
Challenges
There are several challenges that we have.
First of all, it is a challenge to support multiple versions of MPS. We have different branches to support MPS 2019.3, 2020.1, 2020.2, and 2020.3. It is difficult to add features and port them to every single branch, so we will probably start to support one single version at a time.
Testing is also challenging because tests require running MPS.
There are a lot of features of MPS that we want to expose and that means that there is a lot of work to be done.
Documentation is very poor at the moment: it will need a significant effort.
In the future, there are different things we want to do:
- Internally, we want to define a DSL to define the protocol to make it simpler to add new HTTP routes or serve new WebSocket messages. But also to make it possible to generate better documentation.
- We want to start using JSON RPC the standard instead at the moment we are using basically the same protocol, but with different field names.
- We want better documentation.
- And in the future, we could also experiment with replacing singles MPS sub services like, for example, a type system and user connecting to MPSServer will not notice that we are replacing piece by piece MPS. And eventually we call the solution that is completely independent from MPS for more flexibility.
Summary
MPSServer is based on a simple idea: making MPS capabilities accessible to other systems. This is necessary because we store very important knowledge inside MPS and we want to build an ecosystem of tools working with MPS to take advantage of that knowledge.
While MPSServer is doing a simple job, it enables a lot of interesting stuff to be built on top of it and we are very excited to see what others will build with it.
Please share with us any feedback you may have!

